Creating objects with edges of varying blur levels
-
In vector portraiture objects with varying blur levels along their circumference are necessary, i.e. not just objects with a single blur level for their entire circumference, but with variations of blurriness along their edges. The crux is to create a larger transparent clipping object (with or without a blur level) and place inside it a smaller clipped object. The clipped object will keep its blur level as long as its edge does not interfere with or is move near to that of the larger clipping object. The clipping object can have an irregular shape, meaning its edge can overlap that of the clipped object in one area, be moved near towards it with the node tool (on the outside of the clipped object) or moved further away from it (away from the clipped object's edge towards the outside). This allows to create objects that have varying levels of blurriness along their edges.
An example image you see here:
https://vectorwhiz.com/VS/Tutorial edges of objects with varying blur levels.pngThe vstyler file to inspect and tinker with you find here:
0_1667043848333_Tutorial of objects with blurred edges of varying level.vstylerDigital Art & Creative Text - https://vectorwhiz.com | Portfolio blog - https://communicats.blogspot.com
-
cool solution
-
@VectorWhiz You can use a gradient mask for the opacity of the blurred stroke of the container object so it's visible only on the lower left side:


-
@b77 In vector portraits many objects such as creases, shadow areas and parts of the face (eyes, nostrils, eyebrows, mouth, hair areas and ears) require a number of different (more than one) varying blur ratios along their circumference, which is why I uploaded this brief tutorial. I probably have to go deeper into the mesh transparency tool, but at this point I am still experimenting with it. If you look at the vector portrait tutorial that I have also posted in this forum, you may get an idea of how this technique is applied. A more extended version of the (as of now still unfinished and therefore ongoing) process of creating a vector portrait I posted in my portfolio blog.
-
@VectorWhiz The technique you describe here is good — nothing against it — but the problem is that the
blurred stroke of the container object on Artboard 3 remains visible in the upper right side of the shape against
the white of the artboard, and I guess most of the time you don't want that.My suggestion is an improvement to the method you described and if you download the attached file
you can see in the Appearance panel the gradient masking applied to the opacity of that blurred stroke, which
makes it transparent in the upper right area: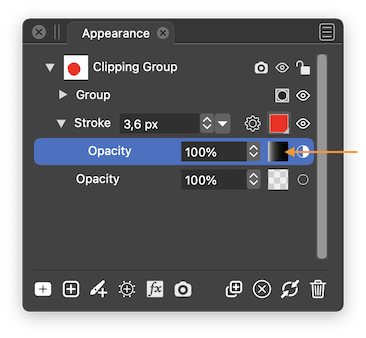
This is the file: 0_1667086031503_modified.vstyler
-
@b77 I only gave the clipping object a stroke for the purpose of clarity in this tutorial, but of course in the projects I create their stroke is given a transparent property.
-
@VectorWhiz Got it.
