Fish drawing - WIP
-
Hello all
For practice and learning using Vectorstyler I've just started a personal project to recreate an old hand-coloured engraving a fish, and thought I would share my progress here. It might take some time to finish as I’m easily distracted and sometimes busy, but hopefully this year!!!
I tend to do things by trial and error, in an organic sort way, concentrating mainly on how things look rather than working out the best or most efficient way to do it. This means what I've done here might give more experienced users a good laugh!

Anyway it's still early days, but I'm enjoying using Vectorsyler for this mini project.
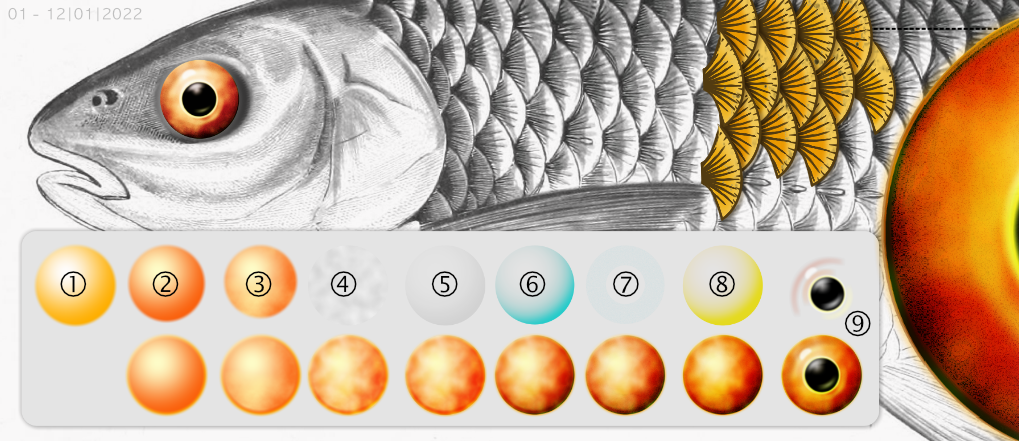
So here it is - the eye!
For info here are the main steps:
-
Draw an ellipse with a concentric graduated fill and a slight Gaussian blur to soften the edge.
-
Repeat first step making the ellipse slightly smaller and darken colour. This is to make a small border around the eye.
-
Copy step two, reduce size slightly and apply Noise (Median) image effect.
-
Draw another ellipse, apply Gaussian blur, Turbulence (from the Generate options) and Black and White (from the Color options). Change blend to Overlay.
-
Copy ellipse from step 1 and apply black and White color image effect and change blend to Exponent dark to bring out some of the underlying colour.
-
Copy the ellipse from previous step and adjust the colour, still keeping the same blend mode.
-
Copy ellipse again (remove previous image effects) apply Noise (White) and apply Torus Lens to exclude noise from the middle of the eye. Apply the Color Burn blend mode
-
Copy ellipse from step 6 and adjust colour. Use the Exponent dark blend mode. This is to strengthen the colours again.
-
Draw an ellipse for the black part of the eye and overlay curved shapes for highlights. Apply some blur and reduce transparency as required.
I'll probably tweak it more as I discover new things along the way (I do tend to suffer from 'tweakitus'). I’ve already toned down the eye colours to make it look a bit more natural.
Until next time, Happy New Year! (If it’s not too late to say that!)
Jono
-
-
I just came in, to say that I appreciate your idea and effort to help beginners in VS.
Looks good so far.