Add a Create Boundary/Perimeter Command

-
@vectoradmin
Looking forward to the Create Boundary feature being added in the future.
I hope you won’t keep us in suspense too long before it’s included, ha ha

I continue to be impressed by your listening to users feedback and implementing their suggestions to improve VectorStyler!

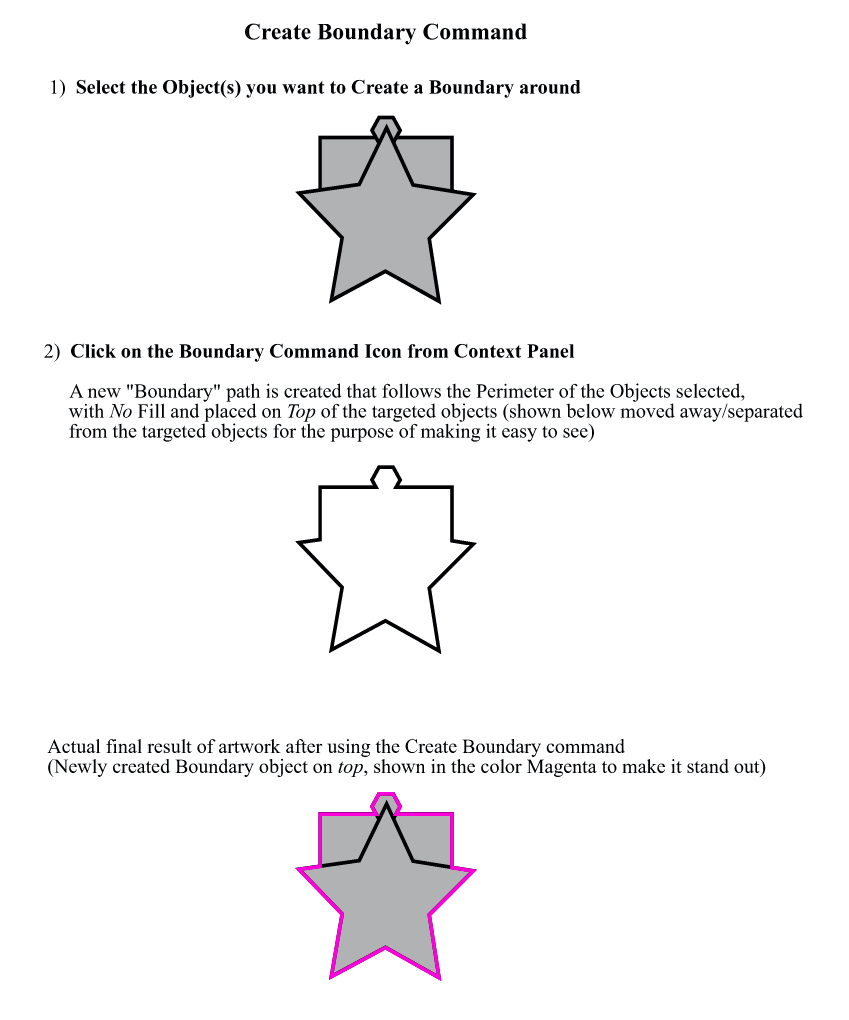
Two points of note about Create Boundary command. First, it’s beauty is in its simplicity- it’s a single click operation (no need for unnecessary extra steps or workarounds), and produces a separate object without interior holes.
Second, it is a very purpose-driven feature, predominately (but not exclusively) used to address the need to easily and quickly create cut lines for printer-cutting plotter machines.
In a typical workflow, a Spot Color Swatch is created to be assigned to the created Boundary object with the appropriate settings for your RIP software/equipment (named CutContour or PerfCutContour, often with a distinctive color stroke such as 100% Magenta or 100% Cyan and set as a Hairline). Sometimes, if desired, the Boundary is then offset/contoured to move the cut line.
BTW,
……I agree the “live” concept you described has appeal. It will be interesting to see if at some point you come up with a new feature like that. Also, the demo you showed was cool. I couldn’t replicate it though, I must be accidentally missing a step(s). -
@Vector-Rock The steps for the video:
- group the objects.
- select union on the group, this will create a shape union of the group content, without changing the grouped objects. The group content remains fully editable.
- select Object Options (Object menu) and set a name for the group. This will be needed to see this group as a shape style.
- with the Role button, select a role for the object. This is a VS specific feature, the object becomes the source of a style defined by the selected role(s).
- create a new object, any shape wil do.
- with the new object selected, select the shape style in the context panel (or the Shape panel). There should be a Style or Shape drop down.
- again, this is a VS specific feature, the shape of any object can also be set from a shape style.
- now you have a new object, whose shape is a style pointing to the other object (unified group) shape.
- set any color or style for the new object.
- double click the original group, to enter into isolation mode and move its shapes around.
- the group union is updated automatically as the shapes inside the group are changed.
- and the other (with the shape style) object shape is also updated automatically since the shape style changes as the group union changes.
VS has a lot of these dynamic link to somewhere features
")
-
@vectoradmin Forgot to say that there is a Offset Path shape effect added on the new object (with the shape style) that is also live (updated as the shape changes). Can be added from the Shape Effects panel of the Panels -> Effects menu.
-
@vectoradmin I think the role feature is a real game-changer. I have to create unified background shapes of the featured design all the time. The ability to expedite that with an action like that is awesome!
-
@vectoradmin
Thanks for the steps to the video.I was able to successfully recreate what you did except I was having trouble with alignment centering. I'm sending you the file to see what I did wrong (probably
) or if something is not quite working properly in VS. -
@Vector-Rock Everything was done right. Unfortunately, alignment is not really suitable to to center offset shapes, as the bounding box may be extended unevenly around the offset shape. Alignment centers the bounding box of the two objects, not the shapes.
These steps would really need some kind of optical alignment (not available yet), or a proper live boundary feature with all these steps (will be done).
-
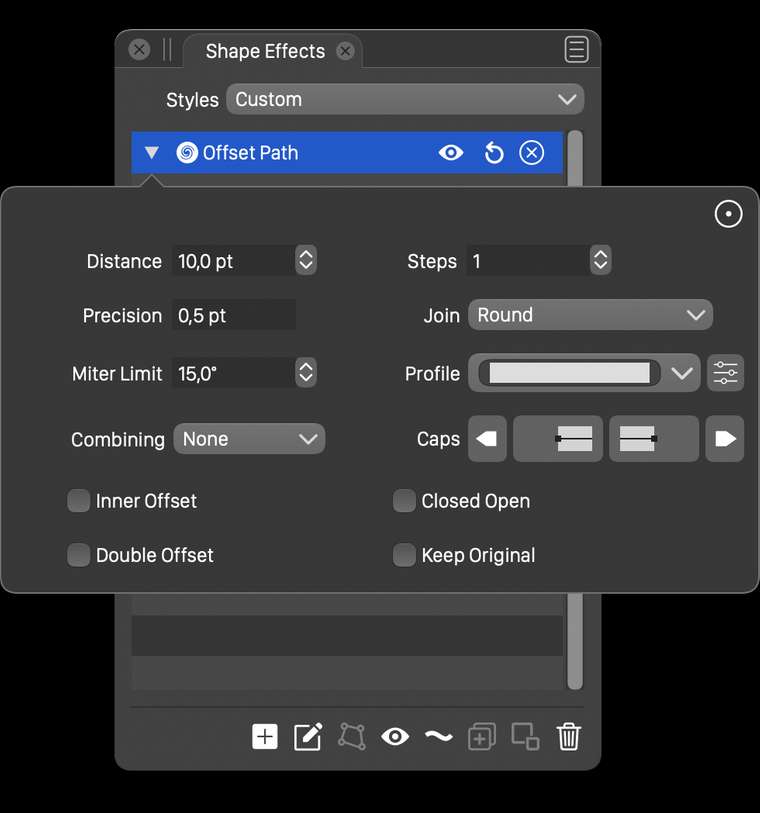
@Vector-Rock One way to make alignment usable for this is to use rounded corners in the Offset Path effect.
To do this, open the Offset Path effect in the effects panel, switch to the detailed view (upper right corner icon with circle and dots inside).
In the Join drop down, select Round.Then the sharp corners will have a round offset, avoiding the long miters causing the uneven bounding box expansion.
-
@vectoradmin said in Add a Create Boundary/Perimeter Command:
@Vector-Rock Everything was done right. Unfortunately, alignment is not really suitable to to center offset shapes, as the bounding box may be extended unevenly around the offset shape. Alignment centers the bounding box of the two objects, not the shapes.
These steps would really need some kind of optical alignment (not available yet), or a proper live boundary feature with all these steps (will be done).
Thanks for clarifying that. I forgot to take into account the bounding box, oops!

So, if I understand you correctly, just as you offer two Offset Path options, a destructive one (Object> Shape>Offset Path) and a live fx version (Effects>Outline>Offset Path) so the user can choose the best one for the task at hand, your plan is offer two (2) varieties of the Boundary feature as well, a destructive one and a proper live fx one. If so, that would really be cool.
-
@Vector-Rock said in Add a Create Boundary/Perimeter Command:
plan is offer two (2) varieties of the Boundary feature as well, a destructive one and a proper live fx one. If so, that would really be cool.
yes, in fact all the shape combination operators (intersect, union, etc) already come in both destructive and nondestructive forms.
-
@vectoradmin said in Add a Create Boundary/Perimeter Command:
@Vector-Rock said in Add a Create Boundary/Perimeter Command:
plan is offer two (2) varieties of the Boundary feature as well, a destructive one and a proper live fx one. If so, that would really be cool.
yes, in fact all the shape combination operators (intersect, union, etc) already come in both destructive and nondestructive forms.
That's outstanding! Really looking forward to this.
-
@Vector-Rock Boundary shape operation is available in build 1.0.025.
Some observations on this one:- both destructive and nondestructive boundary operation on shapes are available from the menu and the toolbar (without offset).
- a destructive mode with offset can be achieved with the Object -> Shape -> Offset Path command. Make sure to set the Combining drop down to Before and check the Boundary Offset option.
- when using shape references to a group (as in the demo videi), the Mode shape option (new, both in context panel and shape panel) can be set to Boundary to have a shape that is the boundary of a group. This will be nondestructive (live) and the Offset Path effect can be used to add a (live) offset.
- and probably the most interesting form of boundary: using the Contour effect, add a single contour (fixed steps set to 1), with a fill and stroke. In the Contour panel menu uncheck the Symmetric Offset option (to create a single outer contour) and check the Offset of Boundary from the Combine Mode menu of the panel.
Let me know if there are issues or improvement ideas.
-
@vectoradmin
Great job! Take a bow.
A tip of the hat
 from me.
What is really nice is that not only did you add a proven tool that already existed elsewhere, but also got creative to expand its capabilities to improve it. Well done.
I have only had a chance to just get started playing around with the options you mentioned, so here are a couple quick observations:
Two changes I would like to see
- Have the created Boundary take on the default properties for fill and stroke as set up in user preferences*
- Have the created Boundary be placed on the top of the objects it was created from
-
@vectoradmin
also, forgot to mention.
Notes*:
The two above requests are as done in CorelDRAW.-
CorelDRAW default for newly created graphic objects is Black Stroke, NO Fill.
(User can Change Document Default properties for Fill and Stroke to any color and stroke settings; which if done, the Boundary will be created with the newly created/changed fill and stroke) -
Boundary appears on Top/in front by default
(In the Boundary Docker Panel, there is an option check box to "Place behind selected", to override the default) -
In the Boundary Docker Panel, there is an option check box to remove the "original objects" from which the Boundary was created, which also would override the default.
By the way, in CorelDRAW, you can actually enable and apply a Boundary when only a Single Object is selected! You CAN'T access it from the Context Property bar, because the Boundary Icon will be grayed out...... however, it can be accessed and used through the Bounty Docker Panel... or... if the Boundary Icon has been manually added to the Toolbar by customization.
-
-
@Vector-Rock The boundary boolean operation has been improved in builds 1.0.026 and 1.0.027. The options can be accessed in the Path panel menu. The default fill style will still be the selected object style, as the default drawing style is updated when an object is selected,