Image Effects
An image effect or image filter is an adjustment of the image resulting from the rendering of an object or a group of objects. The type of the adjustment made on the image is determined by the type of the image effect. Image effects can adjust the colors of the pixels, make geometric deformations, smooth or blur images, make stylistic adjustment or generate new, synthetic images.
When an object or group of objects contains image effects, the image effects are applied to the image obtained when rendering the objects. Since these image effects are applied to vector objects, the result of the image effect is calculated during the rendering of the canvas, and are resolution independent (subject to the display quality limitation).
Overview
Creating and editing image effects depends on the type of the image effect and the choice of tools. These are described in the following sections:
- Image Effects Panel - Describes how to use the Image Effects panel to create and edit image effects on selected objects. The image effect panel provides the easiest access to the attributes of image effects.
- Image Effects Editor - Describes how to use the image effect modal editor, to create and edit a set of image effects. The modal editor can be used to create and edit image effects of the selected objects, or to edit image effect styles or presets.
- Blur Effects - Contains the description of the image effects in the Blur group of effects. These are image effects applying some form of smoothing on the objects.
- Color Effects - Contains the description of the image effects in the Color group of effects. These are image effects adjusting the colors in the rendered object image.
- Distortion Effects - Contains the description of the image effects in the Distortion group of effects. These are image effects creating some form of parametric spacial distortions of the objects image.
- Generator Effects - Contains the description of the image effects in the Generate group of effects. These are image effects creating a new synthetic image over the objects.
- Mesh Effects - Contains the description of mesh based image effects. These are image effects under the Mesh and Warp group, that distort the image of the objects using some form of mesh.
- Pixelating Effects - Contains the description of the image effects in the Pixelate group of effects. These image effects simulate a reduced resolution of the rendered object image, using various geometric approximations.
- SVG Effects - Contains the description of the image effects in the SVG group of effects. These are the image effects allowed by the SVG standard. When importing SVG filters, a combination of these effects are used to create complex visual appearances. These effects are exported to the SVG file format, without converting the object to an image.
- Stylistic Effects - Contains the description of the image effects in the Stylistic group of effects. These image effects create various stylistic augmentations of the displayed image.
Displaying
The quality of rendering image effects can be set in the Filter Precision field of the Image section of the Display Options. The quality settings affects only the display quality. Printing and exporting is done with the highest quality setting available. The display quality of the image filter also affects the performance of rendering image filters. If many image filters are stacked on objects, the rendering of an artwork may slow down. Allowing a lower quality for displaying image filters can improve the rendering of artwork with a large number of image filters.
By default, image effects are rendered using GPU acceleration. The ability to use the GPU, and the obtained performance benefit, depends on the level of support for the specific GPU type in the users computer. The Display Options contains options to enable or disable GPU acceleration for various image effect types. The Performance section of the application Settings, contains options to select the mode of rendering image effects, including the ability to disable GPU use altogether.
Using Effects
Multiple image effects can be stacked on an object, group of objects, or object content, to create various visual effects. Image effects are parametric and nondestructive attributes if added to an object or a style. Effect attributes remain editable, and can be adjusted at any time.
- Nondestructive means that objects are not converted to images, instead a final object image is obtained during rendering, and adjusted by a series of image effects stacked on the object.
- Parametric means that the attributes specific to an image effect can be modified at any time, after an effect is applied on an object. This includes the possibility to alter image effect attributes, even if there were additional image effects applied over the object.
The Appearance panel can be used to add image effects to an object content only, adjusting a fill, stroke or brush style of an object.
Image effects can also be used as adjustment effects, augmenting the backdrop of an object, group of objects or a whole layer. Adjustment effects can be created as adjustment layers, when the content of a layer can be used as the effect mask. Regular objects containing image effects, can be turned into adjustment objects, using the object shape as a clipping mask to define the effect region and augmenting the backdrop of the object.
Important aspects to consider when working with image effects:
- Image effects augment the image obtained when rendering the objects. Objects containing image effects remain selectable and editable.
- Since they are applied during rendering, image effects will alter all of the object content, including fill and stroke appearances.
- Stacking multiple image effects on objects, and having multiple objects with image effects may affect the performance of displaying a canvas.
- The default display quality of image effects is set to medium level. Some of the heavier image effects will be rendering in lower quality by default. Set the Filter Precision to maximum (100%) in the Display Options to achieve high quality image effect display, at the expense of performance.
- Past image effects applied on an object can be accessed and modified in the Image Effects panel and editor.
- Multiple image effects can be stacked on an object, group or layer. Each effect augments the object appearance obtained from the previous effect. Attributes of stacked image effects remain editable.
- Image effect attributes can be adjusted visually, using the image effect tool from the Image Effects panel. For example, the strength of the Gaussian Blur effect can be adjusted visually, by dragging the strength handle on the object.
- Image effects can be grouped, and saved as a single preset or style. Image effect presets and styles can be applied on objects from the Image Effects panel or editor.
- When image effect styles are used on objects, modifying the style will modify all objects using that style.
- Objects, augmented with image effects, can be converted to images using the Rasterize command of the Objects menu. This removes all editable attributes of the objects, and the image effects.
- The backdrop of an object can be adjusted with image effects, by enabling the Adjustment Layer option of the object in the Object Options view. The shape of the object will determine the adjusted region of the canvas.
- When inside an isolated layer or group, adjustment objects and layers augment the appearance of the backdrop of the isolated group only.
Creating Image Effects
The recommended way of adding a new image effect to an object is to use the image Effects panel.
- Select the object to be augmented using an image effect.
- If multiple objects are changed with a single image effect, select the objects and group them.
- Open the Image Effects panel from the Window - Effects menu.
- Click on the
 button in the icon section of the Image Effects panel. A menu of available image effects is opened.
 - Select the image effect from the menu opened from the panel.
- The image effect is added to the selected object using default attributes.
- If there are multiple objects selected, these will be automatically grouped when an image effect is applied.
- Adjust the image effect attributes in the panel. It may be necessary to open an image effect attributes in the panel, using the arrow button shown before the image effect name. See the Image Effects Panel section, for more details on how to use the panel.
- Use the
 or
or  buttons to visually adjust image effect attributes, depending on the image effect type.
Alternative ways to apply image effects on an object are:
- Select the image effect from the Effects menu of the application. A modal view is opened, to edit the image effects applied on an object. Setup one or more image effects with attributes, and confirm by pressing Ok. For more details on the modal image effect editor, see the Image Effect Editor section.
- Double click on a previously created image effect preset in the Presets panel.
- Double click on a previously created image effect style in the Styles panel.
- Copy and paste image effects between objects, using the Copy Image Effect and Paste Image Effect commands from the Edit menu.
- Pick and apply image effects using the Image Effect Picker
 tool.
tool.
Modifying Image Effects
Attributes of image effects previously applied on an object can be modified, using the Image Effects panel, editor or tools.
- Select the object containing the image effects.
- Open the Image Effects panel from the Window - Effects menu.
- The panel will show the list of image effects from the selected object.
- Open the attributes of an image effect, using the arrow button, if not already opened.
- If there are many image effects, or large attribute sections, the panel content can be scrolled, or the panel resized, to access attributes of an effect.
- Select an image effect, by clicking on the effect name in the list of image effects.
- Edit the image effect specific attributes, by adjusting the options shown under an image effect name.
- By default, only the most common attributes of an image effect are shown. Use the
 button, shown at each image effect name, to select more attributes.
 - Use the or buttons to visually adjust the selected image effect attributes, depending on the image effect type.
- Alternatively, select the Edit Image Effects command from the Effects menu, to modify and organize the image effects of the selected object, in a modal editor.
Adjustment Effects
Adjustment effects are image effects applied to the backdrop of an object (instead of the object image). Adjustment effects can be used to apply adjustments to regions of a layer or the whole canvas. Adjustment effects can be added using an object with a shape, a group of objects, or as a layer.
Any image effect can be used as an adjustment effect. Some of the distortion and mesh based image effects are less suitable as adjustment effects.
To create a new adjustment layer:
- Select an image effect from the Create Adjustment Layer menu of the Object menu.
- Set the image effect attributes and confirm by pressing Ok.
- The content of the adjustment layer can be used as a mask, by enabling the Content is Mask option in the Layer Options view.
- Drawing objects and using fill and stroke styles in the adjustment layer will modify the mask of the adjustment effect.
- An existing layer can be converted to an adjustment layer, by applying some image effects to it and enabling the Adjustment Layer option.
To create an adjustment object:
- Select an object or group and apply one or more image effect used for adjustments.
- Select the Object Options command and enable the Adjustment Layer option.
- If the object shape is used to delimit the adjusted region, leave the Content is Mask option unchecked.
- If the object content (group, shape or style) is used as an adjustment mask, enable the Content is Mask option.
- Moving or transforming adjustment objects, changes the region augmented by the adjustment effect.
Using SVG Effects
Artwork stored in an SVG file format may contain a combination of a limited number of SVG specific image effects, to create complex visual appearances. The SVG file format allows a hierarchical combination of several effects to create new effect styles.
When importing SVG files, the effects are also imported and remain editable by selecting the objects containing the effects. It is also possible, to import only the SVG effect definitions from an SVG file, and use these as image effect presets.
To import image effects as presets from SVG files:
- Create a new folder used only for SVG files with image effects imported as presets (if not already created).
- Copy the SVG files into the this folder.
- Select the Preset Manager command from the Styles menu.
- Click o the Create Group button in the Preset Manager view to create a new preset group.
- Set the new preset group name.
- Copy-paste the full path to the folder containing the SVG files, or click on the file selector icon at the end of the Folder field to use the file selection view.
- Once the name and folder are correctly set, confirm the new preset group by clicking Ok.
- The image effects found in the SVG files from the selected folder are shown as image effect presets in the Effects menu, and in the menu opened with the button of the image effects panel.
If a user folder, containing SVG files with filters, has already been created and added as a preset group, it is sufficient to copy the SVG file to this folder and restart the application to access the new filters.
Examples
Image effects have numerous attributes controlling the appearance and adjustment made with the effect.
Using blur to create glow
The Gaussian Blur image effect blurs the object image by a user selected amount. The blurring amount can be locally controlled by a blur mask. The object can be combined with a backdrop color to create a blurred glow around the object.
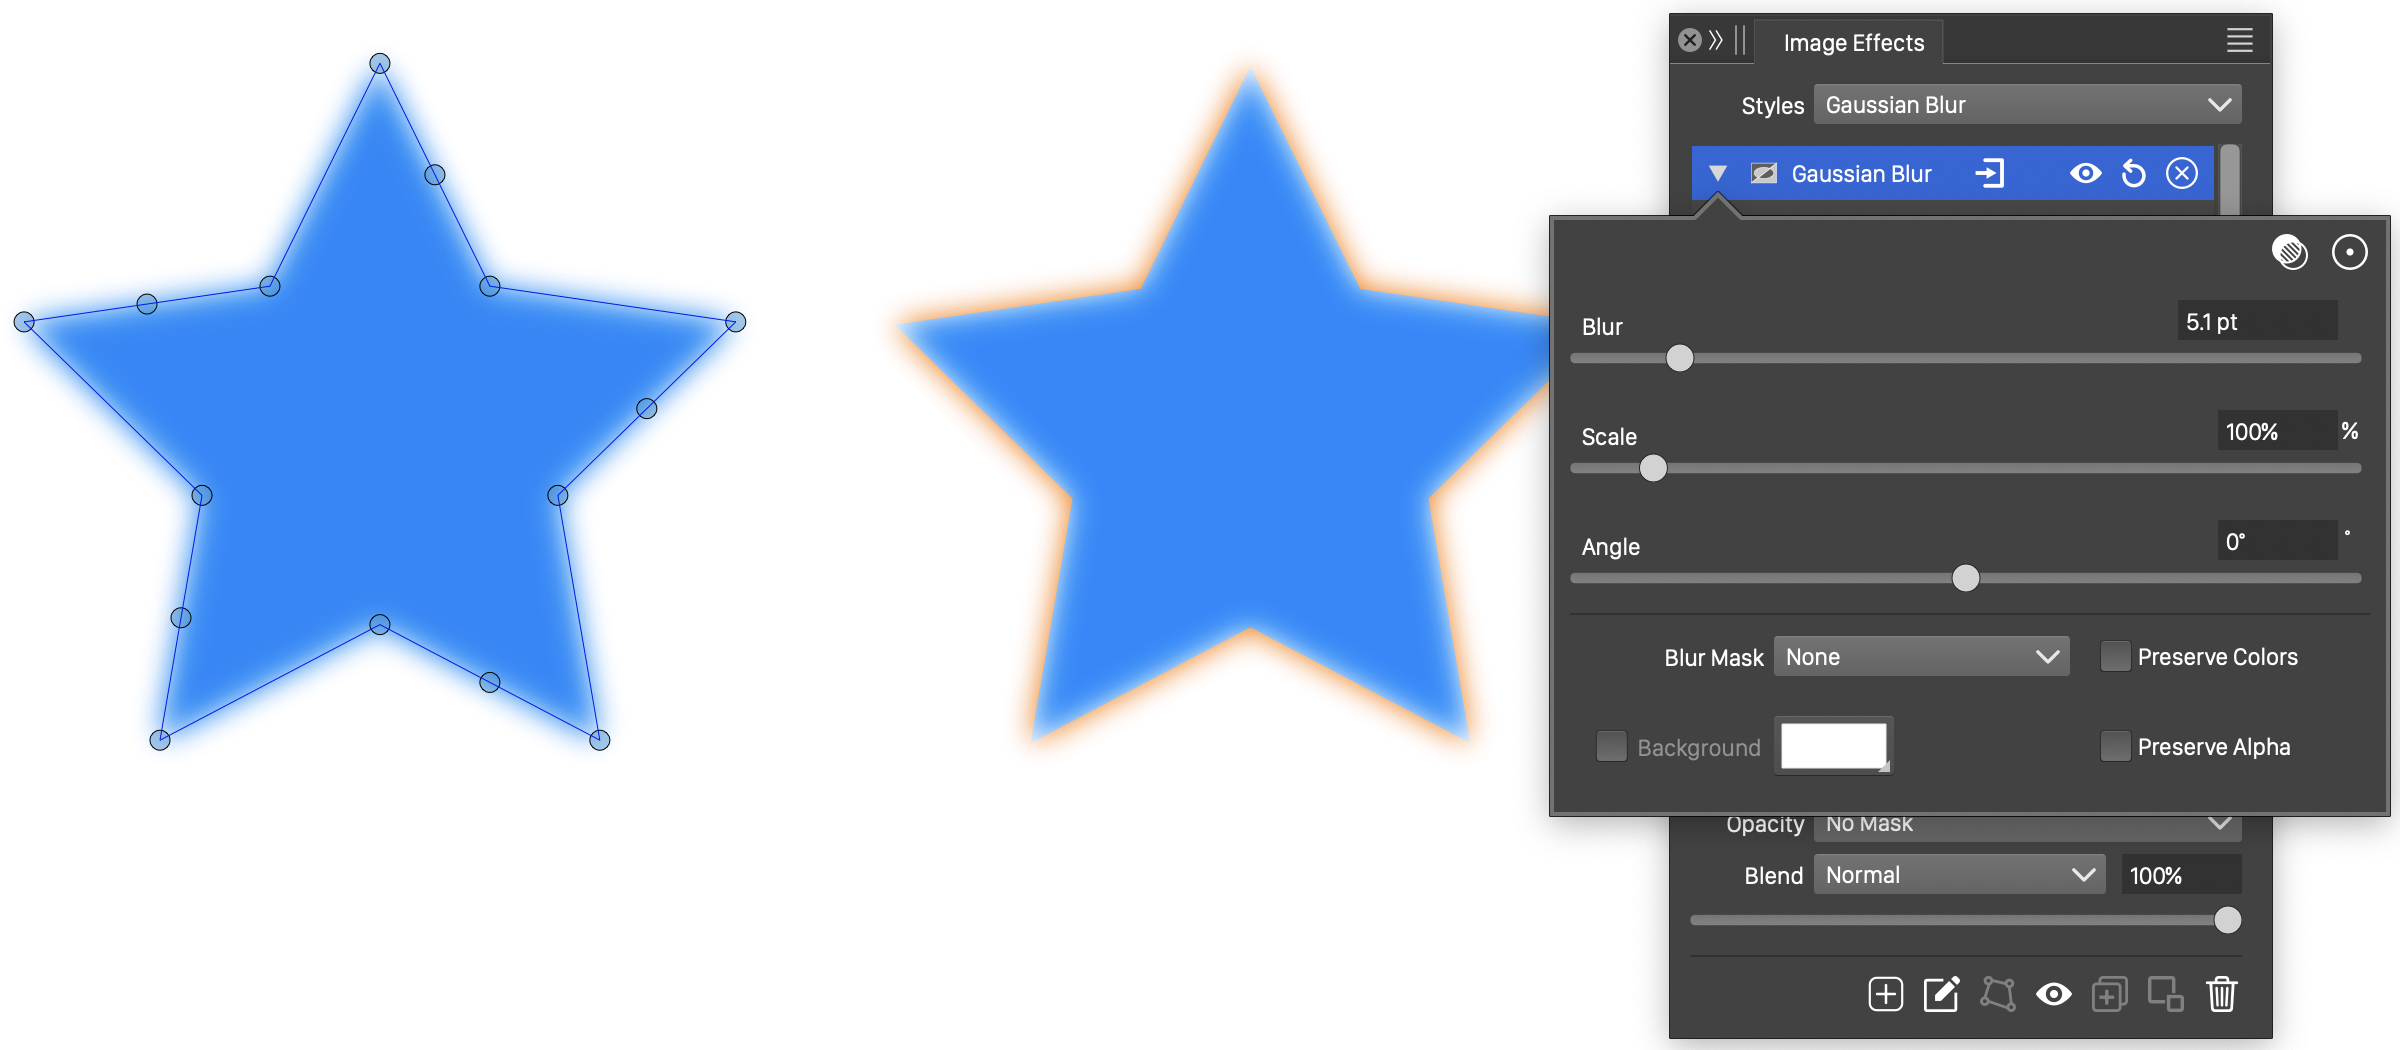
Gaussian blur and a color glow using blur.
Brushed metal effect and options
The Add Brush effect adds a brushed metal effect to the object colors. The direction, variation and frequency of the brush can be controlled from the Image Effects panel.
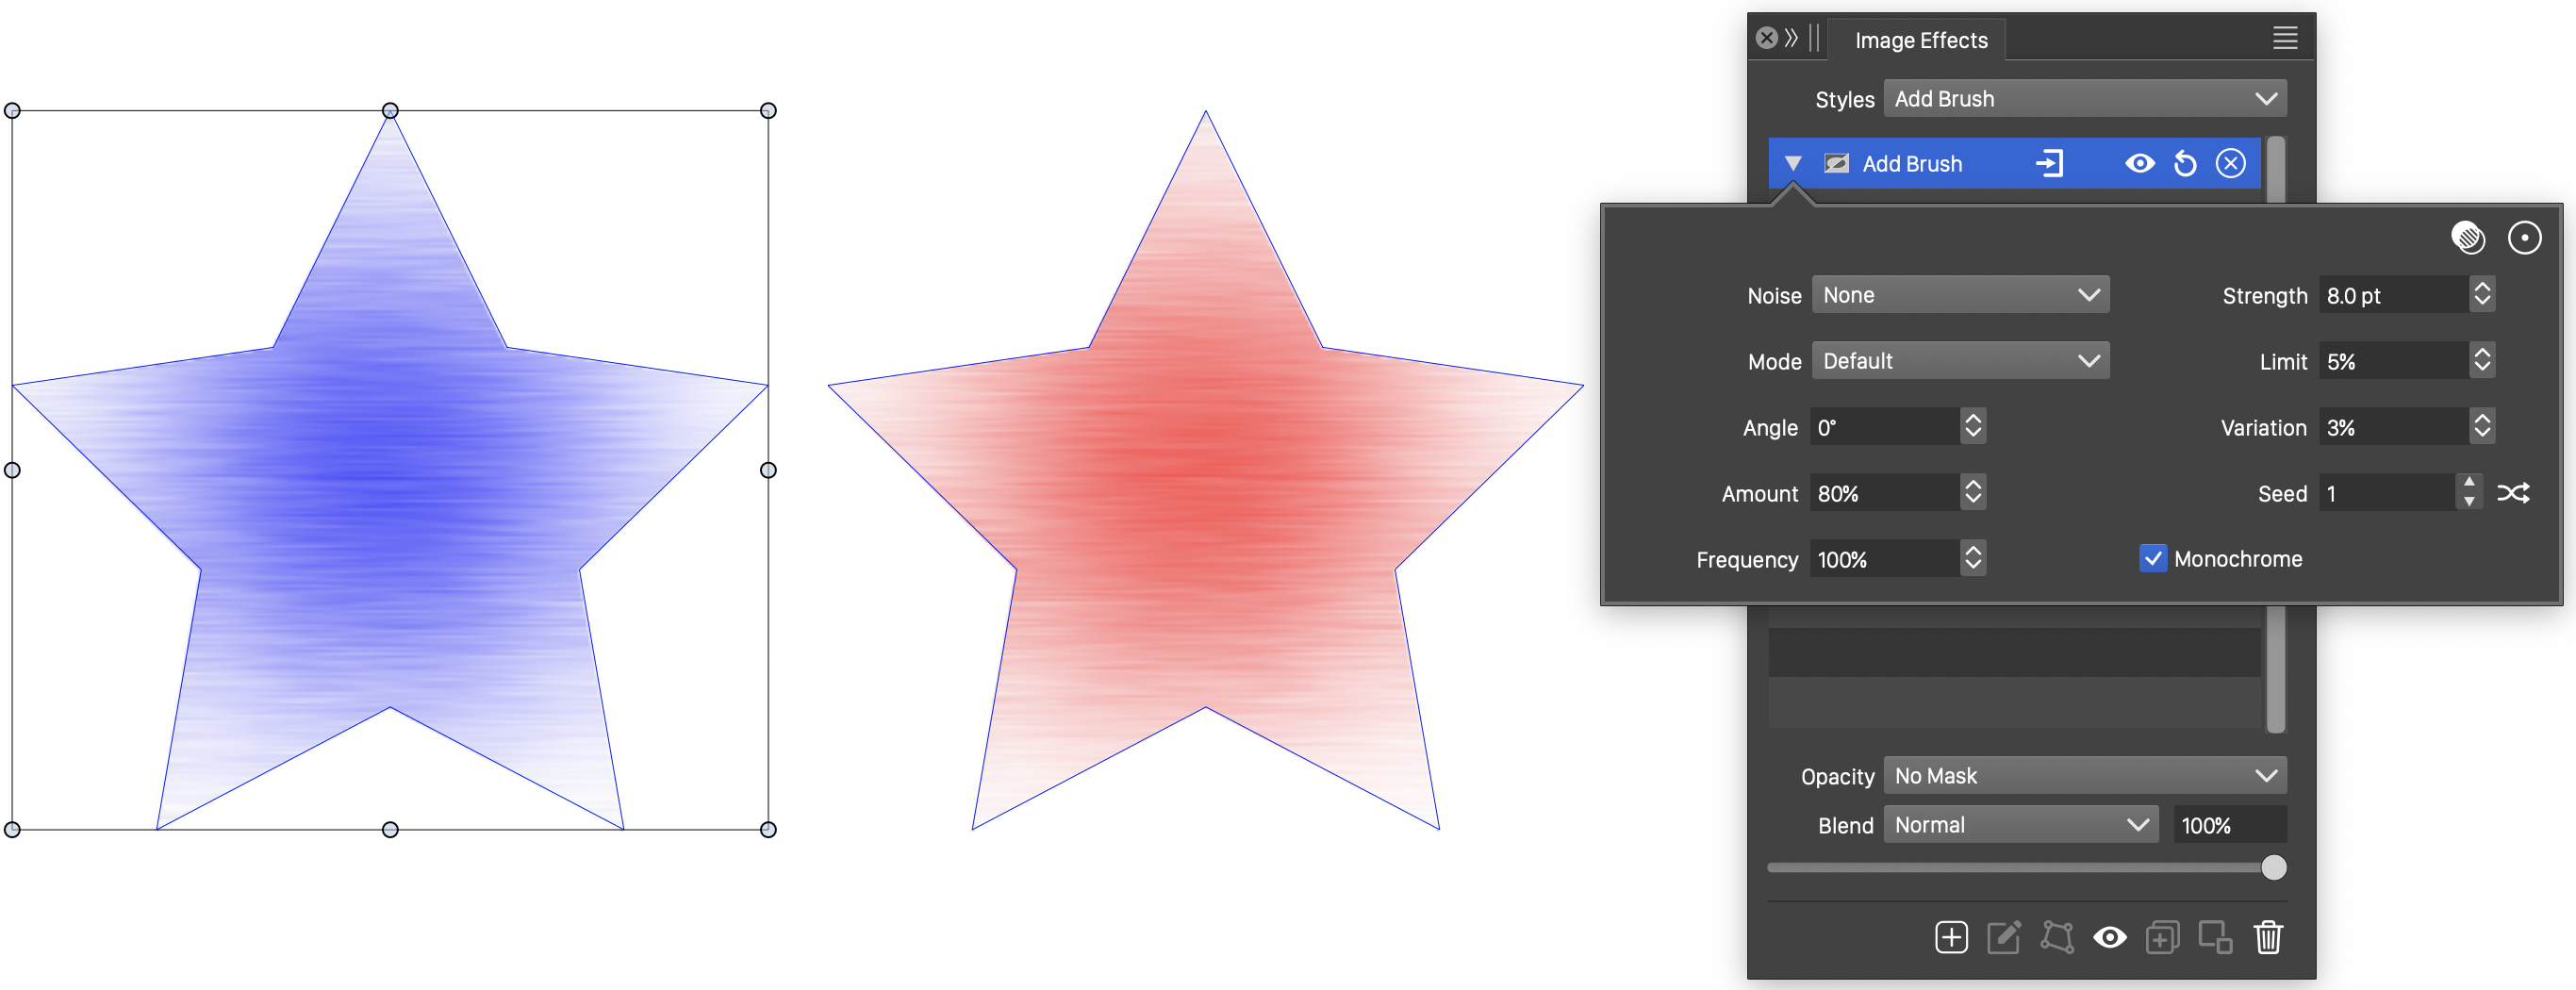
Adding a brushed metal effect on a gradient.
Adjusting colors with an adjustment object
Adjustment effects are image effects applied to the backdrop of an object. In the example below, an object with a user defined shape contains a Black and White image filter, as an adjustment filter. The backdrop of the object, consisting of color rectangles, is adjusted by the black and white filter, only in the region defined by the object shape
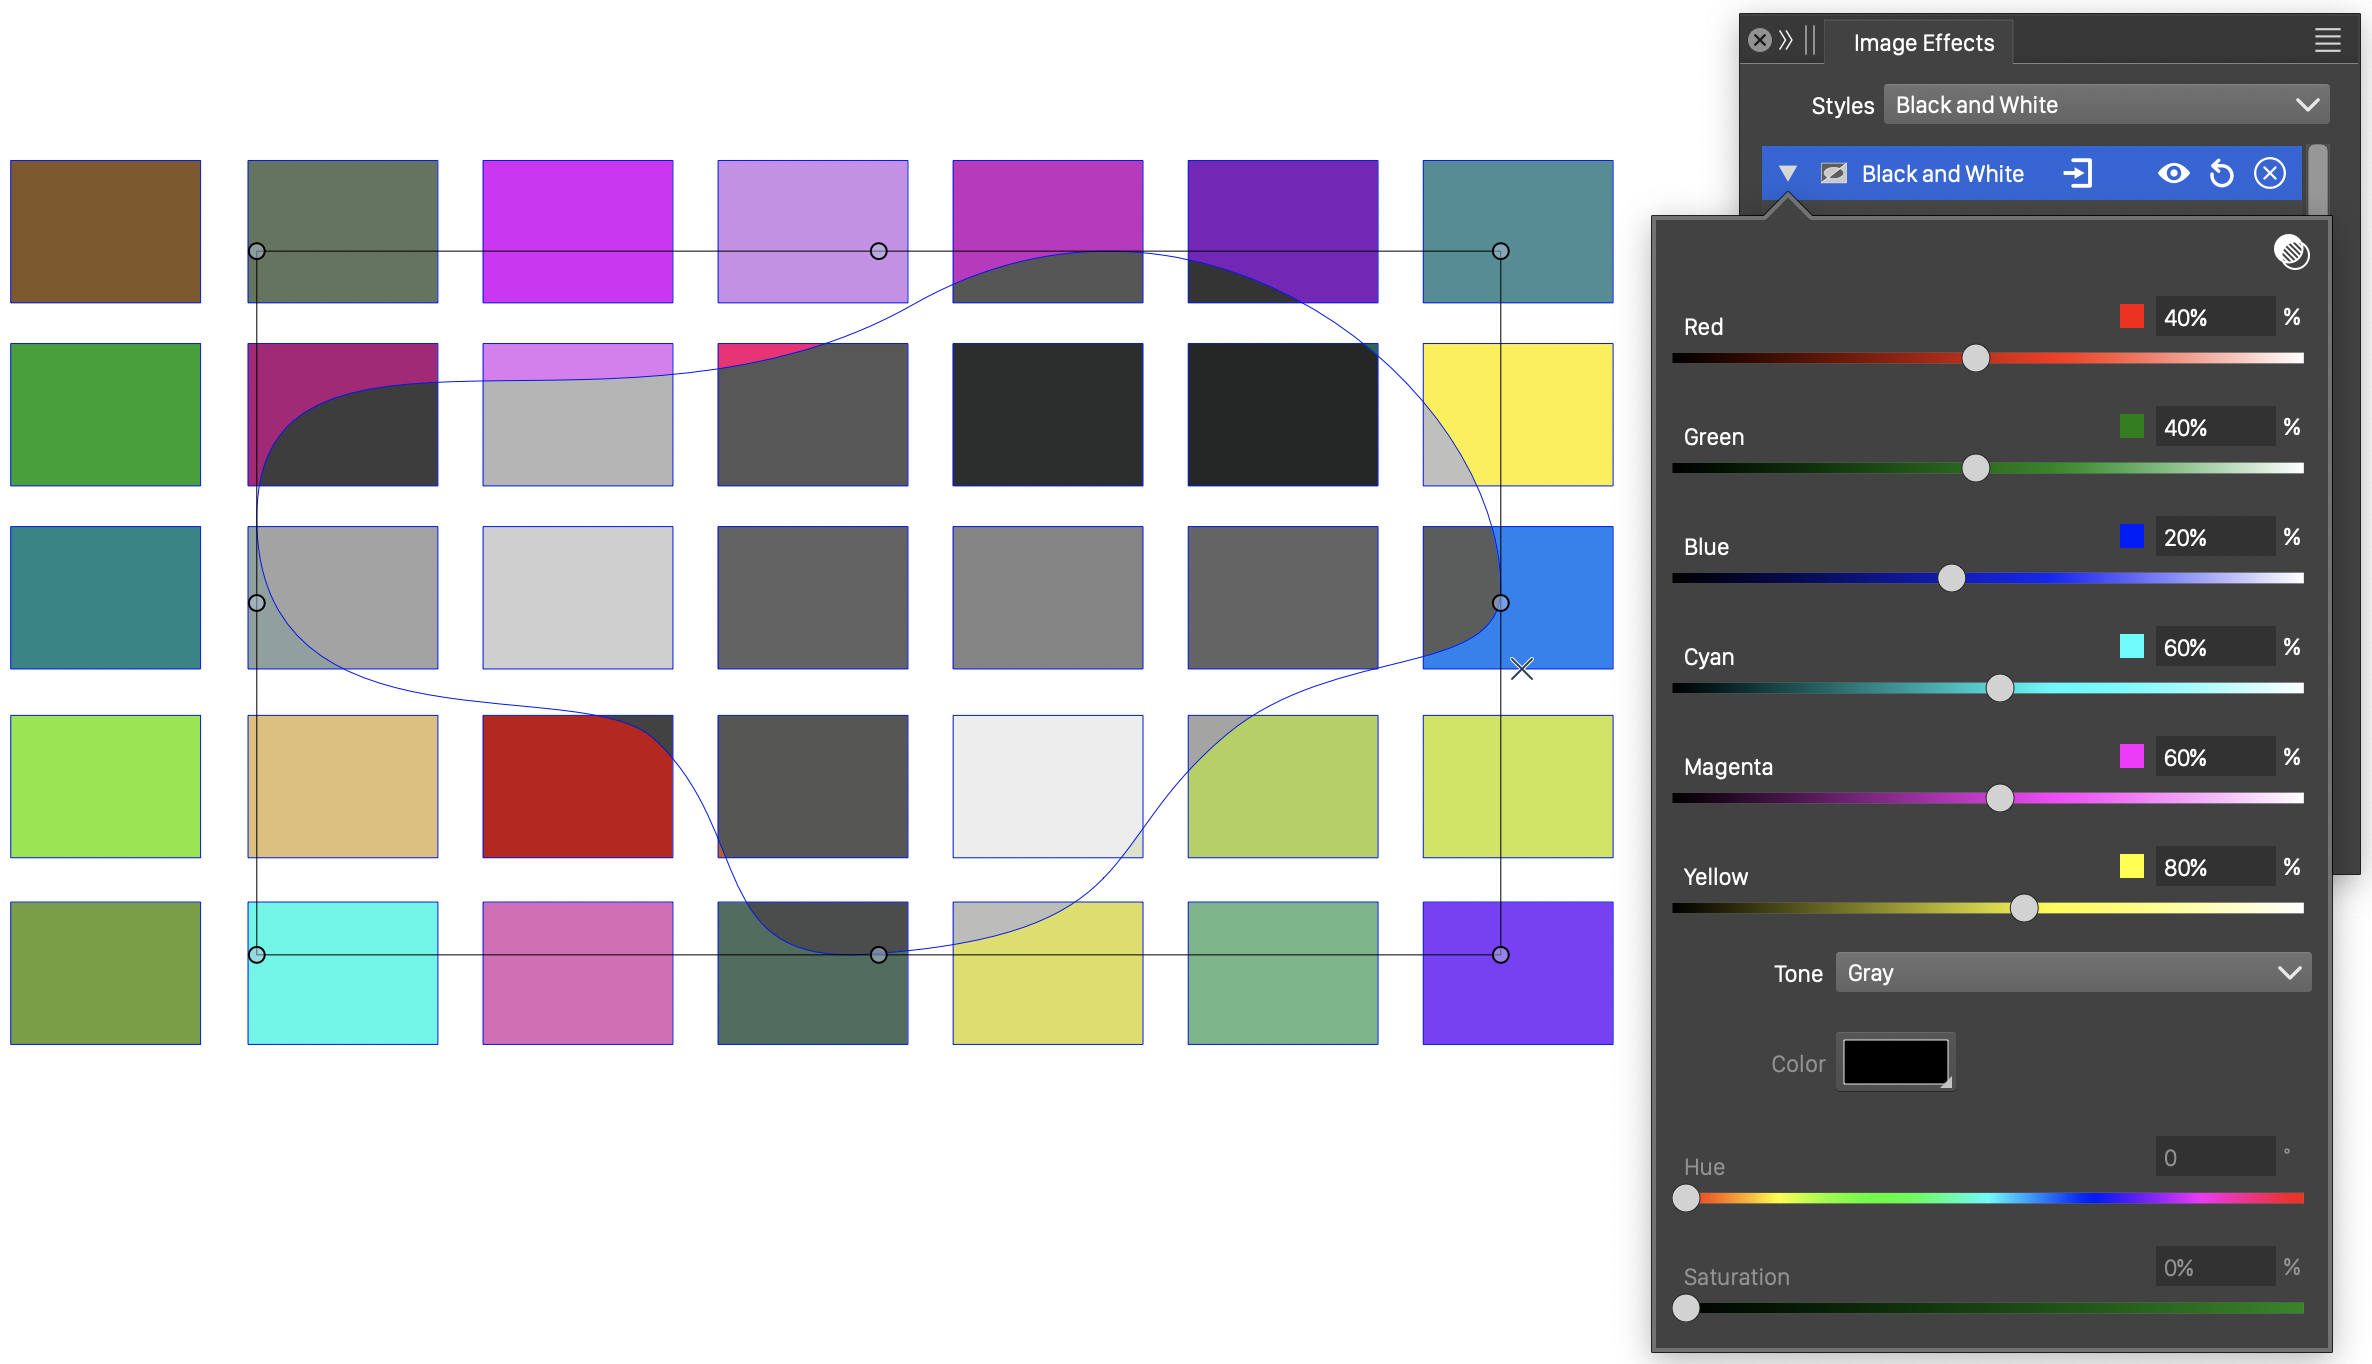
Adjustment effect using an object shape.
Drop shadow options
The Drop Shadow effect is used to give depth to objects, by creating a shadow at a user selected direction. The extent, direction and blurring of the drop shadow can be adjusted in the Image Effects panel, to create variations of the effect.
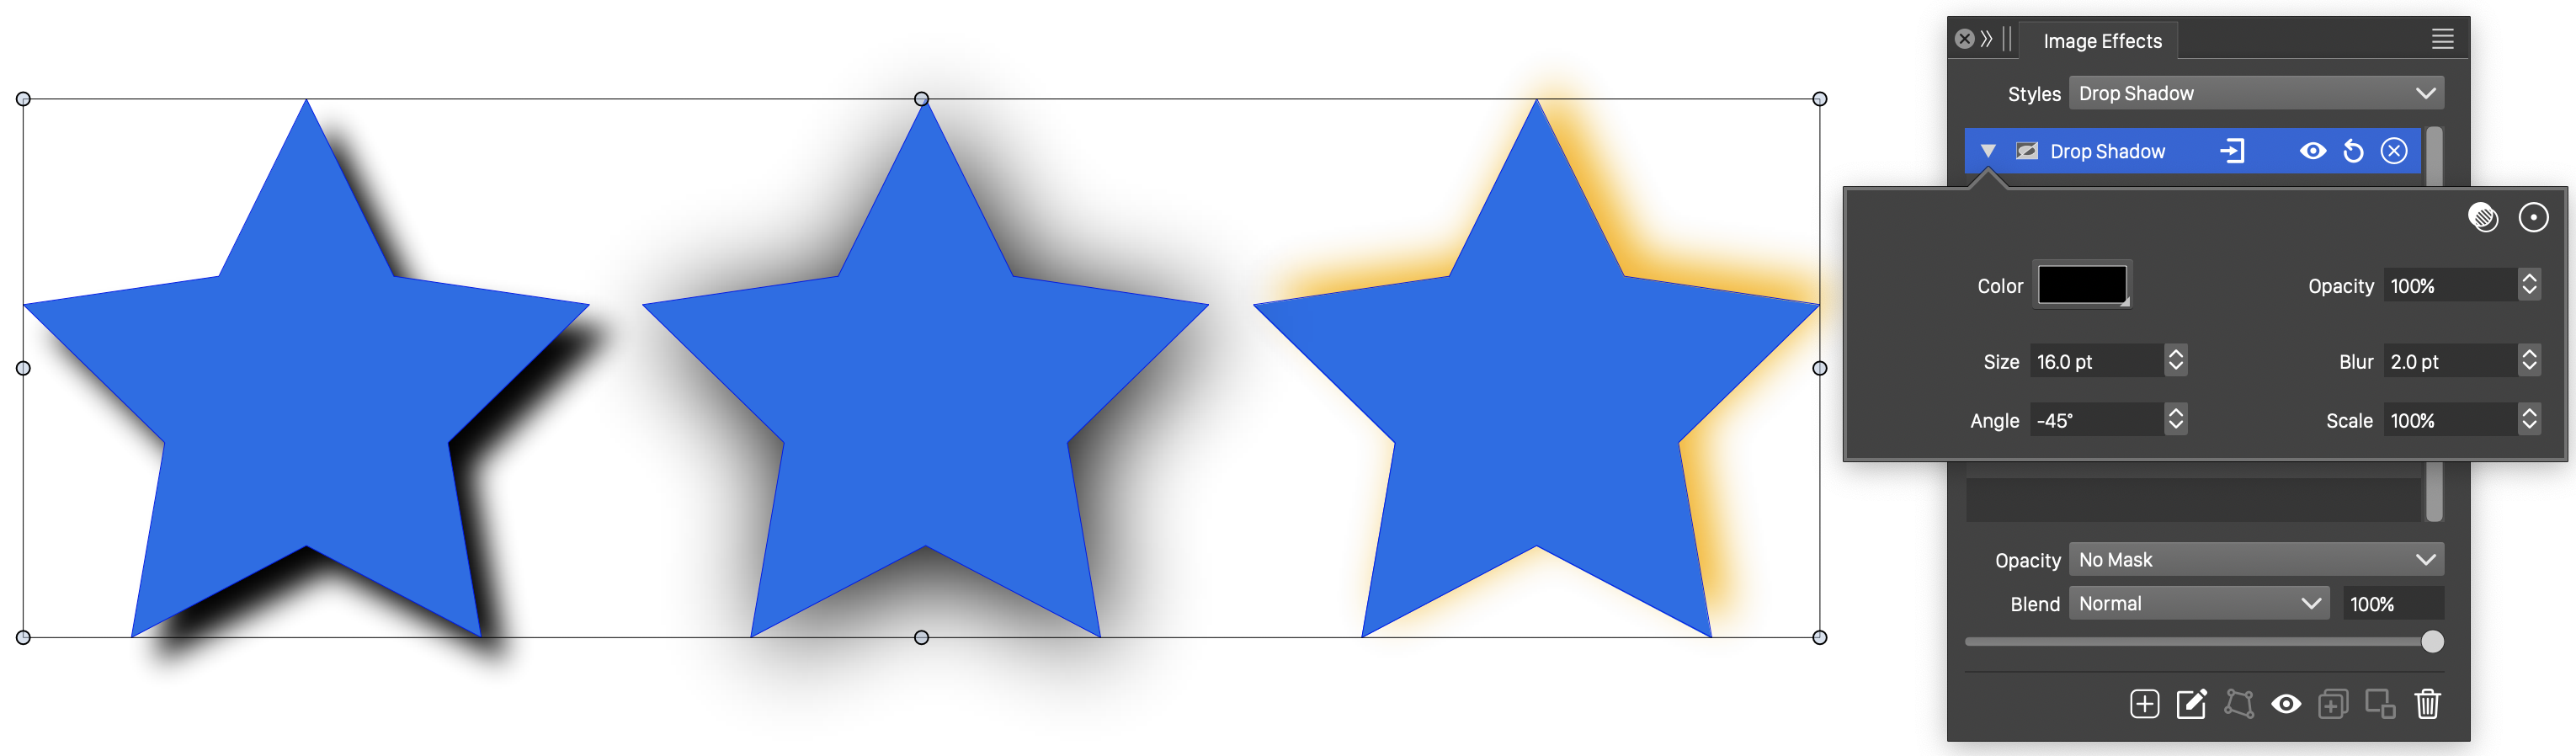
Variations of the drop shadow effect.
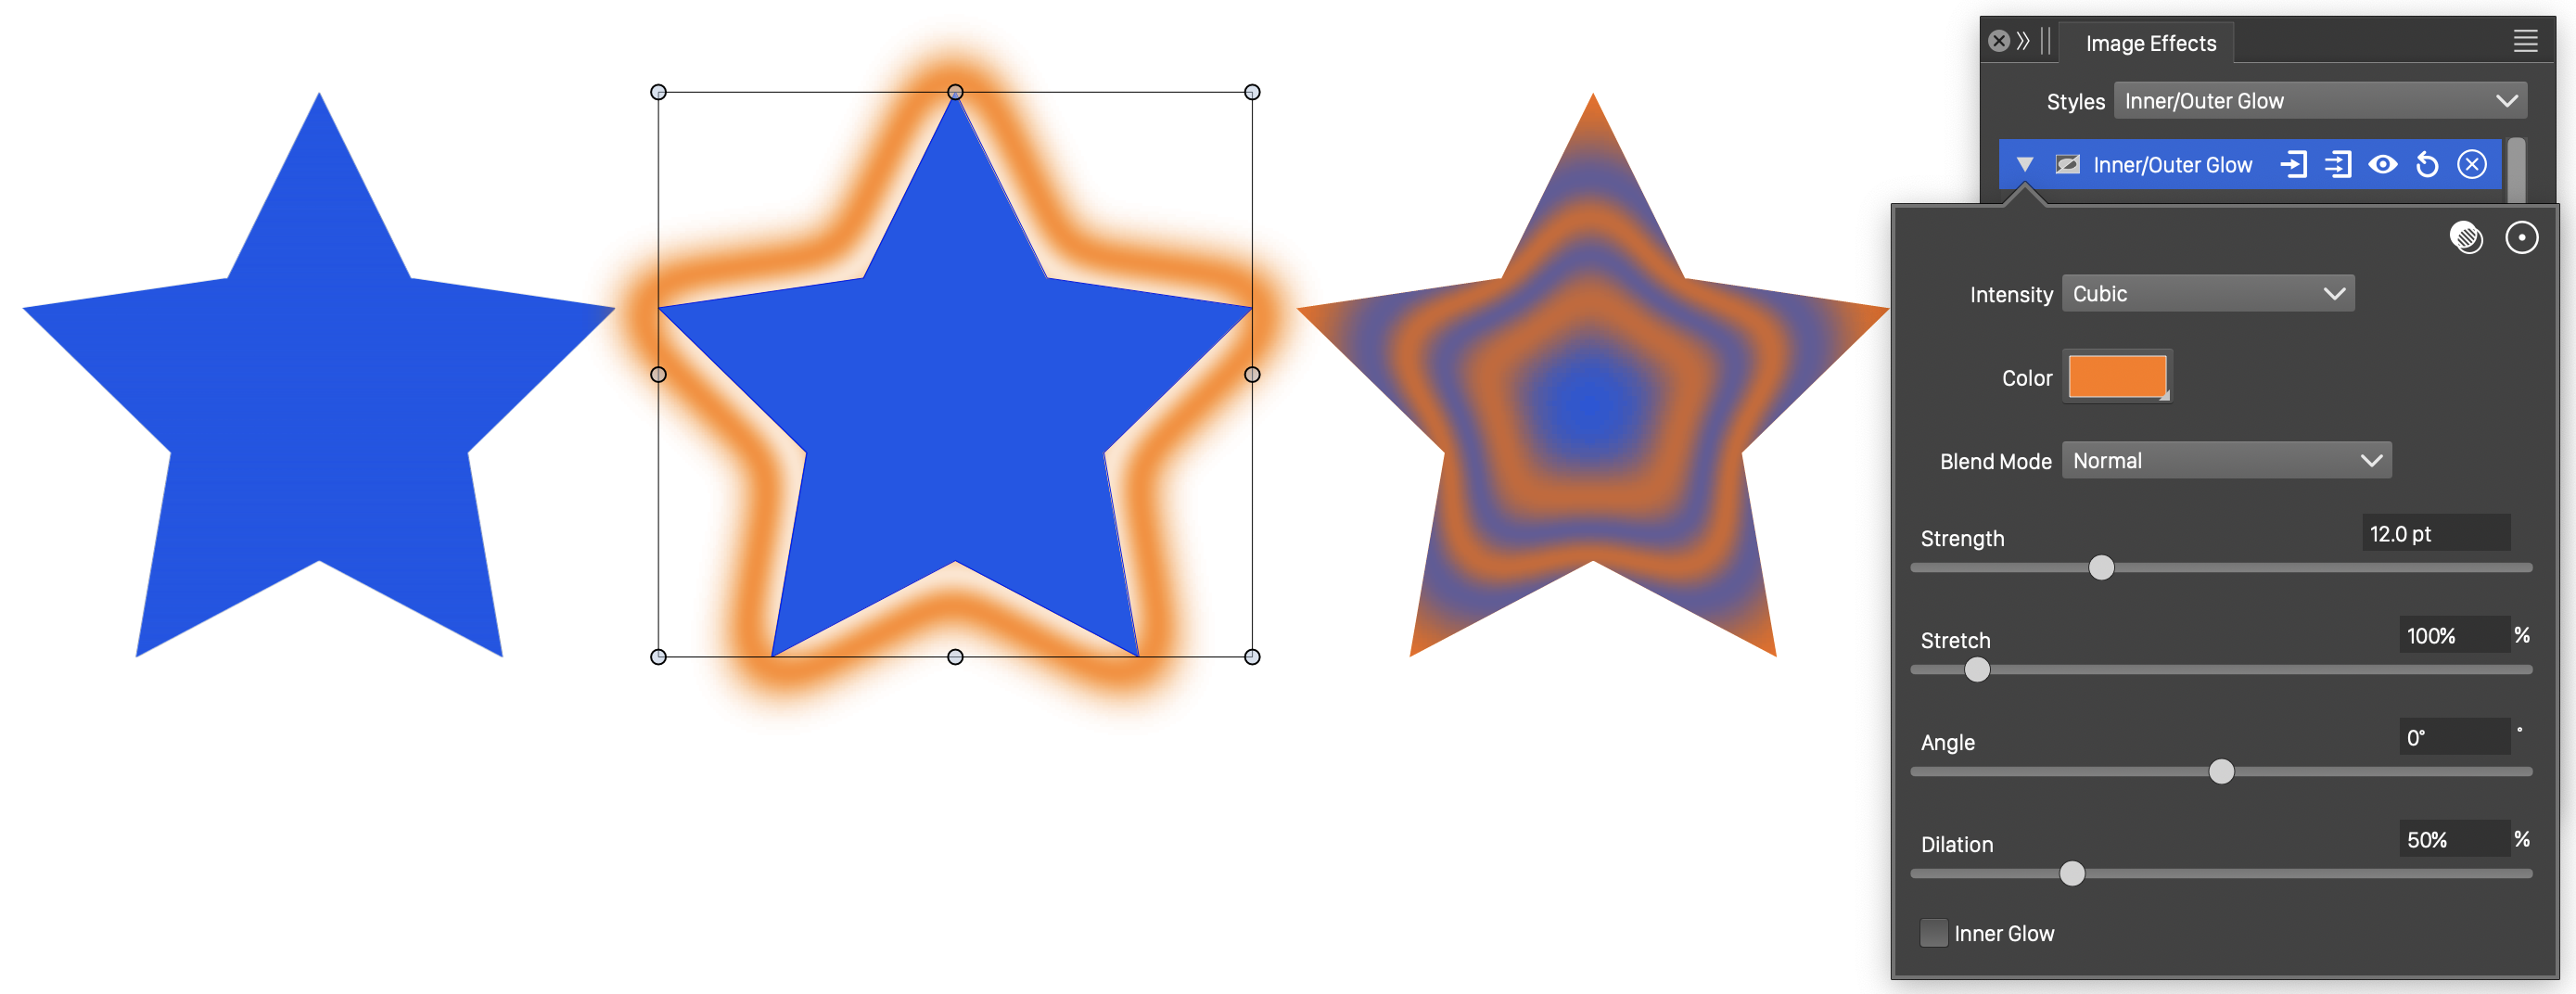
Inner or outer glow with intensity
The Inner/Outer Glow effect is used to create inner or outer glows around an object. The extend and dilation can be adjusted in the Image Effects panel. The Intensity variation function (in advanced options) can be used to create variations of the glow intensity, resulting in the multiple parallel glow stripes of the example below.