Blur Effects
The Blur section of the image effect menu, contains blurring effects of various types. These effects will blur the image of an object, by using various geometric forms and shapes for the blur direction, strength and mode.
The blurring image effects are well suited to be used as effects for adjustment layers or adjustment objects, as these do not change the geometry of the filtered image.
For some of these image blurring effects, the primary image effect  tool can be used to adjust the blurring strength and other attributes.
If the blurring effect uses a shape, the secondary image effect  tool can be used to adjust the shape controlling the blurring geometry.
Image effect parameters are given in resolution independent metrics, unless selected otherwise. This results in higher values per pixel at higher zoom levels. This means that blur strength and sizes are also larger at larger zooms, and may result in slower or less precise rendering.
Box Blur
The Box Blur image blurring effect, uses a rectangular (box) blur region, with all pixels contributing an equal amount to the resulting color. The box blur is the average of the colors in a rectangular region.
The rectangular region of the box blur can be rotated and stretched interactively. The box blur size defines the size of the square used as the neighborhood of a pixel.
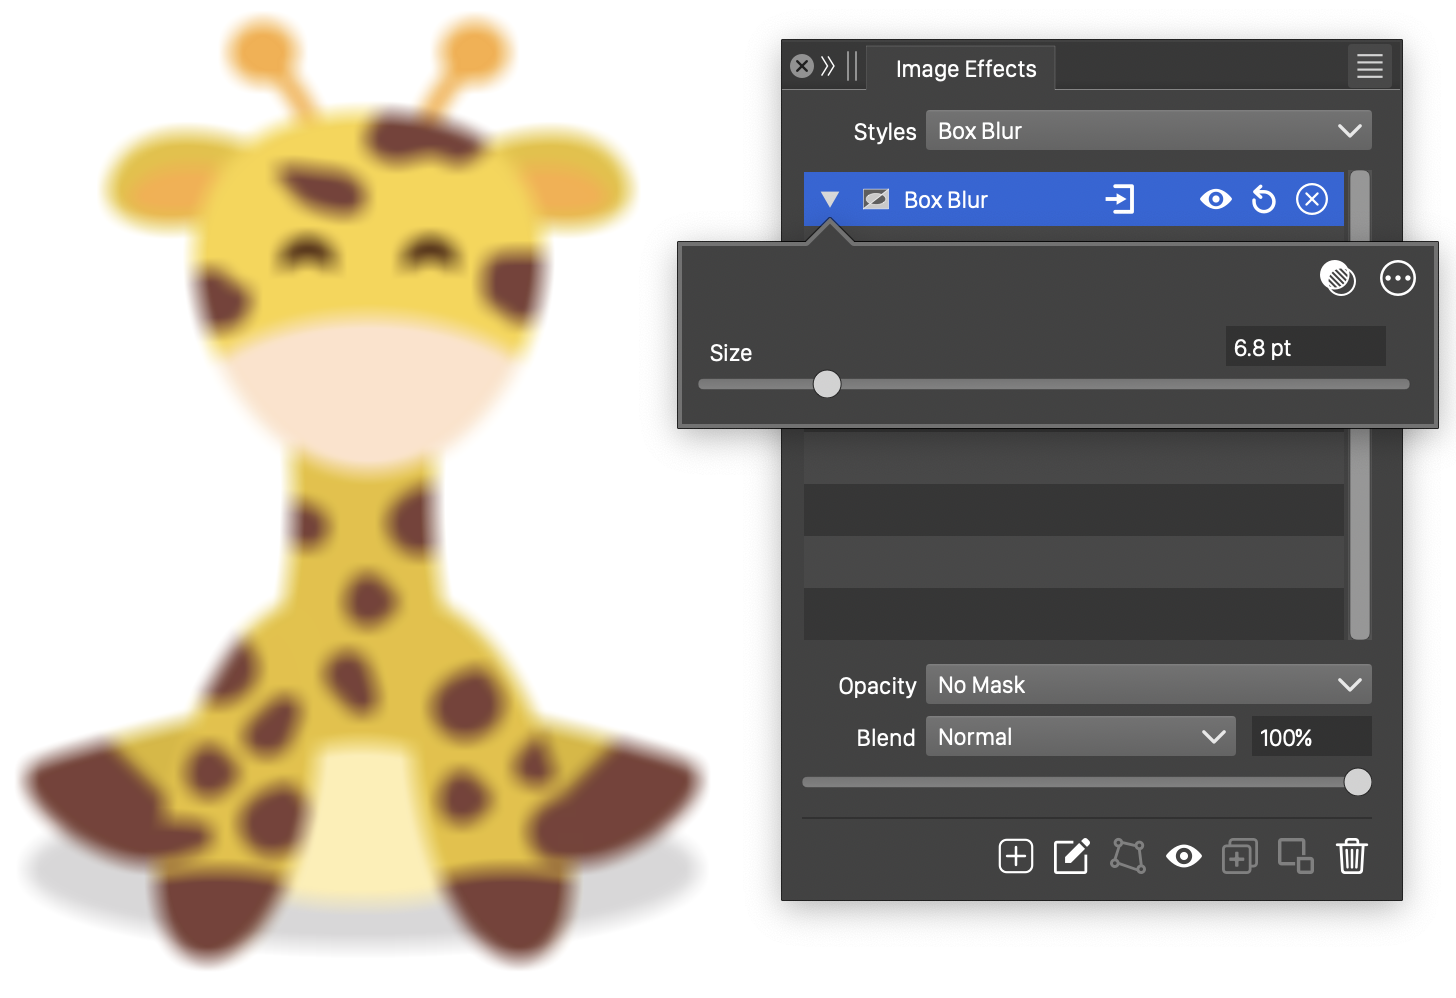
The Box Blur effect, with basic options.
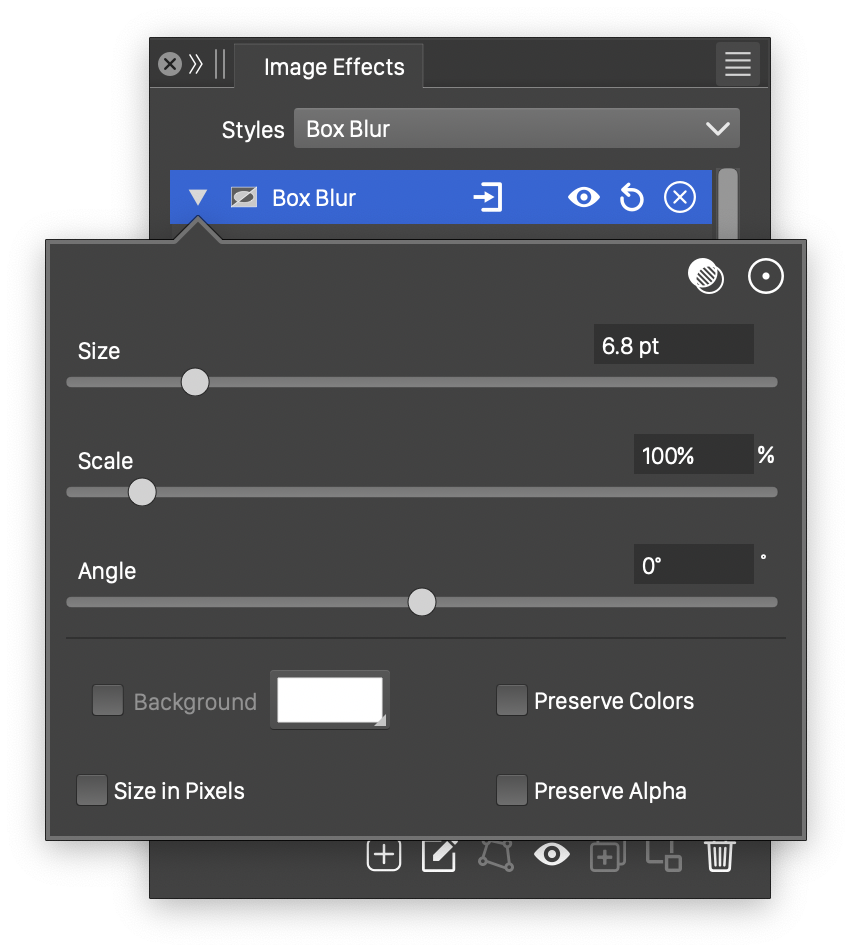
Advanced options of the Box Blur effect.
The Box Blur effect uses the following basic options:
- Size - Set the size of the square used to calculate the average pixel color.
The advanced options of the Box Blur effect are available, by clicking on the  button.
- Scale - Set the vertical stretching of the square used to determine the averaging region. This results in rectangular blur regions.
- Angle - Set the rotation of the box blur region.
- Background - Check to enable the use of a background color, when colors are preserved. The background color can be selected by clicking on the color preview box. The background color option is available and used only when the Preserve Colors option is enabled. In this case, only the alpha channel is blurred, allowing the use of a color to create a halo around the image.
- Size in Pixels - Enables the use of the blur size value as a pixel amount. The size is set in points, but if Size in Pixels is checked, the points will be treated as pixels.
- Preserve Colors - Enables the preserving of colors. If checked, the colors are not blurred, and a background color can be used to expand an image with a halo, caused by the blurred alpha channel.
- Preserve Alpha - Enables the preserving of the alpha channel. If checked, the alpha channel of the object is not blurred, resulting in sharp edges, but blurred content.
The button from the Image Effects panel, activates the image effect tool used to interactively edit the box blur effect attributes.

Interactive editing of the Box Blur effect.
Interactive editing of the box blur effect is done by dragging the handles to change an attribute value:
- (1) - Set the strength of the box blur, by dragging this handle away or towards the center.
- (2) - Set the rotation of the box blur region, by dragging this handle around the center.
- (3) - Set the center of the box blur effect.
- (4) - Set the vertical stretching of the box blur square, resulting in a rectangular region.
Clean Edge
The Clean Edge blur image effect blurs the object inside the object mask, leaving clean edges.
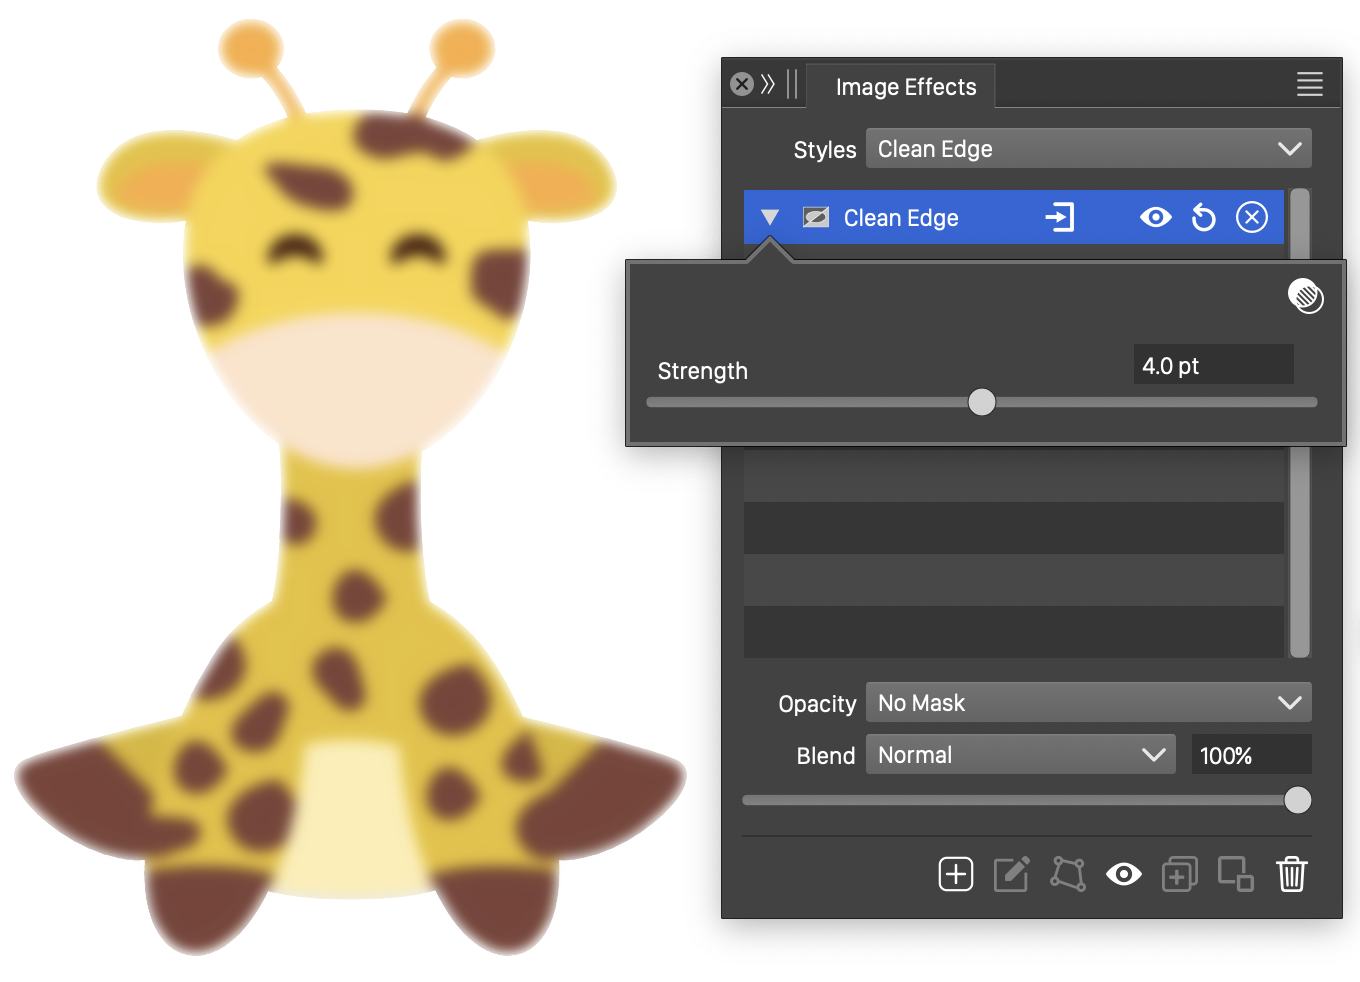
The Clean Edge effect options.
The Clean Edge effect uses the following option:
- Strength - Set the strength of the bluring inside the image edges.
Concentric Blur
The Concentric Blur image effect blurs images along concentric shapes. The blur direction is determined by the direction of the concentric shapes. The blur direction may be straight tangential to the shape, or bent locally along the shape.
Using the advanced options, it is possible to setup multiple concentric shapes, to control the blur direction. Noise can be used to locally control the blur strength. The blurring strength may also vary along the concentric shapes and can be adjusted locally at any point.
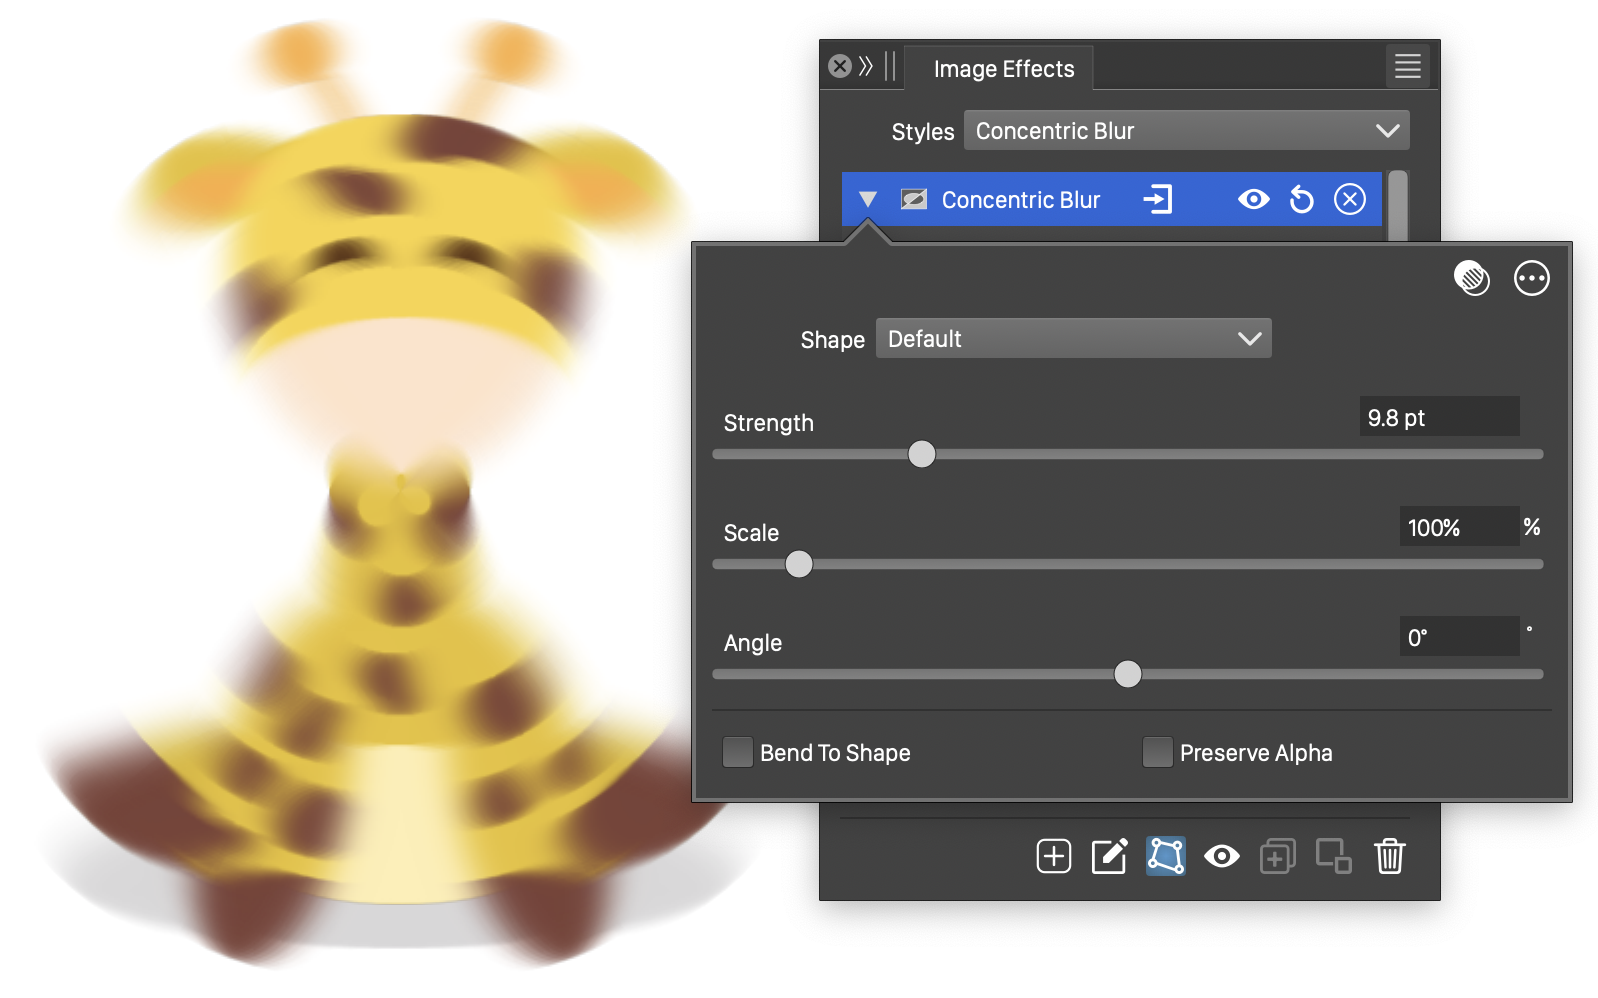
The Concentric Blur effect, with basic options.
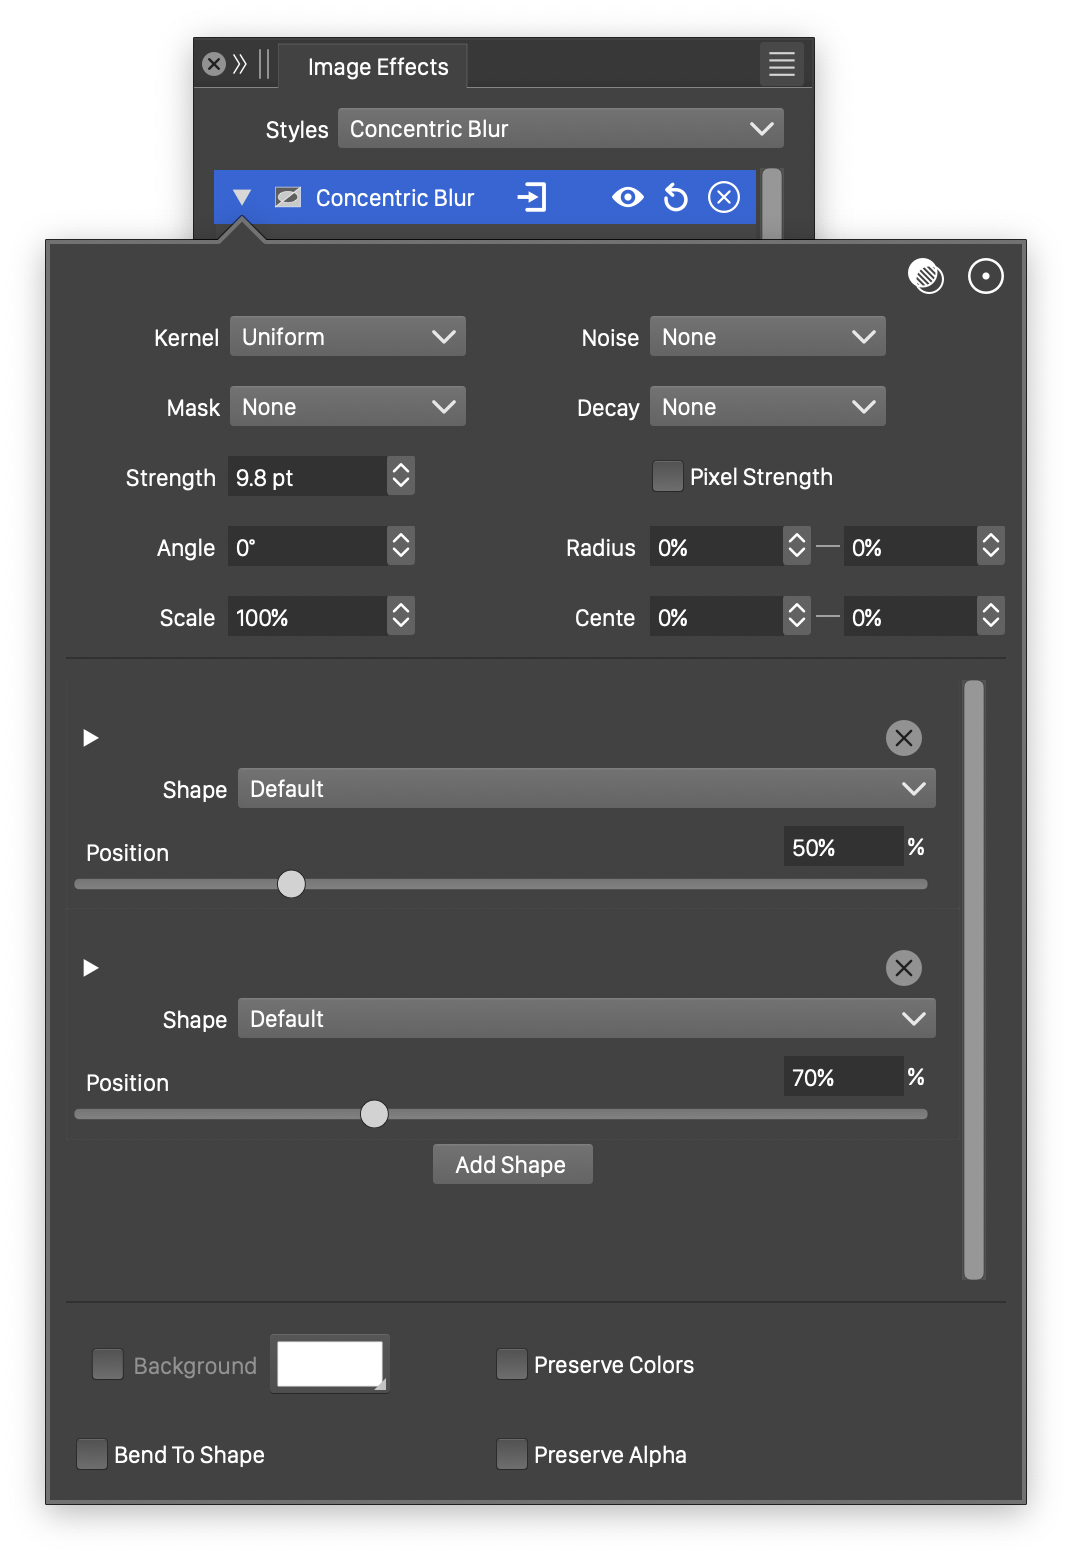
Advanced options of the Concentric Blur effect.
The Concentric Blur effect uses the following basic options:
- Shape - Set the primary shape of the concentric blur. The Shape field opens a menu of shape styles and presets, and object names with the Shape role. The shape can be edited using the path editor, by clicking on the button in the icon section of the panel.
- Strength - Set the strength of blurring along the shape.
- Scale - Set the vertical stretching of the concentric shapes used to determine the blurring direction.
- Angle - Set the rotation of the concentric shapes.
- Bend To Shape - Enables the bending of the blurring direction along the shape. When enabled, pixel colors are determined by the neighboring pixels along the concentric shape passing through the pixel. When disabled the neighborhood of a pixel is a straight line, tangent to the concentric shape at the pixel.
- Preserve Alpha - Enables the preserving of the alpha channel. If checked, the alpha channel of the object is not blurred, resulting in sharp edges, but blurred content.
The advanced options of the Concentric Blur effect are available, by clicking on the button.
- Kernel - Select the pixel averaging mode (blur kernel) used in the concentric blur. The kernel type determines whether pixels are smoothed, sharpened or edges are highlighted. The following options are available:
- Uniform - Uniform averaging of colors.
- Edge - Detect edges along the concentric blur shapes.
- Gaussian - Smooth pixel colors using the Gaussian kernel, emphasizing the immediate neighborhood of the pixel.
- Gaussian Edge - Detect edges along the concentric blur shapes, emphasizing immediate neighborhood of the pixel.
- Sharpen - Sharpen pixel colors relative to the neighboring colors.
- Noise - Select the noise style from the list of predefined noise types, or user defined noise presets and styles. The noise is used to locally control the blur strength. To browse randomly generated synthetic noise styles, select the Browse Styles command. To edit the noise attributes, select the Edit Noise command. Selecting noise is described with more detail in the Noise chapter.
- Mask - Select a transparency mask controlling the blurring strength locally. The transparency mask is aligned with the filtered object, and the mask intensities are used to adjust the blur strength. The masking options are the same as described in the Transparency chapter.
- Decay - Adjust the blur strength variation from the center of the concentric blur towards the margins. The decay is edited as a function, transitioning blur strength from the center to the margin. The Edit Curve command opens the function editor view to edit cubic or monotone functions.
- Inner Radius - The radius used for the innermost shape.
- Outer Radius - The radius used for the outermost shape.
- Center X and Center Y - Set the center of the concentric blur, relative to the object frame. The center can also be adjusted visually using the primary image effect editor tool.
- Background - Check to enable the use of a background color, when colors are preserved. The background color can be selected by clicking on the color preview box. The background color option is available and used only when the Preserve Colors option is enabled. In this case, only the alpha channel is blurred, allowing the use of a color to create a halo around the image.
- Pixel Strength - Enables the use of pixels to set the blur strength values. The strength is set in points, but if Pixel Strength is checked, the points will be treated as pixels.
- Preserve Colors - Enables the preserving of colors. If checked, the colors are not blurred, and a background color can be used to expand an image with a halo, caused by the blurred alpha channel.
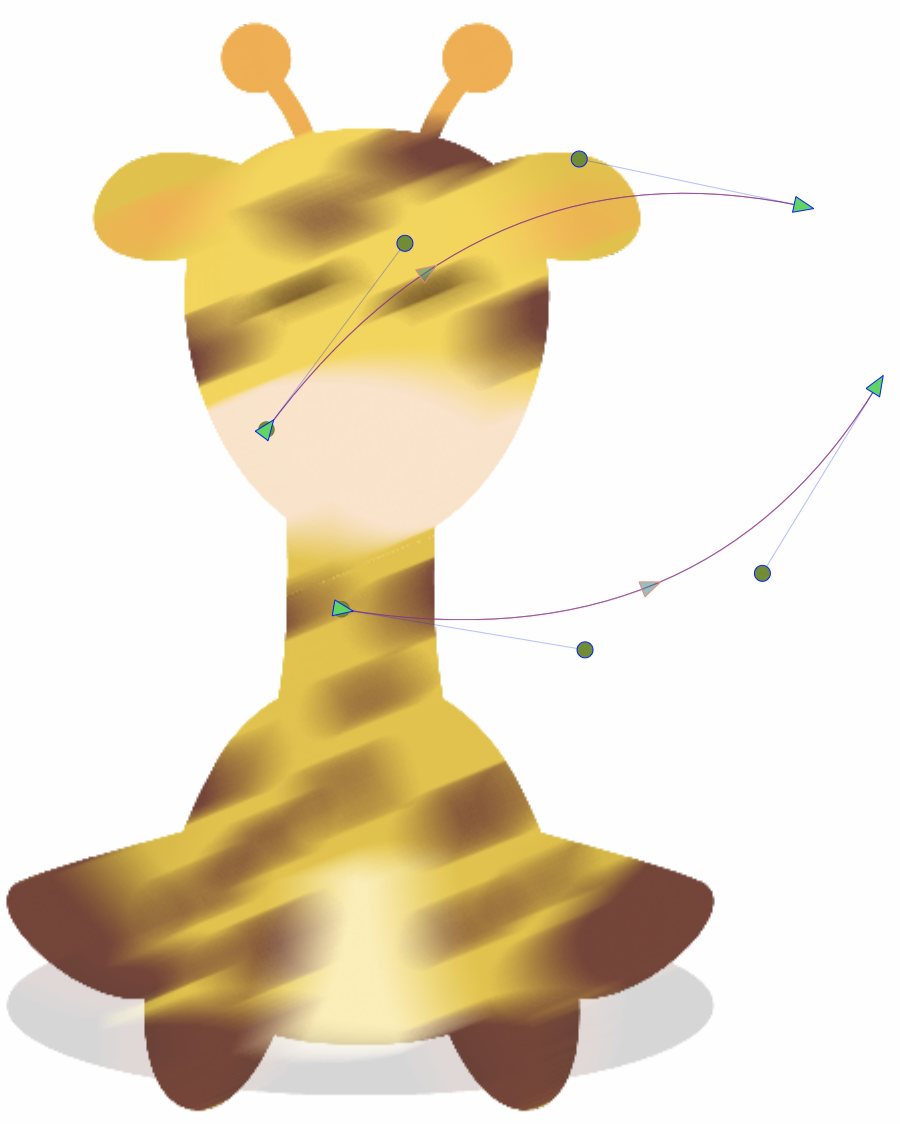
Interactive editing of the Concentric Blur effect.
The concentric blur may use one or more concentric shapes to set the blur direction around the center, at various distances from the center. Each shape can be associated with a number of blurring strength locations along the shape.
The list of shapes and blurring strengths are shown in advanced editing mode.
- The
 button is used to open or close the list of blur strength adjustments of a shape.
 - The
 button is used to remove a shape or a blur strength location.
 - Shape - Set a shape used in the concentric blur.
- Position - Set the position of this shape from the center, relative to the radius of the blurred region.
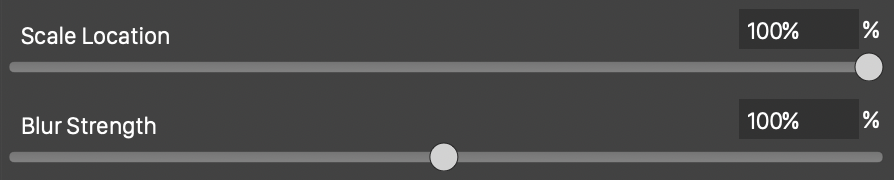
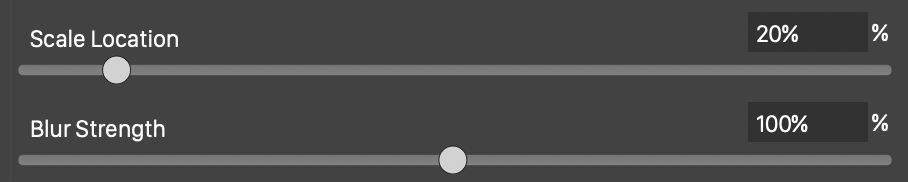
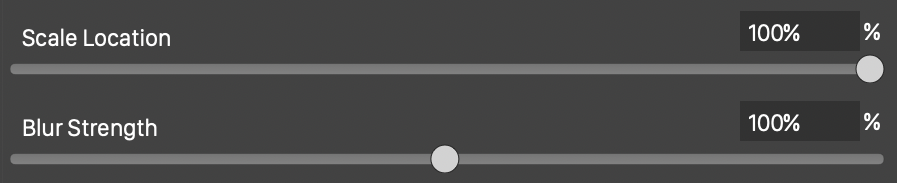
- Scale Location - Set the blurring strength location, along the concentric shape.
- Blur Strength - Adjust the blur strength at the shape location.
- Add Scaling - Add a new blur strength scaling location to the shape.
- Add Shape - Add a new concentric shape to the blur.
The blur strength scaling and locations can also be adjusted using the primary image effect editor tool.
The button from the Image Effects panel, activates the image effect tool used to interactively edit the concentric blur effect attributes.
Editing the location and scale of a blur strength adjustment.
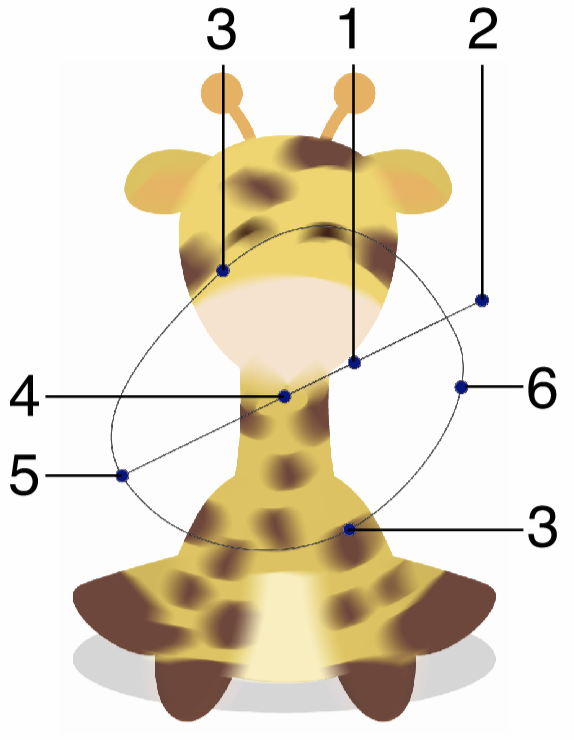
Interactive editing of the concentric blur effect is done by dragging the handles to change an attribute value:
- (1) - Set the strength of the concentric blur, by dragging this handle away or towards the center.
- (2) - Set the rotation of the concentric blur region, by dragging this handle around the center.
- (3) - Set the vertical stretching of the concentric blur shapes.
- (4) - Set the center of the concentric blur effect.
- (5) - Set the distance of the concentric blur shape from the center.
- (6) - Move the blur strength location along the shape.
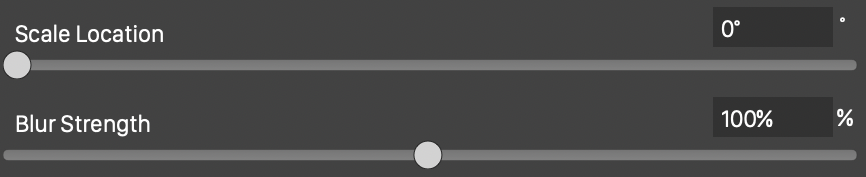
Double clicking a blur strength node (6), opens the blur strength position and scale editor view. Adjust the scale and location of the selected node using the sliders and numeric editors:
- Scale Location - Set the blurring strength location, along the concentric shape, of the selected node.
- Blur Strength - Adjust the blur strength at the shape location, of the selected node.
The concentric blur shapes can be edited as regular paths using the secondary image effect tool from the icon section of the panel. When the secondary image effect tool is active, the concentric blur shape nodes are shown and can be adjusted using regular path editing commands.
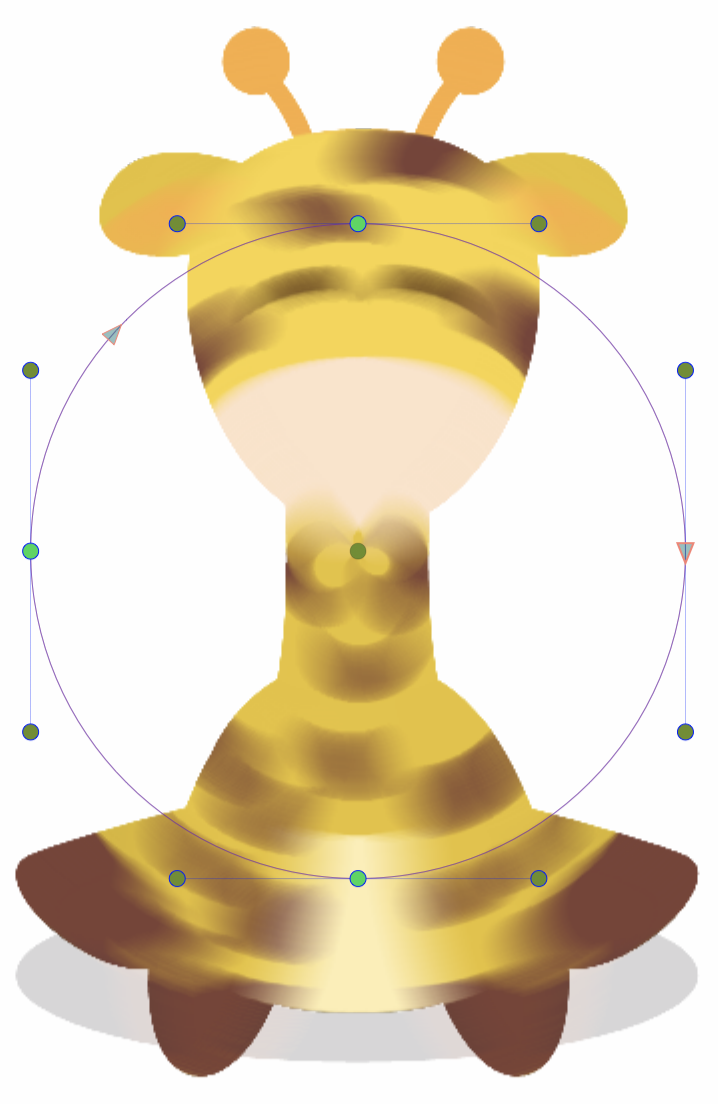
Editing the shapes of the Concentric Blur effect.
Cone Blur
The Cone Blur image effect blurs images along open shapes positioned from the center of the blur. Cone Blur is similar to the Zoom Blur, but instead of straight lines going out from the center, here these lines can be modified to curves. The blur direction is determined by the direction of the shapes. The blur direction may be straight tangential to the shape, or bent locally along the shape.
Using the advanced options, it is possible to setup multiple cone shapes, to locally control the blur direction. Noise can be used to locally control the blur strength. The blurring strength may also vary along the cone shapes and can be adjusted locally at any point.
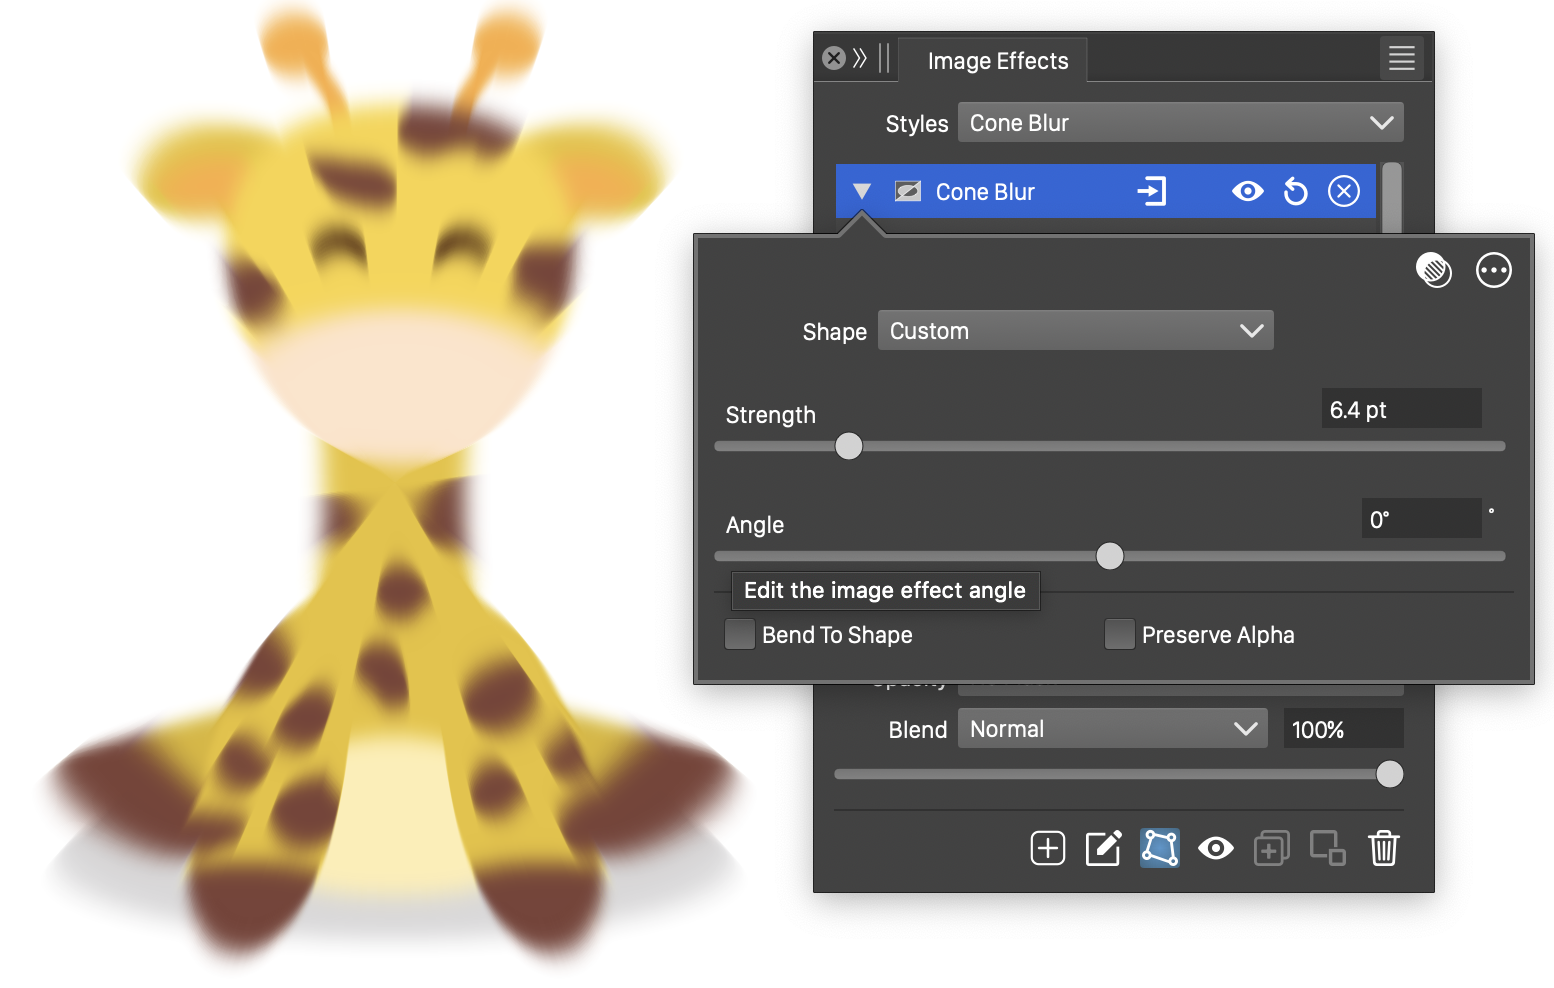
The Cone Blur effect, with basic options.
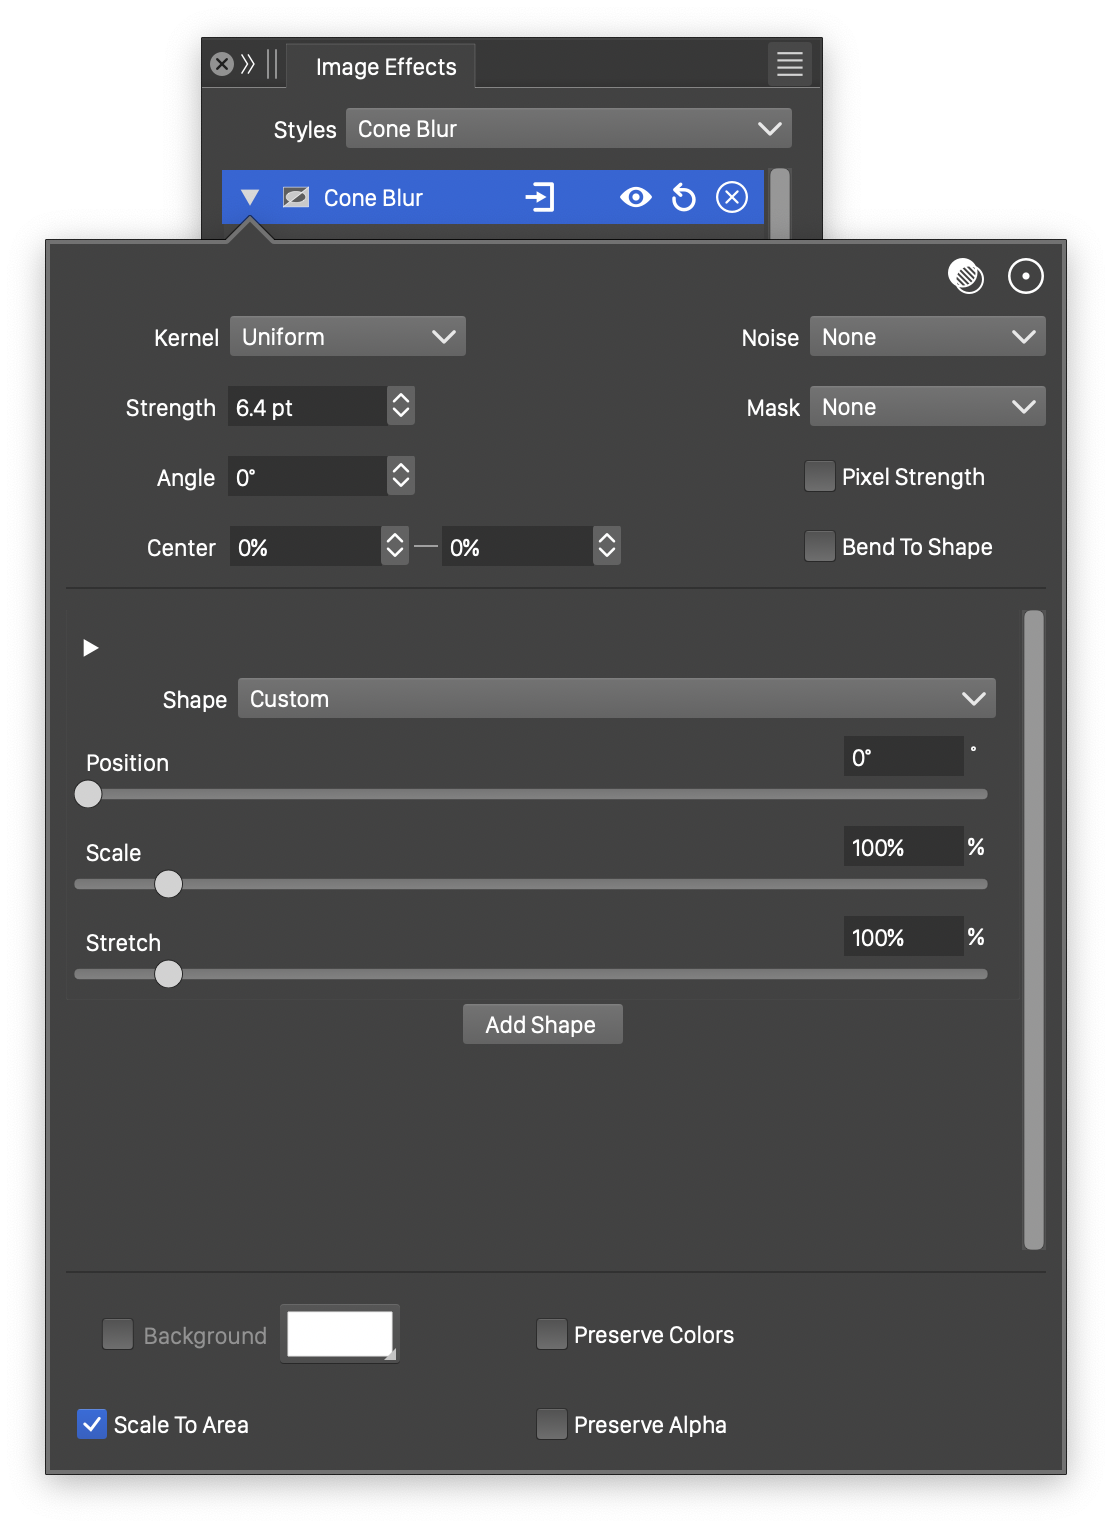
Advanced options of the Cone Blur effect.
The Cone Blur effect uses the following basic options:
- Shape - Set the primary shape of the cone blur. The Shape field opens a menu of shape styles and presets, and object names with the Shape role. The shape can be edited using the path editor, by clicking on the button in the icon section of the panel. Only single open shapes are accepted.
- Strength - Set the strength of blurring along the cone shapes.
- Angle - Set the rotation of the cone shapes around the center.
- Bend To Shape - Enables the bending of the blurring direction along the shape. When enabled, pixel colors are determined by the neighboring pixels along the cone shape passing through the pixel. When disabled the neighborhood of a pixel is a straight line, tangent to the cone shape at the pixel.
- Preserve Alpha - Enables the preserving of the alpha channel. If checked, the alpha channel of the object is not blurred, resulting in sharp edges, but blurred content.
The advanced options of the Cone Blur effect are available, by clicking on the button.
- Kernel - Select the pixel averaging mode (blur kernel) used in the cone blur. The kernel type determines whether pixels are smoothed, sharpened or edges are highlighted. The following options are available:
- Uniform - Uniform averaging of colors.
- Edge - Detect edges along the cone blur shapes.
- Gaussian - Smooth pixel colors using the Gaussian kernel, emphasizing the immediate neighborhood of the pixel.
- Gaussian Edge - Detect edges along the cone blur shapes, emphasizing immediate neighborhood of the pixel.
- Sharpen - Sharpen pixel colors relative to the neighboring colors.
- Noise - Select the noise style from the list of predefined noise types, or user defined noise presets and styles. The noise is used to locally control the blur strength. To browse randomly generated synthetic noise styles, select the Browse Styles command. To edit the noise attributes, select the Edit Noise command. Selecting noise is described with more detail in the Noise chapter.
- Mask - Select a transparency mask controlling the blurring strength locally. The transparency mask is aligned with the filtered object, and the mask intensities are used to adjust the blur strength. The masking options are the same as described in the Transparency chapter.
- Center X and Center Y - Set the center of the cone blur, relative to the object frame. The center can also be adjusted visually using the primary image effect editor tool.
- Background - Check to enable the use of a background color, when colors are preserved. The background color can be selected by clicking on the color preview box. The background color option is available and used only when the Preserve Colors option is enabled. In this case, only the alpha channel is blurred, allowing the use of a color to create a halo around the image.
- Scale To Area - Enables the scaling of the shape to fit into the radius of the blurred area.
- Pixel Strength - Enables the use of pixels to set the blur strength values. The strength is set in points, but if Pixel Strength is checked, the points will be treated as pixels.
- Preserve Colors - Enables the preserving of colors. If checked, the colors are not blurred, and a background color can be used to expand an image with a halo, caused by the blurred alpha channel.
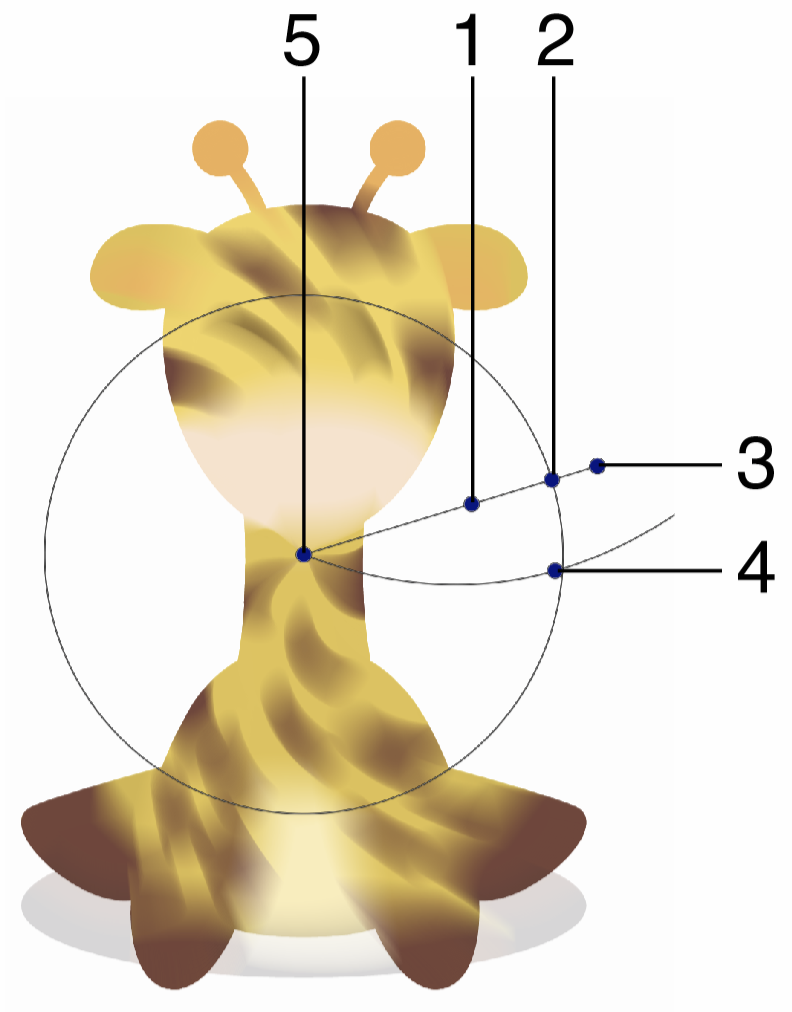
Interactive editing of the Cone Blur effect.
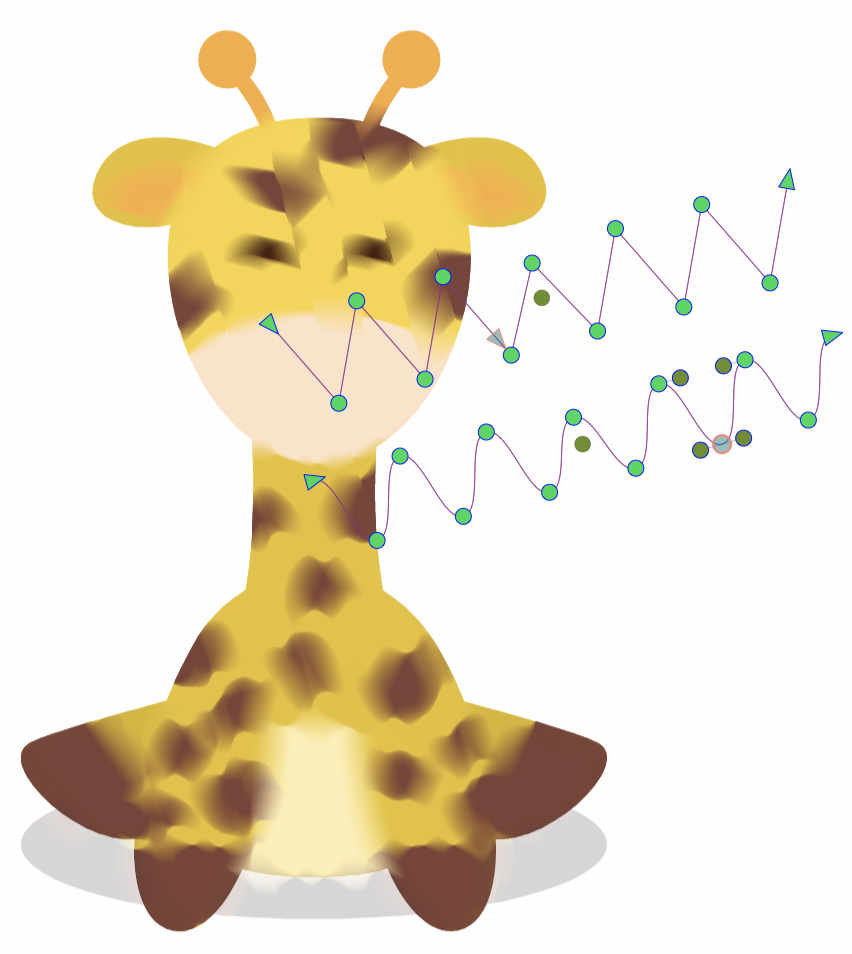
The cone blur may use one or more open shapes to set the blur direction from the center, at various angle. Each shape can be associated with a number of blurring strength locations along the shape.
The list of shapes and blurring strengths are shown in advanced editing mode.
- The button is used to open or close the list of blur strength adjustments of a shape.
- The button is used to remove a shape or a blur strength location.
- Shape - Set a shape used in the cone blur.
- Position - Set the angular position of this shape around the center. The shape is positioned at this angle.
- Scale - Set an uniform scaling factor used to resize the cone shape.
- Stretch - Set a vertical stretching factor to scale the cone shape.
- Scale Location - Set the blurring strength location, along the cone shape.
- Blur Strength - Adjust the blur strength at the shape location.
- Add Scaling - Add a new blur strength scaling location to the shape.
- Add Shape - Add a new cone shape to the blur.
The blur strength scaling and locations can also be adjusted using the primary image effect editor tool.
The button from the Image Effects panel, activates the image effect tool used to interactively edit the cone blur effect attributes.
Selecting a blur shape.
Interactive editing of the cone blur effect is done by dragging the handles to change an attribute value:
- (1) - Set the strength of the cone blur, by dragging this handle away or towards the center.
- (2) - Set the position of the cone shape around the center.
- (3) - Set the rotation of the cone blur region, by dragging this handle around the center.
- (4) - Move the blur strength location along the shape.
- (5) - Set the center of the cone blur effect.
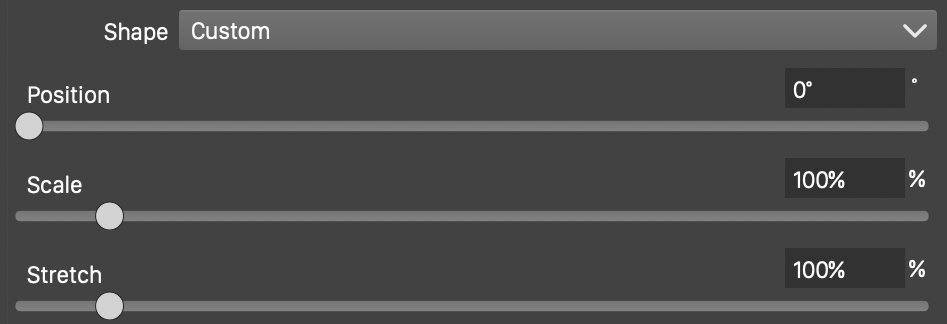
Double clicking a blur direction shape node (2), opens the blur shape selector view. There can be multiple shapes at different angles arranged around the center. Each shape is positioned at an angle, and determines the blurring direction. the following options are available when selecting a cone blur shape.
- Shape - Set a shape used in the cone blur.
- Position - Set the angular position of this shape around the center. The shape is positioned at this angle.
- Scale - Set an uniform scaling factor used to resize the cone shape.
- Stretch - Set a vertical stretching factor to scale the cone shape.

Editing the location and scale of a blur strength adjustment.
Double clicking a blur strength node (4), opens the blur strength position and scale editor view. Adjust the scale and location of the selected node using the sliders and numeric editors:
- Scale Location - Set the blurring strength location, along the cone shape, of the selected node.
- Blur Strength - Adjust the blur strength at the shape location, of the selected node.
The cone blur shapes can be edited as regular paths using the secondary image effect tool from the icon section of the panel. When the secondary image effect tool is active, the cone blur shape nodes are shown and can be adjusted using regular path editing commands.
Editing the shapes of the Cone Blur effect.
Disc Blur
The Disc Blur image effect blurs images using uniform pixel averages in a neighborhood defined by a user selected shape. The pixel neighborhood is defined inside a closed shape. The color values are averaged uniformly inside the blur shape.
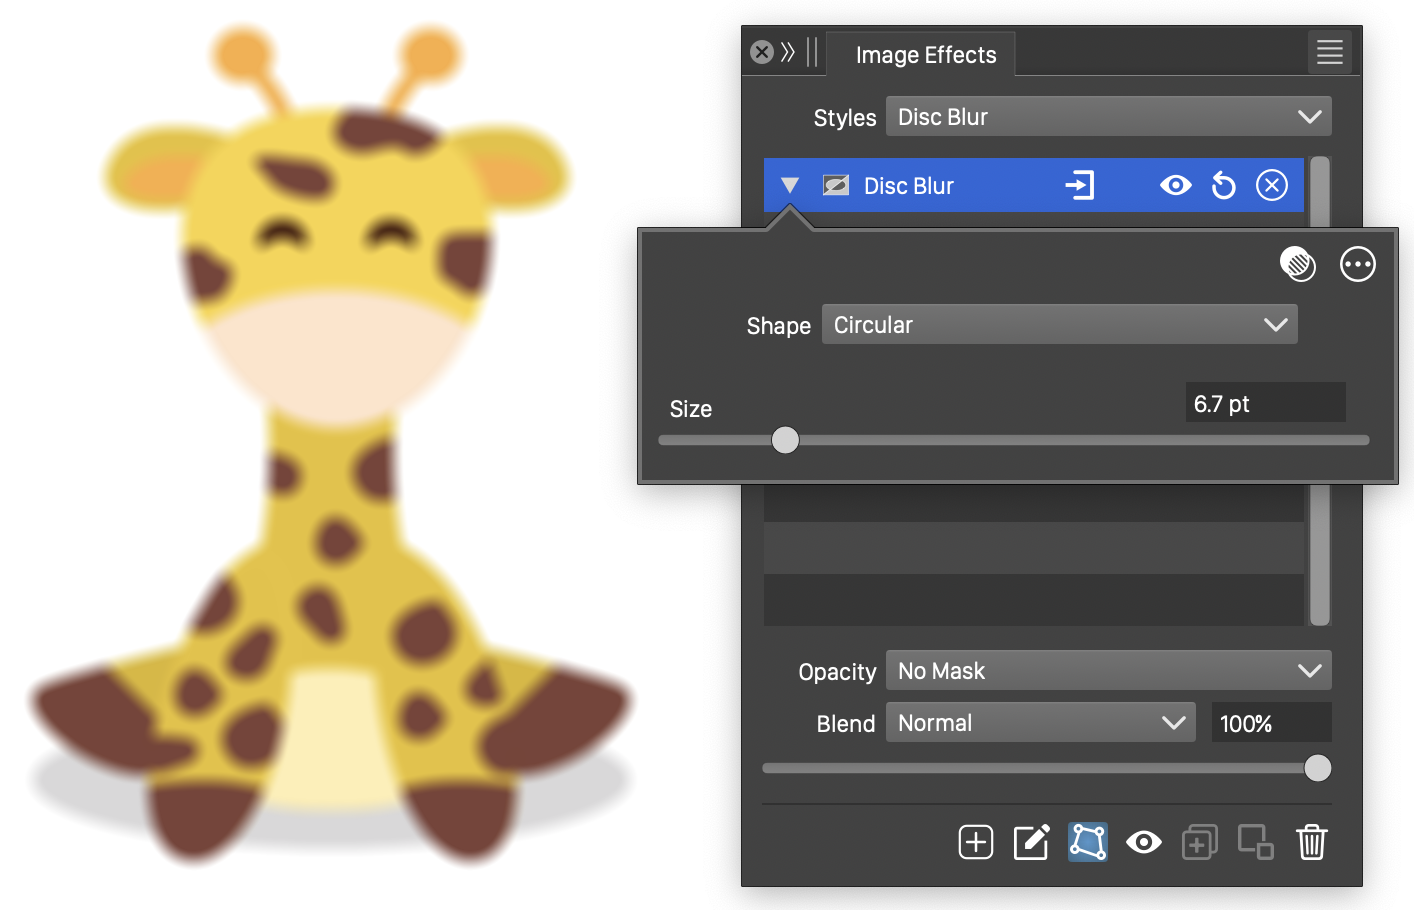
The Disc Blur effect, with basic options.
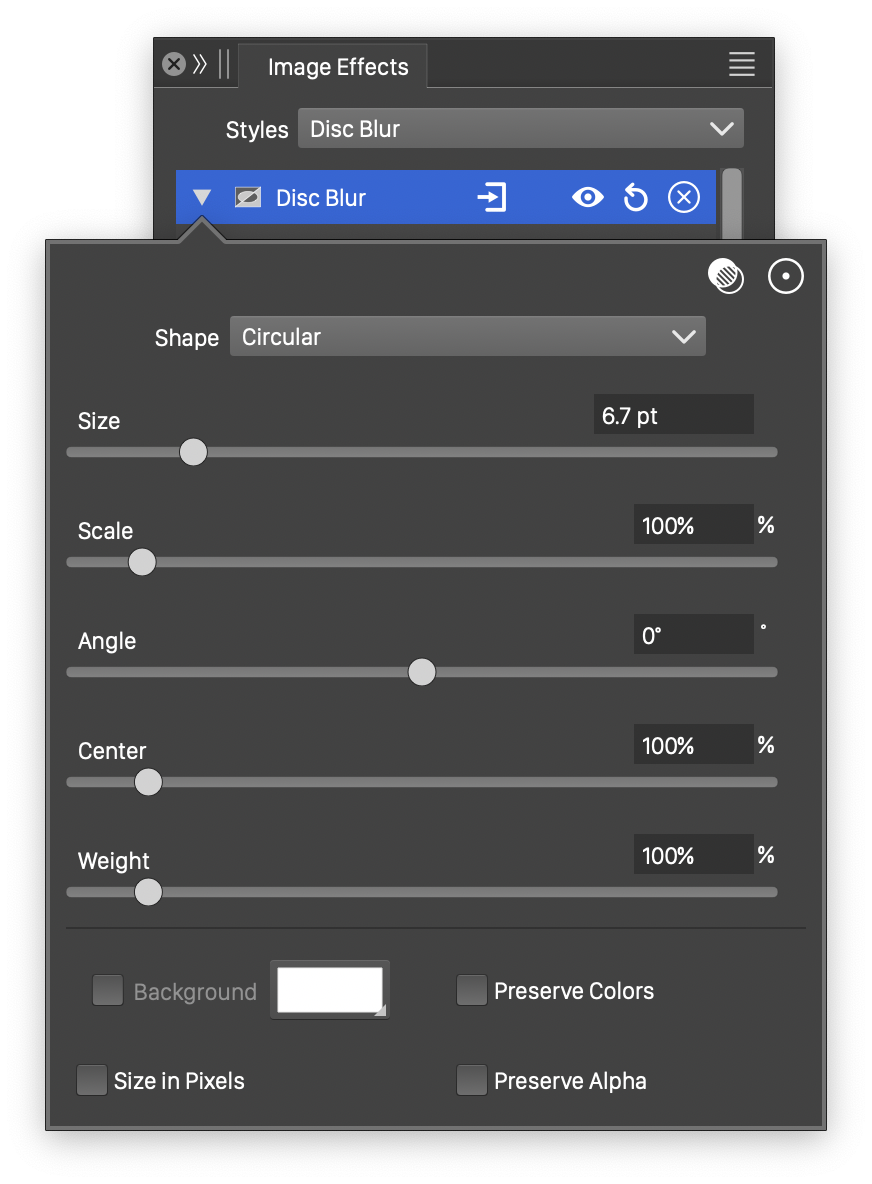
Advanced options of the Disc Blur effect.
The Disc Blur effect uses the following basic options:
- Shape - Set the shape of the disc blur region. By default, the shape is a circle. The Shape field opens a menu of shape styles and presets, and object names with the Shape role. The shape can be edited using the path editor, by clicking on the button in the icon section of the panel. Only single closed shapes are accepted.
- Size - Set the size of the blurring region.
The advanced options of the Disc Blur effect are available, by clicking on the button.
- Scale - Edit a vertical scaling of the blurring region.
- Angle - Set the rotation of the blurring shape.
- Center - Set the weight of the color at the center pixel of the blurring.
- Weight - Set the weight of the colors at the neighborhood of the pixel. Setting different center and neighborhood weights results in a non-uniform blurring.
- Background - Check to enable the use of a background color, when colors are preserved. The background color can be selected by clicking on the color preview box. The background color option is available and used only when the Preserve Colors option is enabled. In this case, only the alpha channel is blurred, allowing the use of a color to create a halo around the image.
- Size in Pixels - Enables the use of the blur size value as a pixel amount. The size is set in points, but if Size in Pixels is checked, the points will be treated as pixels.
- Preserve Colors - Enables the preserving of colors. If checked, the colors are not blurred, and a background color can be used to expand an image with a halo, caused by the blurred alpha channel.
- Preserve Alpha - Enables the preserving of the alpha channel. If checked, the alpha channel of the object is not blurred, resulting in sharp edges, but blurred content.
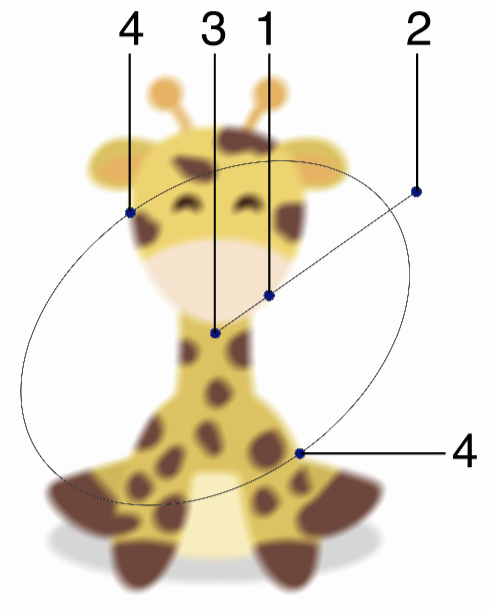
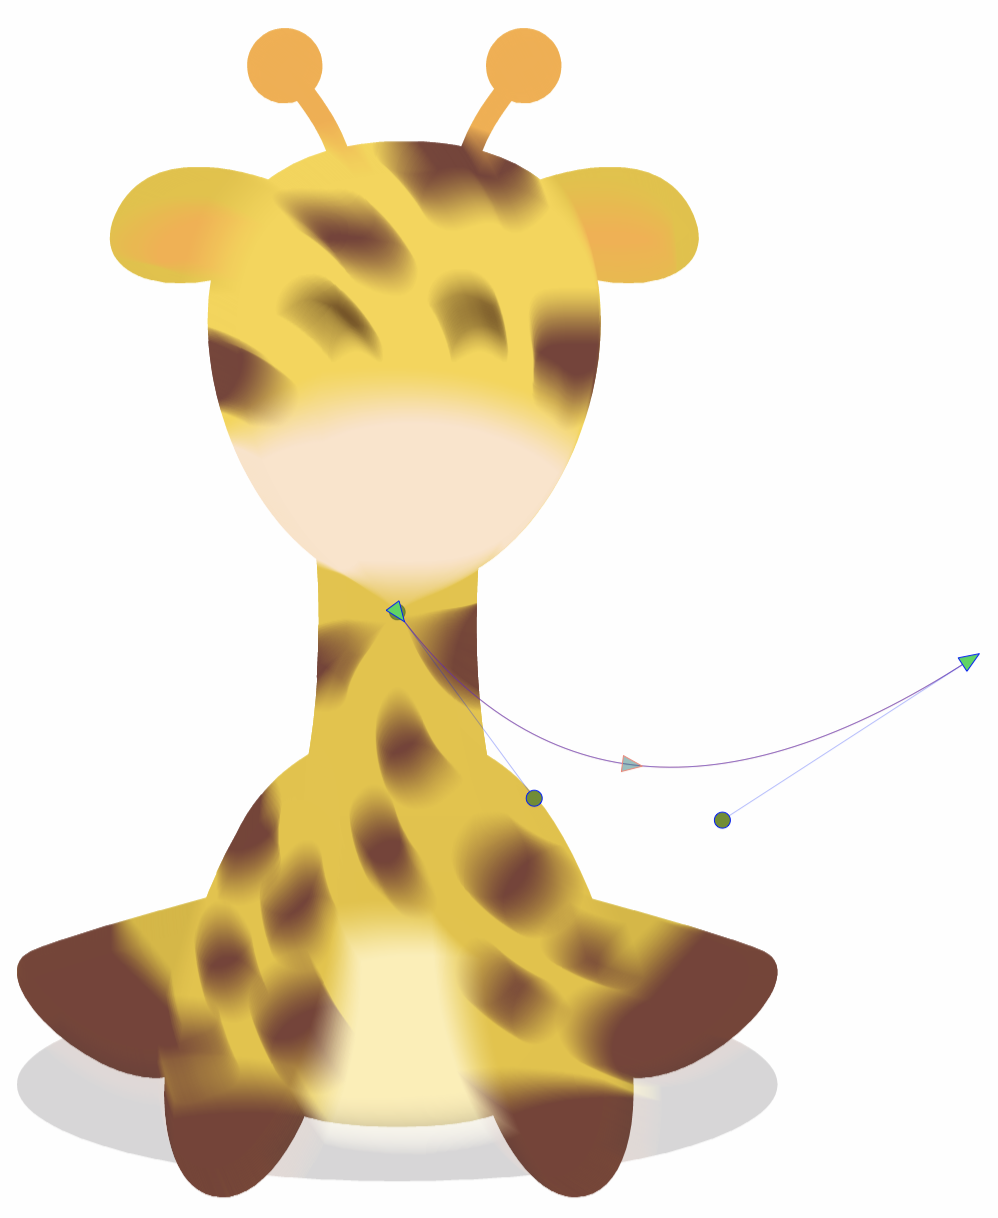
Interactive editing of the Disc Blur effect.
Interactive editing of the disc blur effect is done by dragging the handles to change an attribute value:
- (1) - Adjust the strength of the disc blur, by dragging this handle away or towards the center.
- (2) - Adjust the rotation of the disc blur shape, by dragging this handle around the center.
- (3) - Adjust the center of the disc blur effect.
- (4) - Adjust the vertical scaling of the disc blur shape.
The disc blur shape can be edited as regular a path using the secondary image effect tool from the icon section of the panel. When the secondary image effect tool is active, the disc blur shape nodes are shown and can be adjusted using regular path editing commands.
Editing the shape of the Disc Blur effect.
Field Blur
The Field Blur image effect blurs images along open shapes freely positioned around the image. Field Blur is similar to the Cone Blur, but instead of having a common center, the open shapes can be located anywhere on the blurred image. The local blur direction is determined by the direction of the shapes.
Using the advanced options, it is possible to setup multiple field blur shapes, to locally control the blur direction. Noise can be used to locally control the blur strength. The blurring strength may also vary along the shapes and can be adjusted locally at any point.
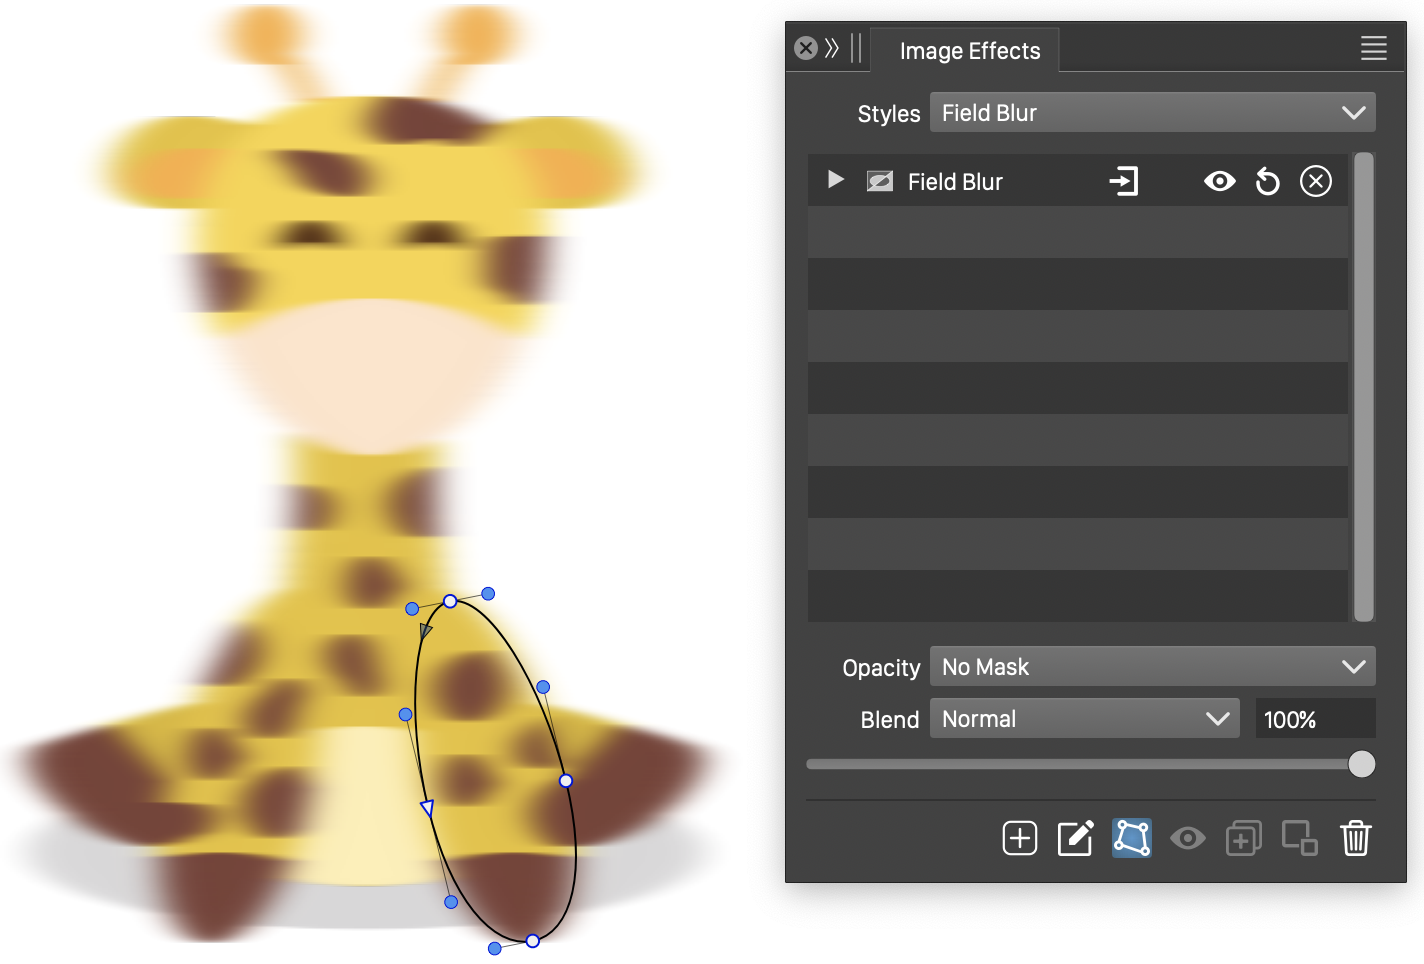
The Field Blur effect, with basic options.
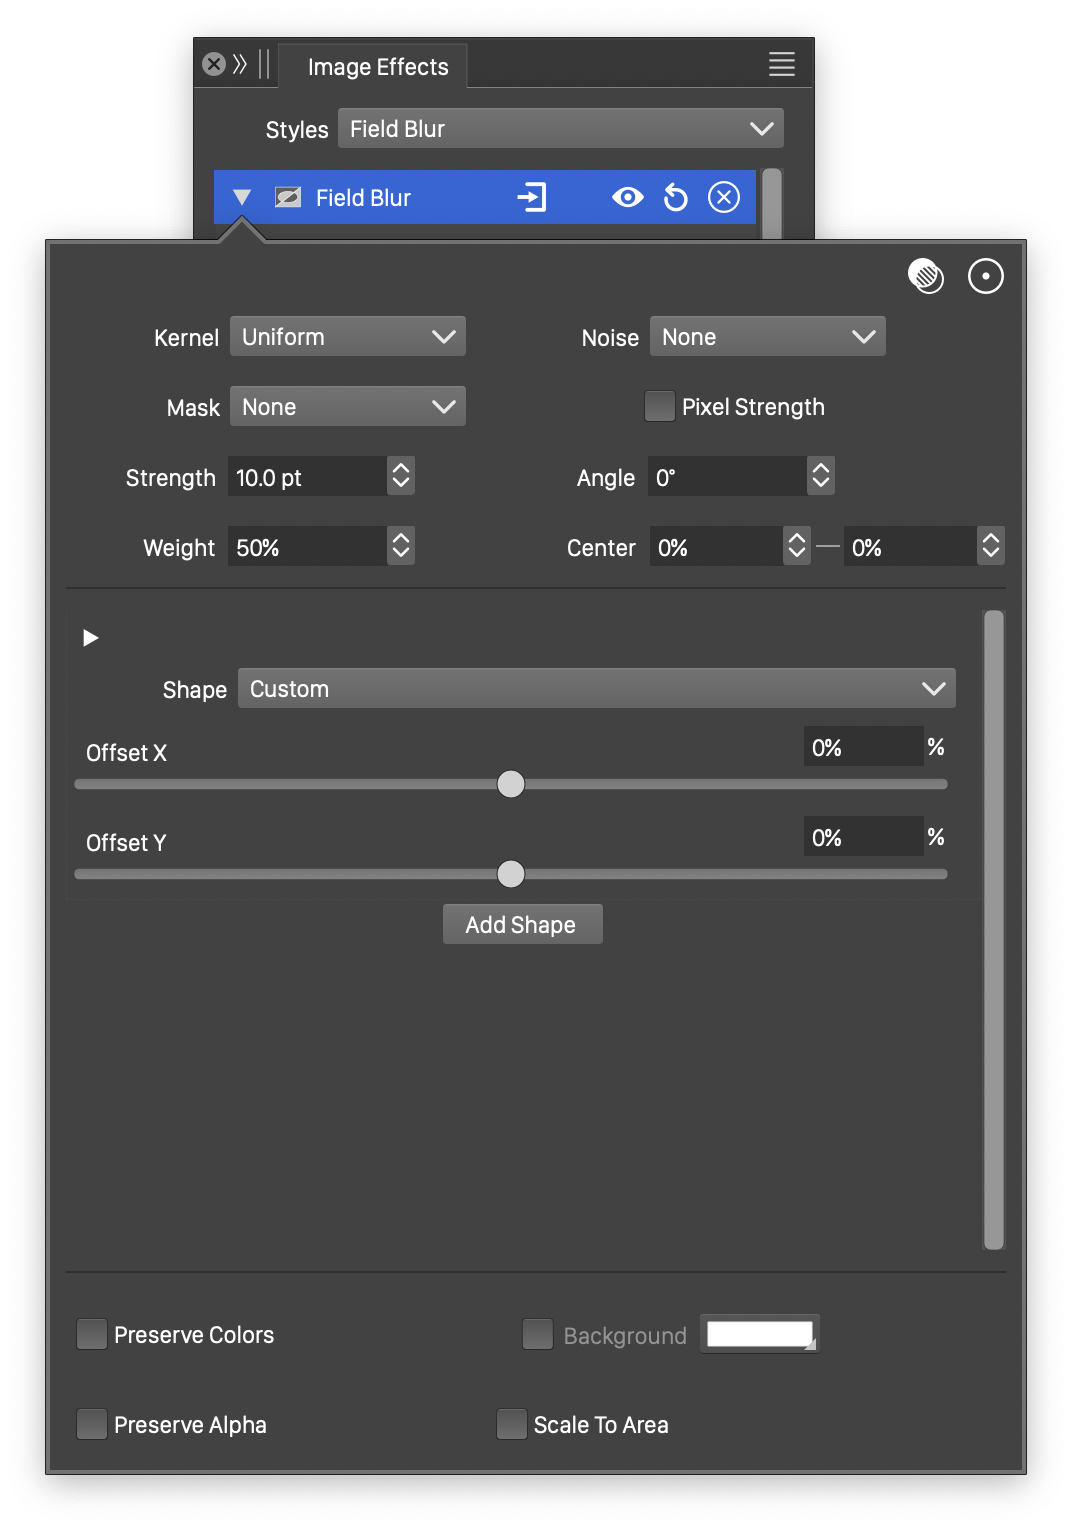
Advanced options of the Field Blur effect.
The Field Blur effect uses the following basic options:
- Strength - Set the strength of blurring along the shapes.
- Angle - Set the rotation of the shapes around the field blur center.
- Weight - Set the weight factor used to determine the blur direction from distances to multiple field blur shapes.
- Preserve Alpha - Enables the preserving of the alpha channel. If checked, the alpha channel of the object is not blurred, resulting in sharp edges, but blurred content.
The advanced options of the Field Blur effect are available, by clicking on the button.
- Kernel - Select the pixel averaging mode (blur kernel) used in the field blur. The kernel type determines whether pixels are smoothed, sharpened or edges are highlighted. The following options are available:
- Uniform - Uniform averaging of colors.
- Edge - Detect edges along the field blur shapes.
- Gaussian - Smooth pixel colors using the Gaussian kernel, emphasizing the immediate neighborhood of the pixel.
- Gaussian Edge - Detect edges along the field blur shapes, emphasizing immediate neighborhood of the pixel.
- Sharpen - Sharpen pixel colors relative to the neighboring colors.
- Noise - Select the noise style from the list of predefined noise types, or user defined noise presets and styles. The noise is used to locally control the blur strength. To browse randomly generated synthetic noise styles, select the Browse Styles command. To edit the noise attributes, select the Edit Noise command. Selecting noise is described with more detail in the Noise chapter.
- Mask - Select a transparency mask controlling the blurring strength locally. The transparency mask is aligned with the filtered object, and the mask intensities are used to adjust the blur strength. The masking options are the same as described in the Transparency chapter.
- Center X and Center Y - Set the center of the field blur, relative to the object frame. The center can also be adjusted visually using the primary image effect editor tool.
- Background - Check to enable the use of a background color, when colors are preserved. The background color can be selected by clicking on the color preview box. The background color option is available and used only when the Preserve Colors option is enabled. In this case, only the alpha channel is blurred, allowing the use of a color to create a halo around the image.
- Scale To Area - Enables the scaling of the shape to fit into the radius of the blurred area.
- Pixel Strength - Enables the use of pixels to set the blur strength values. The strength is set in points, but if Pixel Strength is checked, the points will be treated as pixels.
- Preserve Colors - Enables the preserving of colors. If checked, the colors are not blurred, and a background color can be used to expand an image with a halo, caused by the blurred alpha channel.
Interactive editing of the Field Blur effect.
The field blur may use one or more open shapes to set the blur direction from the center, at various angle. Each shape can be associated with a number of blurring strength locations along the shape.
The list of shapes and blurring strengths are shown in advanced editing mode.
-
The
button is used to open or close the list of blur strength adjustments of a shape. -
The
button is used to remove a shape or a blur strength location. -
Shape - Select a shape for the active field blur shape. The Shape field opens a menu of shape styles and presets, and object names with the Shape role. The shape can be edited using the path editor, by clicking on the
button in the icon section of the panel. Only single open shapes are accepted. -
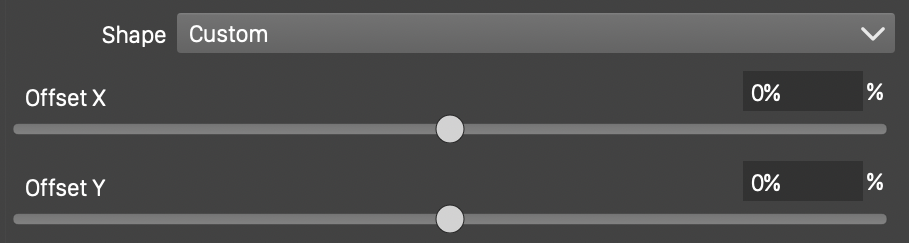
Offset X and Offset Y - Set the starting point of the field blur shape, relative to the blur center and blur region extent.
-
Scale Location - Set the blurring strength location, along the field blur shape.
-
Blur Strength - Adjust the blur strength at the shape location.
-
Add Scaling - Add a new blur strength scaling location to the shape.
-
Add Shape - Add a new field blur shape to the blur options.
The blur strength scaling and locations can also be adjusted using the primary image effect editor tool.
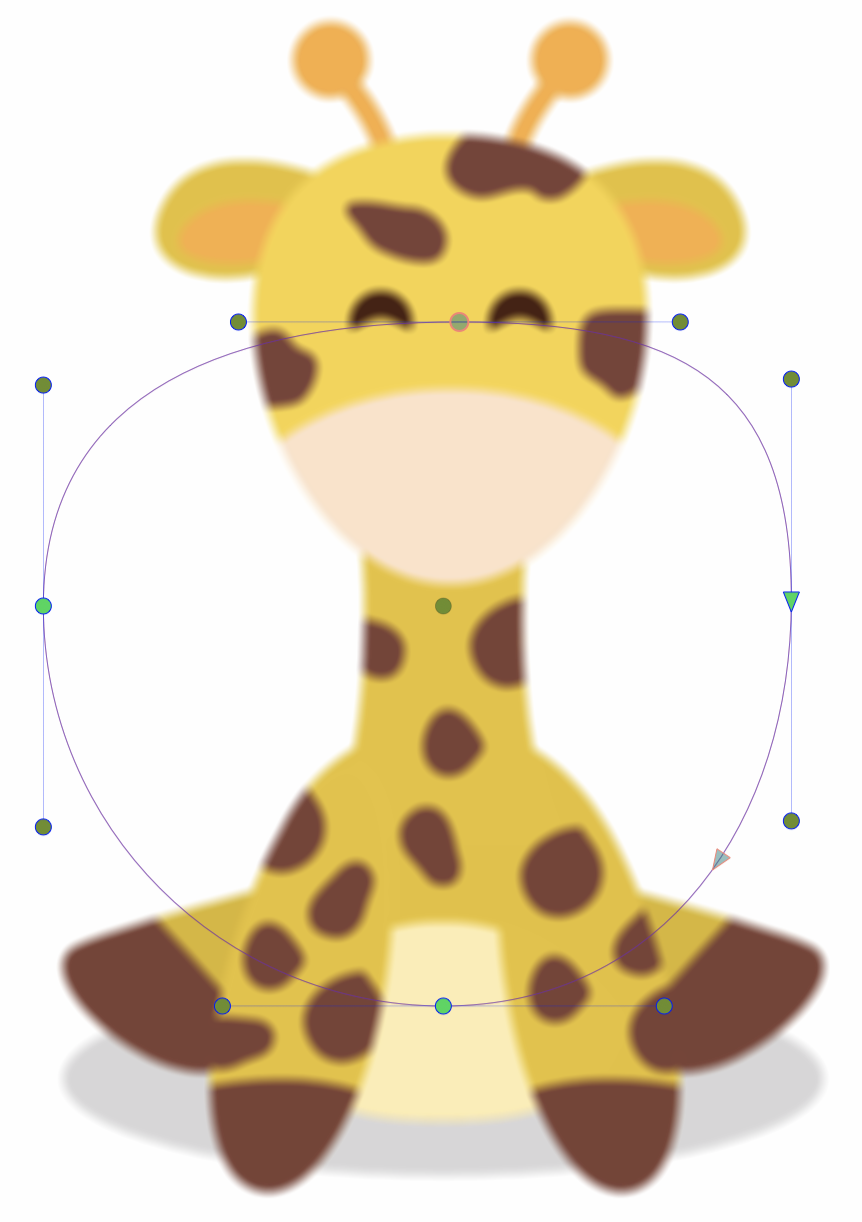
The button from the Image Effects panel, activates the image effect tool used to interactively edit the field blur effect attributes.
Selecting a field blur shape.
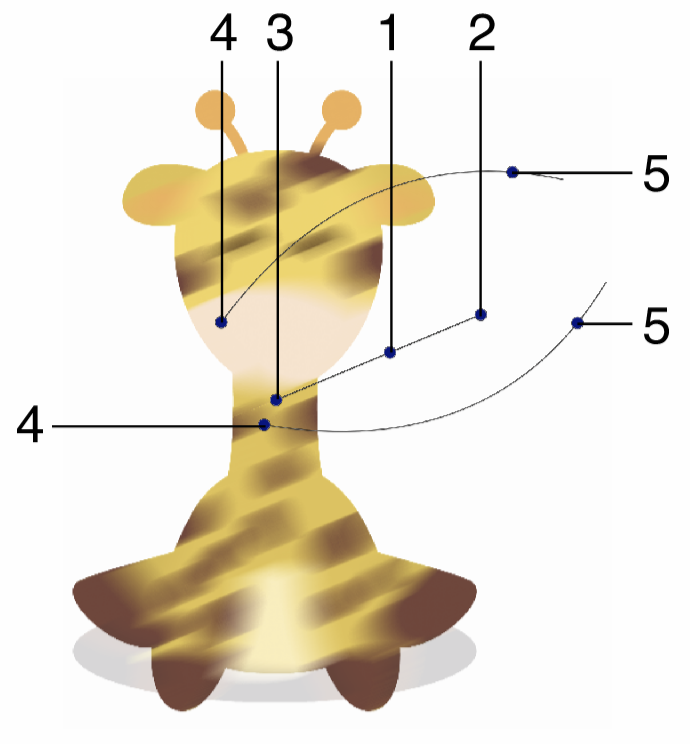
Interactive editing of the field blur effect is done by dragging the handles to change an attribute value:
- (1) - Set the strength of the field blur, by dragging this handle away or towards the center.
- (2) - Set the rotation of the field blur region, by dragging this handle around the center.
- (3) - Set the center of the field blur effect.
- (4) - Set the position of the field blur shape.
- (5) - Move the blur strength location along the shape.
Double clicking a blur direction shape node (2), opens the blur shape selector view. There can be multiple shapes at different angles arranged around the center. Each shape is positioned at an angle, and determines the blurring direction. the following options are available when selecting a field blur shape.
- Shape - Set a shape used in the field blur.
- Offset X and Offset Y - Set the starting point of the field blur shape, relative to the blur center and blur region extent.
Editing the location and scale of a blur strength adjustment.
Double clicking a blur strength node (4), opens the blur strength position and scale editor view. Adjust the scale and location of the selected node using the sliders and numeric editors:
- Scale Location - Set the blurring strength location, along the field shape, of the selected node.
- Blur Strength - Adjust the blur strength at the shape location, of the selected node.
The field blur shapes can be edited as regular paths using the secondary image effect tool from the icon section of the panel. When the secondary image effect tool is active, the field blur shape nodes are shown and can be adjusted using regular path editing commands.
Editing the shapes of the Field Blur effect.
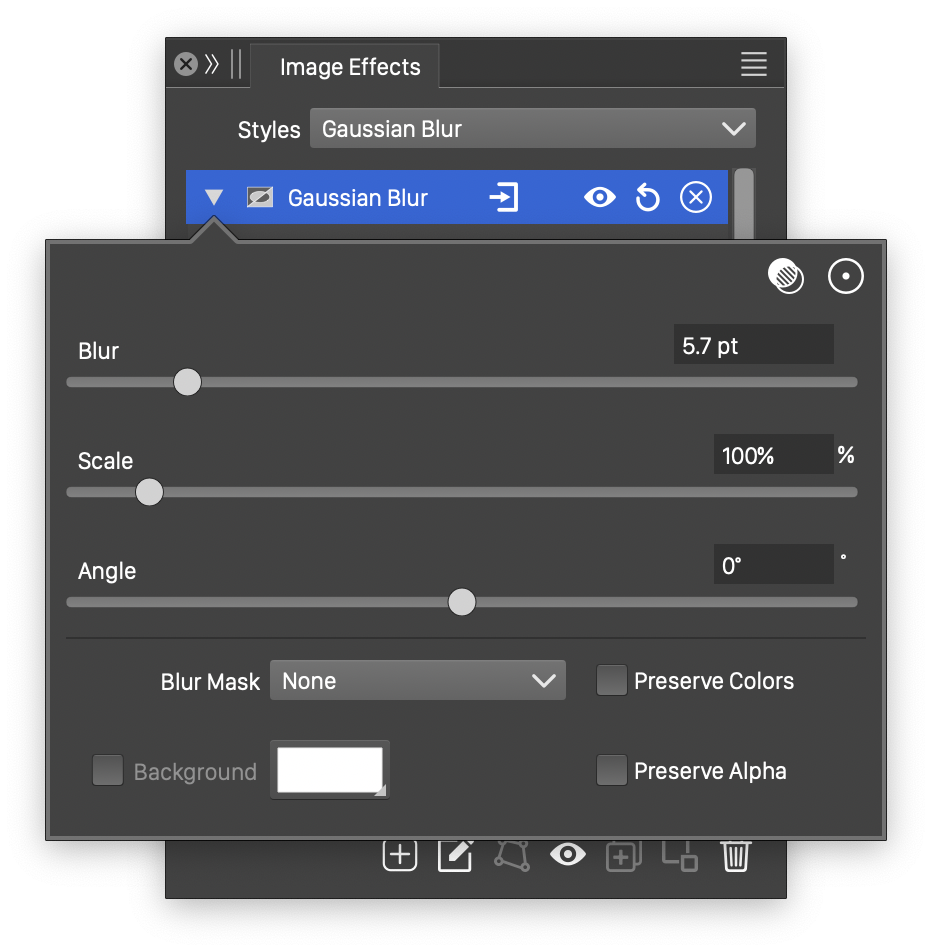
Gaussian Blur
The Gaussian Blur effect is the most common blur effect used to smooth images and edges. In the Gaussian Blur a circular region is used to smooth pixel colors, emphasizing pixels closer to the center.
The Gaussian Blur region can be stretched and rotated to create elliptical blur regions.
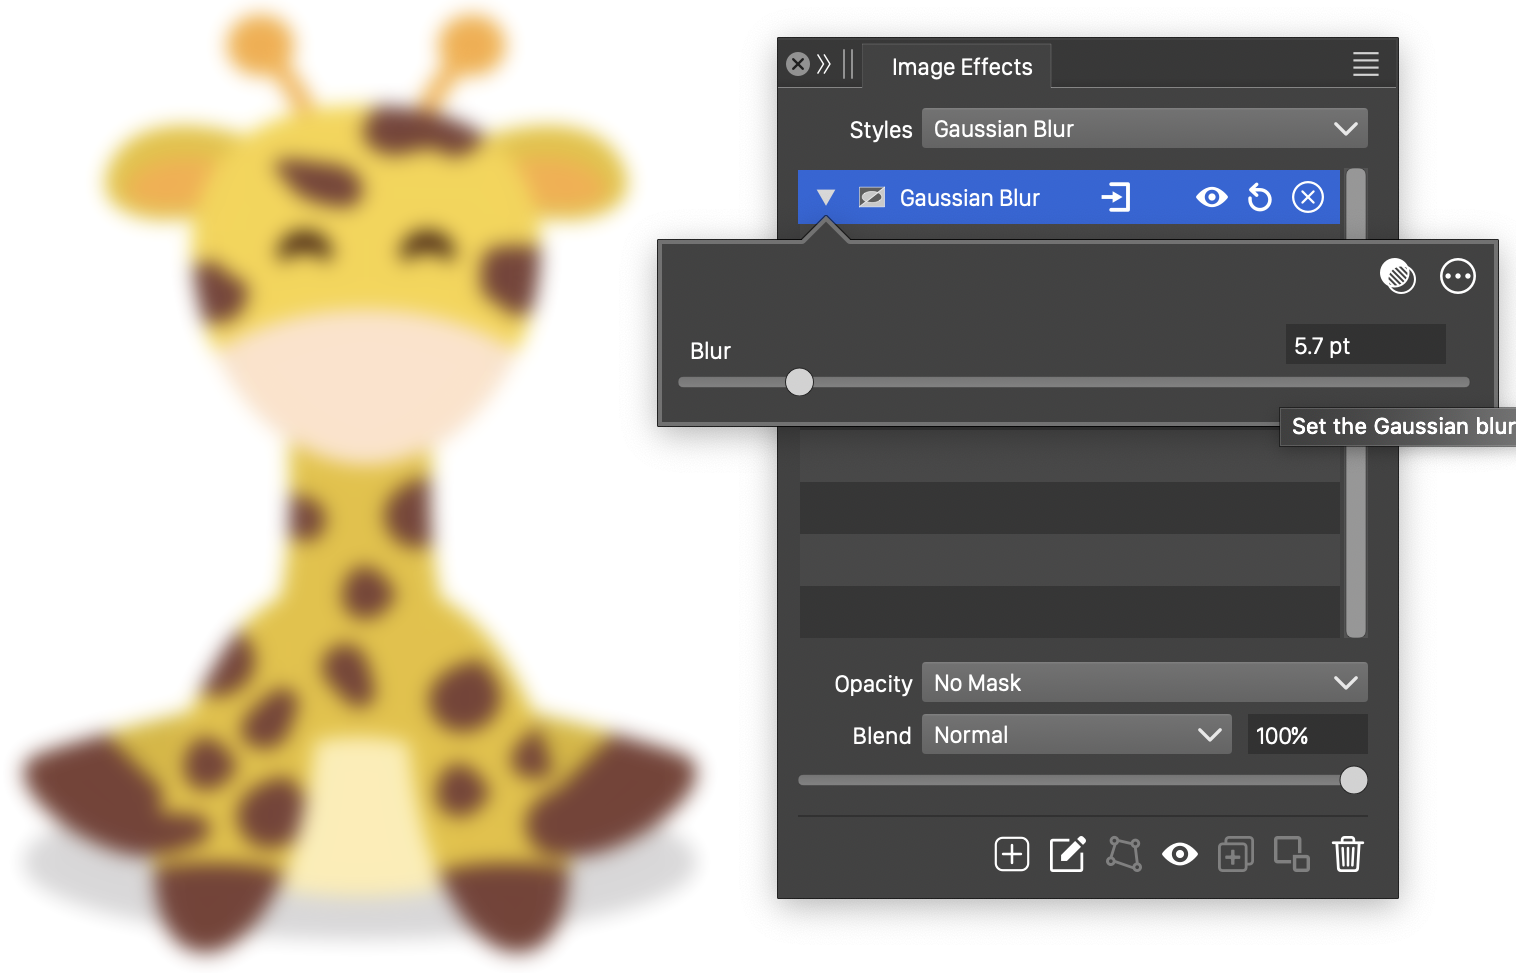
The Gaussian Blur effect, with basic options.
Advanced options of the Gaussian Blur effect.
The Gaussian Blur effect uses the following basic options:
- Amount - Set the extent of the Gaussian blur.
The advanced options of the Gaussian Blur effect are available, by clicking on the button.
- Scale - Set the vertical stretching of the blurring region.
- Angle - Set the rotation of the Gaussian blur region.
- Mask - Select a transparency mask controlling the blurring strength locally. The transparency mask is aligned with the filtered object, and the mask intensities are used to adjust the blur strength. The masking options are the same as described in the Transparency chapter.
- Background - Check to enable the use of a background color, when colors are preserved. The background color can be selected by clicking on the color preview box. The background color option is available and used only when the Preserve Colors option is enabled. In this case, only the alpha channel is blurred, allowing the use of a color to create a halo around the image.
- Preserve Colors - Enables the preserving of colors. If checked, the colors are not blurred, and a background color can be used to expand an image with a halo, caused by the blurred alpha channel.
- Preserve Alpha - Enables the preserving of the alpha channel. If checked, the alpha channel of the object is not blurred, resulting in sharp edges, but blurred content.
The button from the Image Effects panel, activates the image effect tool used to interactively edit the Gaussian Blur effect attributes.
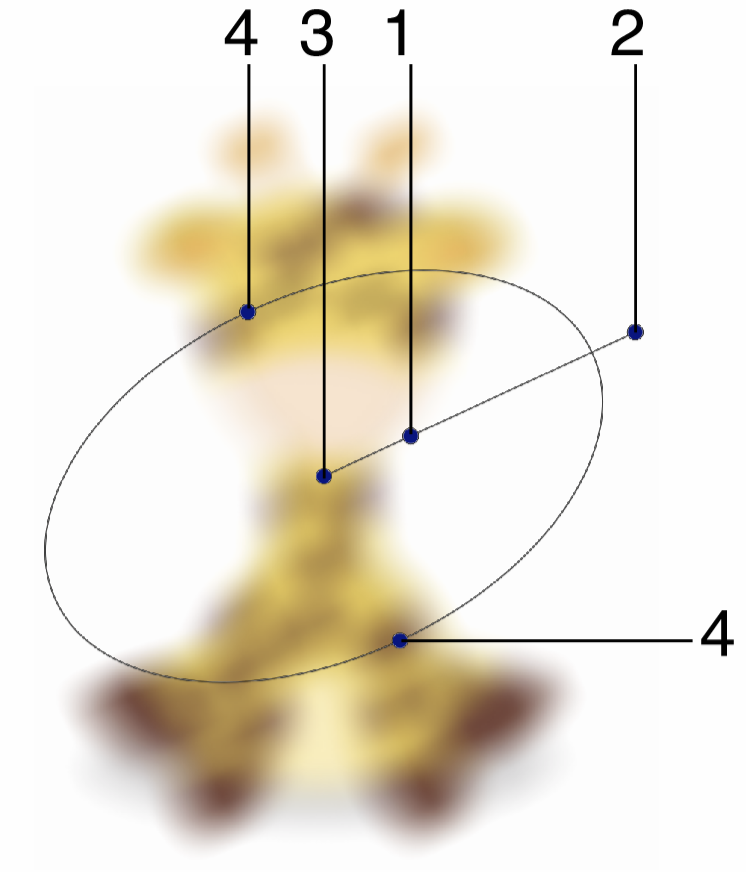
Interactive editing of the Gaussian Blur effect.
Interactive editing of the Gaussian Blur effect is done by dragging the handles to change an attribute value:
- (1) - Set the strength of the Gaussian blur, by dragging this handle away or towards the center.
- (2) - Set the rotation of the Gaussian blur region, by dragging this handle around the center.
- (3) - Set the center of the Gaussian blur effect.
- (4) - Set the vertical stretching of the Gaussian blur, resulting in an elliptical region.
Motion Blur
The Motion Blur effect blurs the image along a single straight direction. The direction of the Motion Blur can be adjusted interactively using the image effect editor.
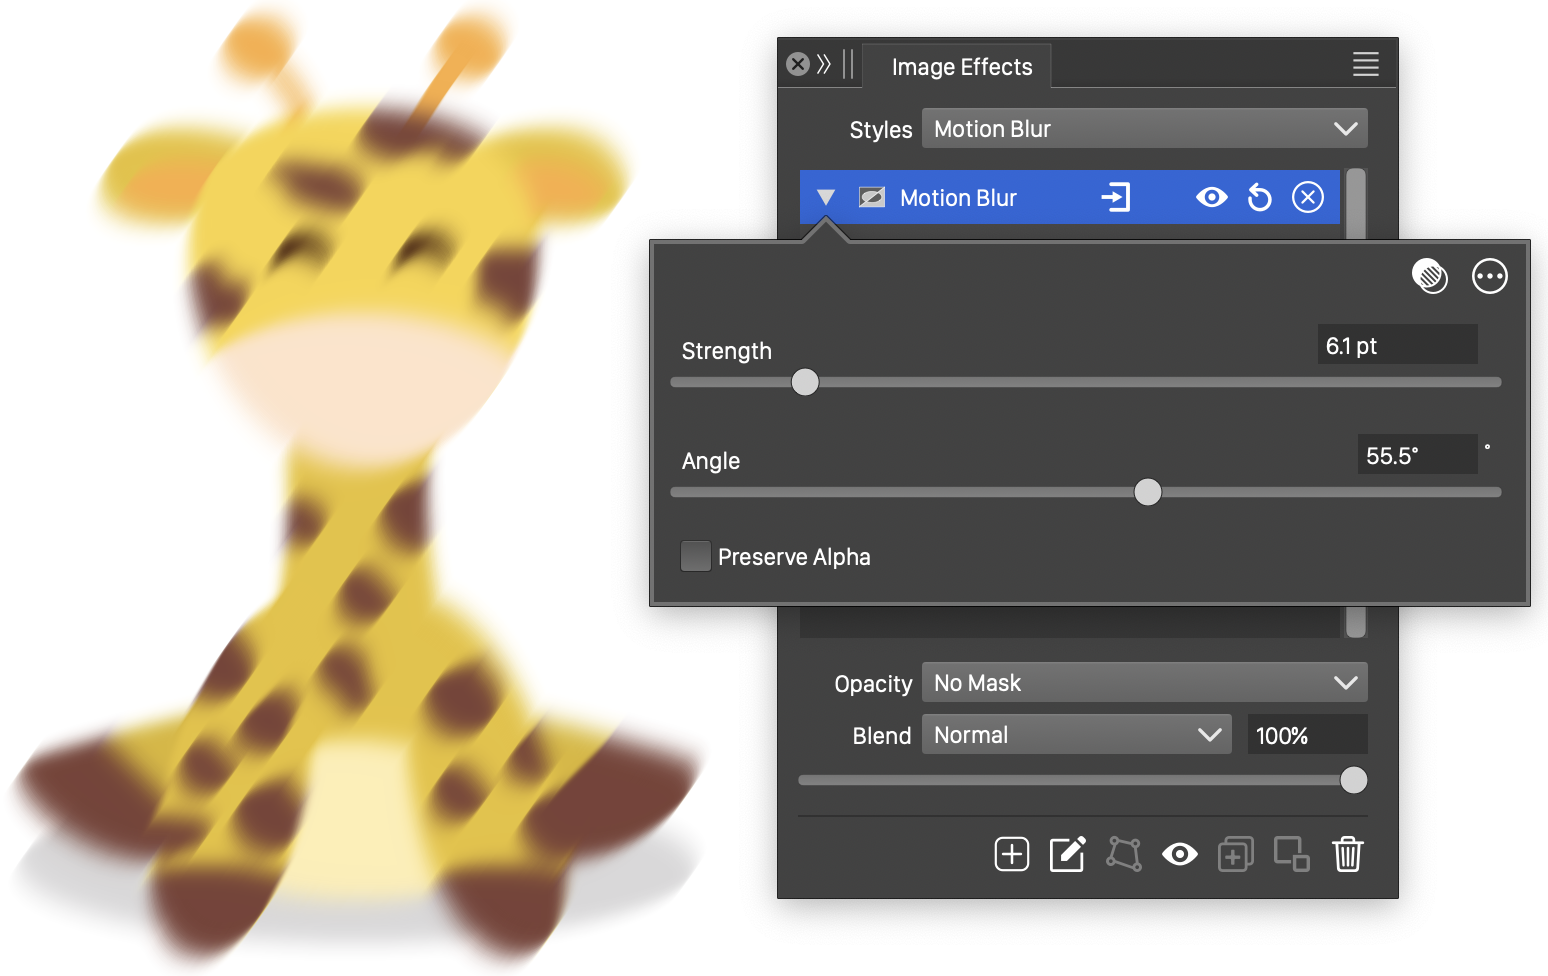
The Motion Blur effect, with basic options.

Advanced options of the Motion Blur effect.
The Motion Blur effect uses the following basic options:
- Strength - Set the strength of the motion blur.
- Angle - Set the direction of the motion blur.
- Preserve Alpha - Enables the preserving of the alpha channel. If checked, the alpha channel of the object is not blurred, resulting in sharp edges, but blurred content.
The advanced options of the Motion Blur effect are available, by clicking on the button.
- Kernel - Select the pixel averaging mode (blur kernel) used in the motion blur. The kernel type determines whether pixels are smoothed, sharpened or edges are highlighted. The following options are available:
- Uniform - Uniform averaging of colors.
- Edge - Detect edges along the motion blur direction.
- Gaussian - Smooth pixel colors using the Gaussian kernel, emphasizing the immediate neighborhood of the pixel.
- Gaussian Edge - Detect edges along the motion blur direction, emphasizing immediate neighborhood of the pixel.
- Sharpen - Sharpen pixel colors relative to the neighboring colors.
- Noise - Select the noise style from the list of predefined noise types, or user defined noise presets and styles. The noise is used to locally control the motion blur strength. To browse randomly generated synthetic noise styles, select the Browse Styles command. To edit the noise attributes, select the Edit Noise command. Selecting noise is described with more detail in the Noise chapter.
- Mask - Select a transparency mask controlling the motion blur strength locally. The transparency mask is aligned with the filtered object, and the mask intensities are used to adjust the blur strength. The masking options are the same as described in the Transparency chapter.
- Angle Mask - Select a mask adding variations to the motion blur direction. The transparency mask is aligned with the filtered object, and the mask intensities are used to adjust the blur direction. The masking options are the same as described in the Transparency chapter.
- Angle Extent - Set the amount of variation in the motion blur direction, if an Angle Mask is selected.
- Background - Check to enable the use of a background color, when colors are preserved. The background color can be selected by clicking on the color preview box. The background color option is available and used only when the Preserve Colors option is enabled. In this case, only the alpha channel is blurred, allowing the use of a color to create a halo around the image.
- Pixel Strength - Enables the use of pixels to set the blur strength values. The strength is set in points, but if Pixel Strength is checked, the points will be treated as pixels.
- Preserve Colors - Enables the preserving of colors. If checked, the colors are not blurred, and a background color can be used to expand an image with a halo, caused by the blurred alpha channel.
The button from the Image Effects panel, activates the image effect tool used to interactively edit the motion blur effect attributes.
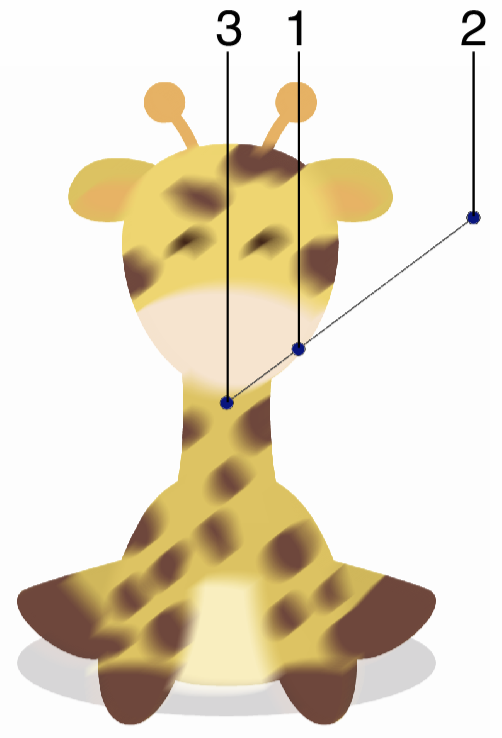
Interactive editing of the Motion Blur effect.
Interactive editing of the motion blur effect is done by dragging the handles to change an attribute value:
- (1) - Adjust the strength of the motion blur, by dragging this handle away or towards the center.
- (2) - Adjust the direction of the motion blur region, by dragging this handle around the center.
- (3) - Set the center of the motion blur effect. This has no impact on the effect appearance, only in the mode of controlling the effect.
Noise Blur
The Noise Blur effect blurs the image in varying directions, controlled by a synthetic noise. The direction and strength of the blurring is determined by local tone intensities in a user selected noise.
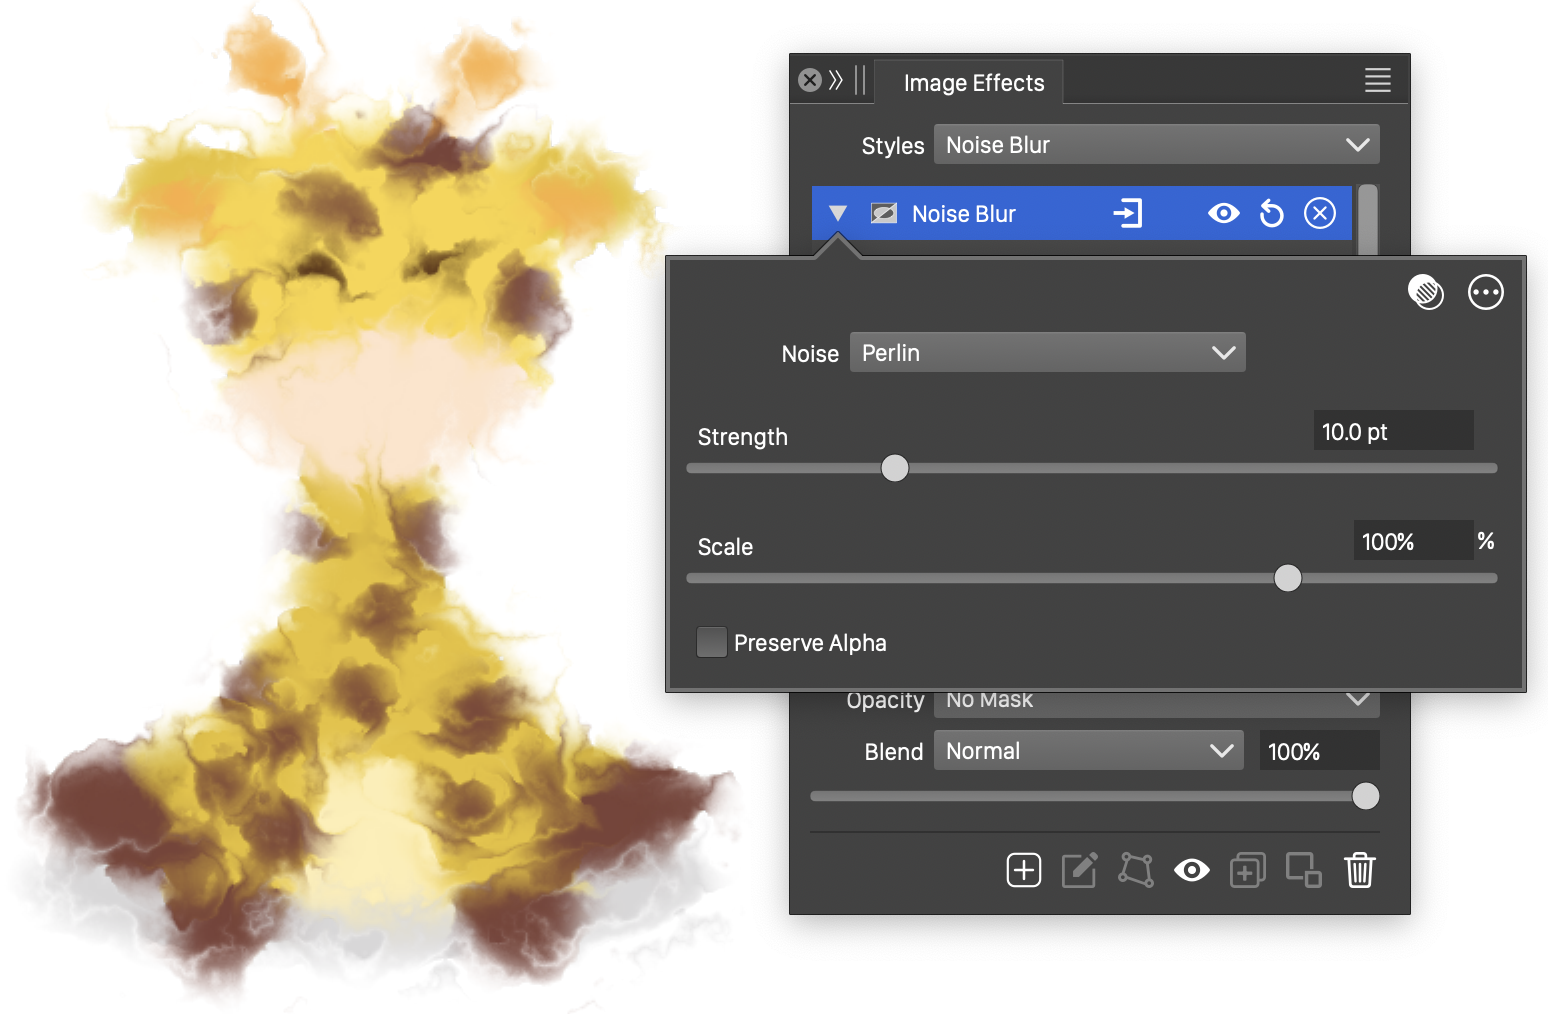
The Noise Blur effect, with basic options.
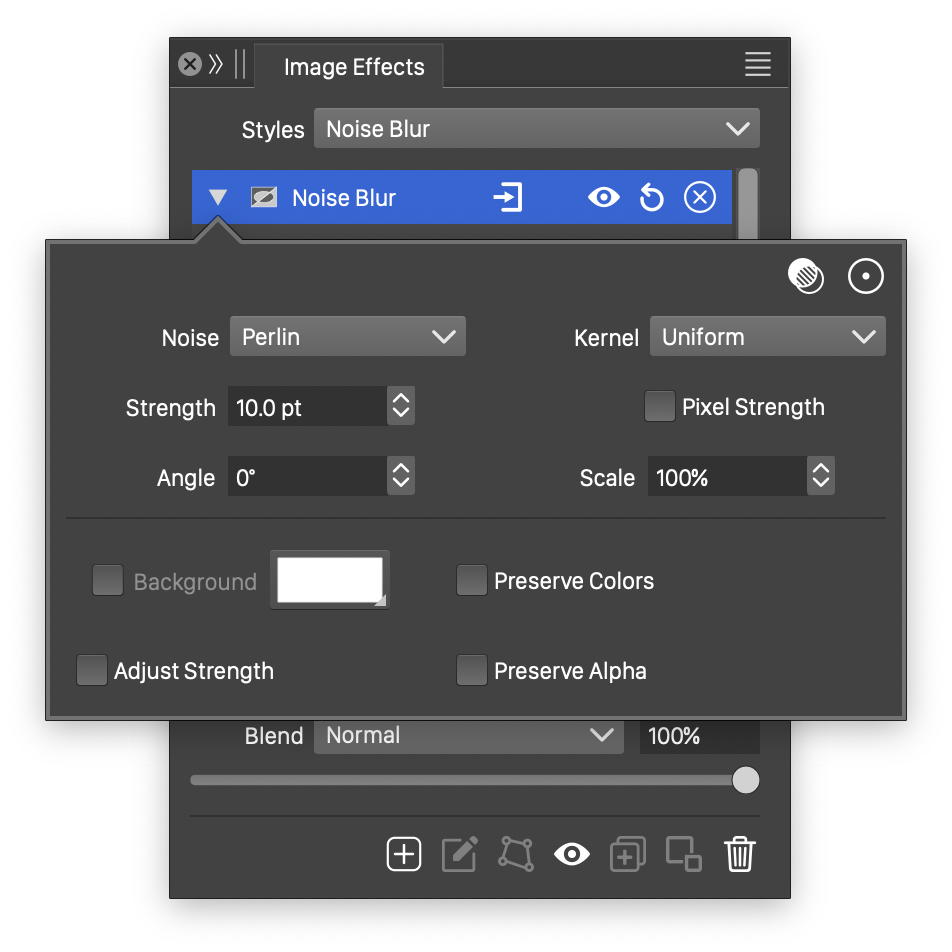
Advanced options of the Noise Blur effect.
The Noise Blur effect uses the following basic options:
- Noise - Select the noise style from the list of predefined noise types, or user defined noise presets and styles. The noise is used to locally control the blur direction and optionally the blur strength. To browse randomly generated synthetic noise styles, select the Browse Styles command. To edit the noise attributes, select the Edit Noise command. Selecting noise is described with more detail in the Noise chapter.
- Strength - Set the strength of the noise blur.
- Scale - Set the amount of noise allowed to adjust the blur direction.
- Preserve Alpha - Enables the preserving of the alpha channel. If checked, the alpha channel of the object is not blurred, resulting in sharp edges, but blurred content.
The advanced options of the Noise Blur effect are available, by clicking on the button.
- Kernel - Select the pixel averaging mode (blur kernel) used in the noise blur. The kernel type determines whether pixels are smoothed, sharpened or edges are highlighted. The following options are available:
- Uniform - Uniform averaging of colors.
- Edge - Detect edges along the noise blur direction.
- Gaussian - Smooth pixel colors using the Gaussian kernel, emphasizing the immediate neighborhood of the pixel.
- Gaussian Edge - Detect edges along the noise blur direction, emphasizing immediate neighborhood of the pixel.
- Sharpen - Sharpen pixel colors relative to the neighboring colors.
- Angle - Set the basis direction of the noise blur. This direction is used as a basis angle and adjusted by noise generated angles.
- Background - Check to enable the use of a background color, when colors are preserved. The background color can be selected by clicking on the color preview box. The background color option is available and used only when the Preserve Colors option is enabled. In this case, only the alpha channel is blurred, allowing the use of a color to create a halo around the image.
- Preserve Colors - Enables the preserving of colors. If checked, the colors are not blurred, and a background color can be used to expand an image with a halo, caused by the blurred alpha channel.
- Pixel Strength - Enables the use of pixels to set the blur strength values. The strength is set in points, but if Pixel Strength is checked, the points will be treated as pixels.
- Adjust Strength - Enables the adjustment of the blur strength by an additional channel of the selected noise.
Radial Blur
The Radial Blur image effect, blurs the pixel colors in a concentric direction around the center. The Radial Blur effect is similar to Concentric Blur, with the restriction that the shape of the blur direction is always circular or elliptic.
The elliptic region of the radial blur can be positioned, stretched and rotated interactively.
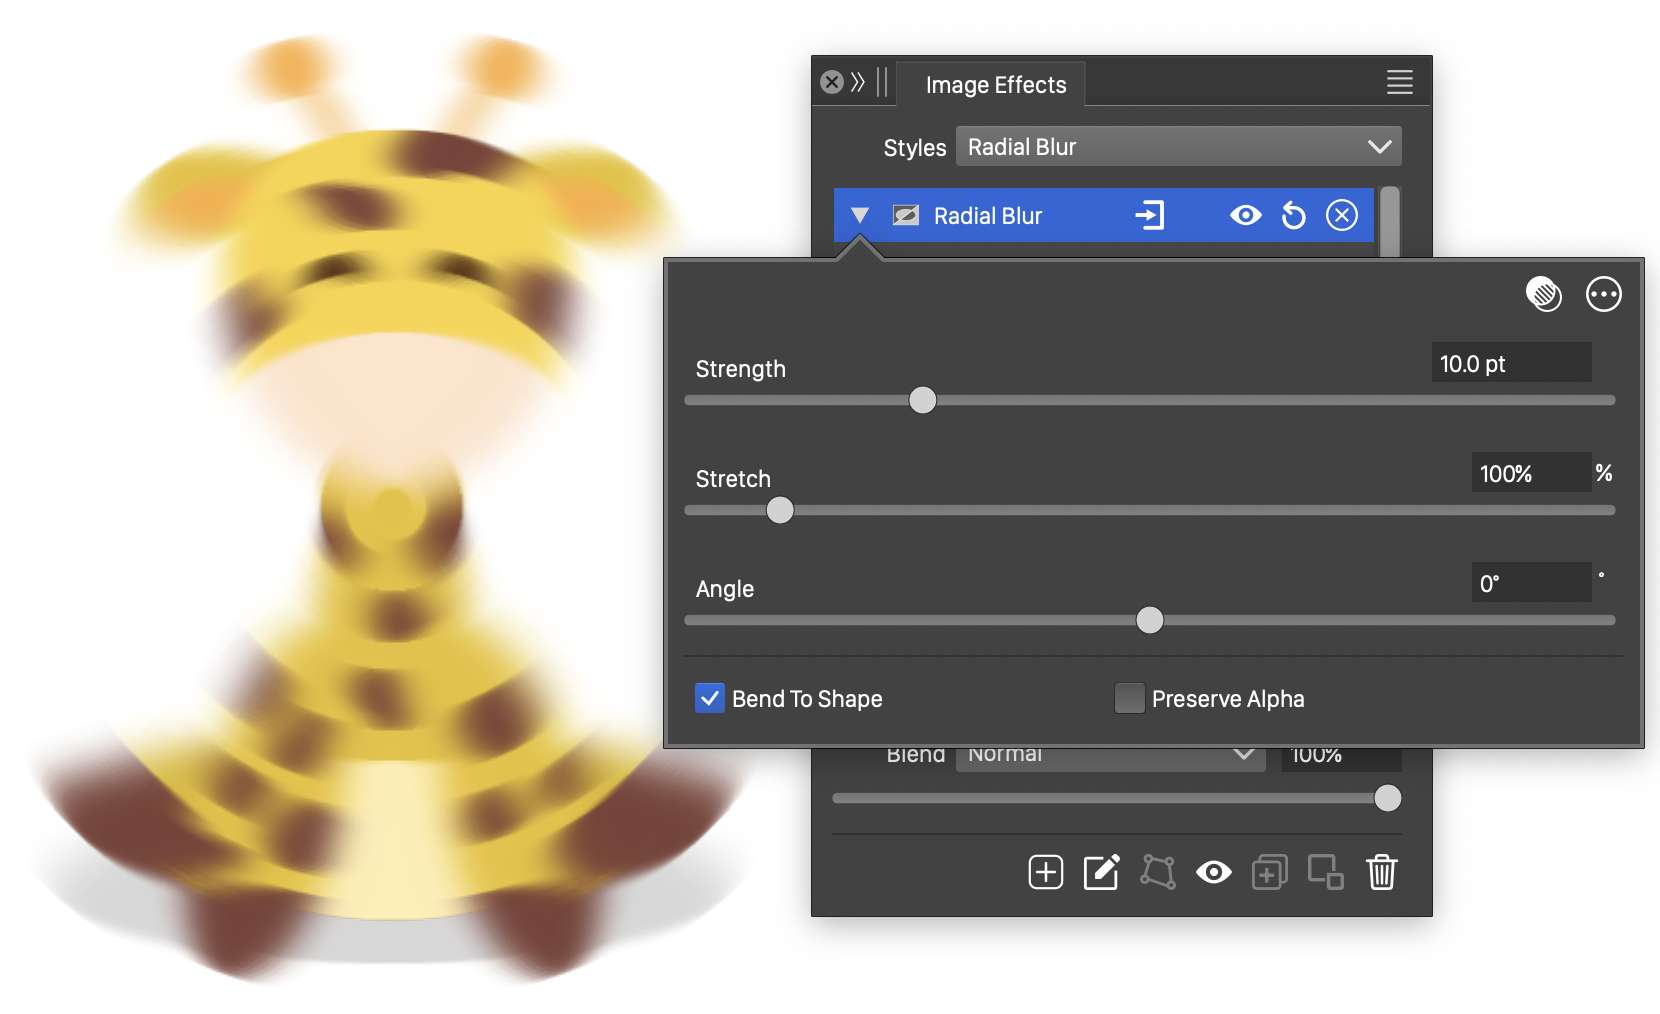
The Radial Blur effect, with basic options.

Advanced options of the Radial Blur effect.
The Radial Blur effect uses the following basic options:
- Strength - Set the strength of the radial blur effect.
- Stretch - Stretch the circular shape of the radial blur, to create an elliptic blur direction.
- Angle - Set the rotation angle of the elliptic blur shape.
- Bend To Shape - Enables the bending of the blurring direction along the shape. When enabled, pixel colors are determined by the neighboring pixels along the cone shape passing through the pixel. When disabled the neighborhood of a pixel is a straight line, tangent to the cone shape at the pixel.
- Preserve Alpha - Enables the preserving of the alpha channel. If checked, the alpha channel of the object is not blurred, resulting in sharp edges, but blurred content.
The advanced options of the Radial Blur effect are available, by clicking on the button.
- Kernel - Select the pixel averaging mode (blur kernel) used in the radial blur. The kernel type determines whether pixels are smoothed, sharpened or edges are highlighted. The following options are available:
- Uniform - Uniform averaging of colors.
- Edge - Detect edges along the radial blur direction.
- Gaussian - Smooth pixel colors using the Gaussian kernel, emphasizing the immediate neighborhood of the pixel.
- Gaussian Edge - Detect edges along the radial blur direction, emphasizing immediate neighborhood of the pixel.
- Sharpen - Sharpen pixel colors relative to the neighboring colors.
- Noise - Select the noise style from the list of predefined noise types, or user defined noise presets and styles. The noise is used to locally control the radial blur strength. To browse randomly generated synthetic noise styles, select the Browse Styles command. To edit the noise attributes, select the Edit Noise command. Selecting noise is described with more detail in the Noise chapter.
- Mask - Select a transparency mask controlling the radial blur strength locally. The transparency mask is aligned with the filtered object, and the mask intensities are used to adjust the blur strength. The masking options are the same as described in the Transparency chapter.
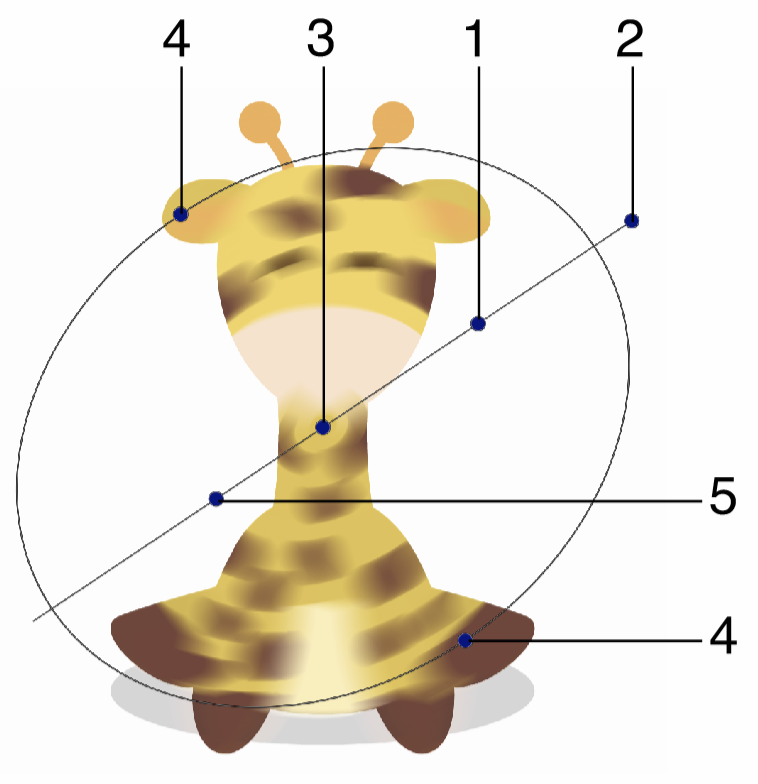
Interactive editing of the Radial Blur effect.
- Center X and Center Y - Set the center of the radial blur, relative to the object frame. The center can also be adjusted visually using the primary image effect editor tool.
- Background - Check to enable the use of a background color, when colors are preserved. The background color can be selected by clicking on the color preview box. The background color option is available and used only when the Preserve Colors option is enabled. In this case, only the alpha channel is blurred, allowing the use of a color to create a halo around the image.
- Pixel Strength - Enables the use of pixels to set the blur strength values. The strength is set in points, but if Pixel Strength is checked, the points will be treated as pixels.
- Preserve Colors - Enables the preserving of colors. If checked, the colors are not blurred, and a background color can be used to expand an image with a halo, caused by the blurred alpha channel.
The radial blur may use one or more blur strength locations, positioned at around the center, to adjust the blurring strength at that angle.
The list of blurring strengths are shown in advanced editing mode.
- Add Scale - Add a new blur strength scaling location.
- To remove a blur strength scaling, click on the button.
- Scale Location - Set the blurring strength location, along the axis, of the selected node.
- Blur Strength - Adjust the blur strength at the shape location, of the selected node.
The button from the Image Effects panel, activates the image effect tool used to interactively edit the radial blur effect attributes.
Interactive editing of the radial blur effect is done by dragging the handles to change an attribute value:
- (1) - Adjust the strength of the radial blur, by dragging this handle away or towards the center.
- (2) - Adjust the rotation of the radial blur region, by dragging this handle around the center.
- (3) - Adjust the center of the radial blur effect.
- (4) - Adjust the vertical stretching of the radial blur region, resulting in an elliptical region.
- (5) - Move the blur strength location along radial axis.
Editing the location and scale of a blur strength adjustment.
Double clicking a blur strength node (5), opens the blur strength position and scale editor view. Adjust the scale and location of the selected node using the sliders and numeric editors:
- Scale Location - Set the blurring strength location, along the axis, of the selected node.
- Blur Strength - Adjust the blur strength at the shape location, of the selected node.
Wave Blur
The Wave Blur image effect blurs images along open shapes positioned at an user defined angle. The Wave Blur is similar to the Motion Blur, but instead of following straight lines for blurring, here these lines can be modified to curves, bending the blur direction. The blur direction may be straight, tangential to the shape, or bent locally along the shape.
Using the advanced options, it is possible to setup multiple wave shapes, to locally control the blur direction. Noise can be used to locally control the blur strength. The blurring strength may also vary along the wave shapes and can be adjusted locally at any point.
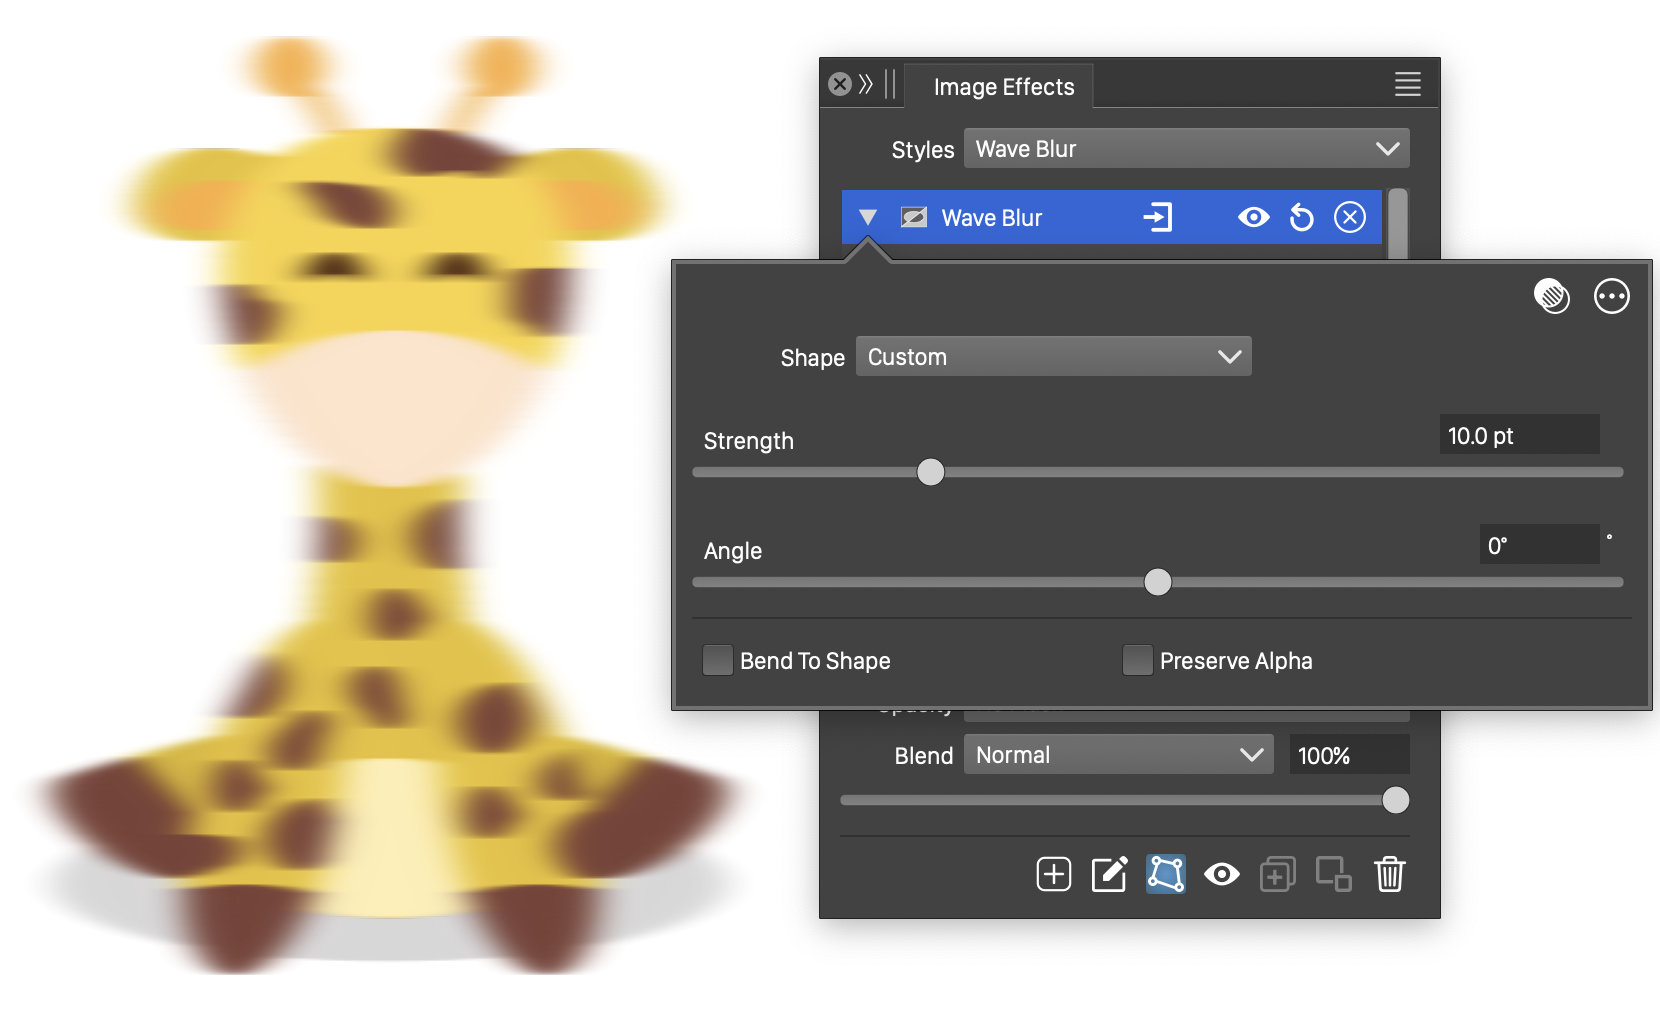
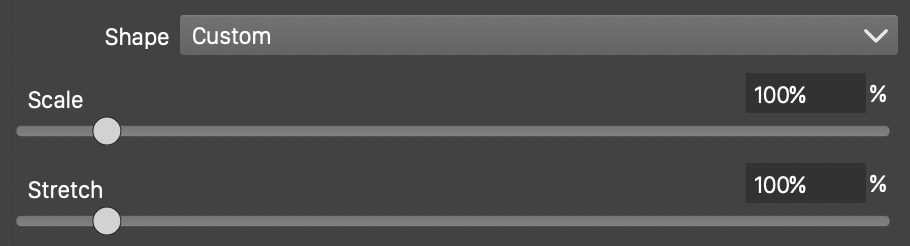
The Wave Blur effect, with basic options.
Advanced options of the Wave Blur effect.
The Wave Blur effect uses the following basic options:
- Shape - Set the primary shape of the wave blur. The Shape field opens a menu of shape styles and presets, and object names with the Shape role. The shape can be edited using the path editor, by clicking on the button in the icon section of the panel. Only single open shapes are accepted.
- Strength - Set the strength of blurring along the wave shapes.
- Angle - Set the rotation of the wave shapes around the center.
- Bend To Shape - Enables the bending of the blurring direction along the shape. When enabled, pixel colors are determined by the neighboring pixels along the wave shape passing through the pixel. When disabled the neighborhood of a pixel is a straight line, tangent to the wave shape at the pixel.
- Preserve Alpha - Enables the preserving of the alpha channel. If checked, the alpha channel of the object is not blurred, resulting in sharp edges, but blurred content.
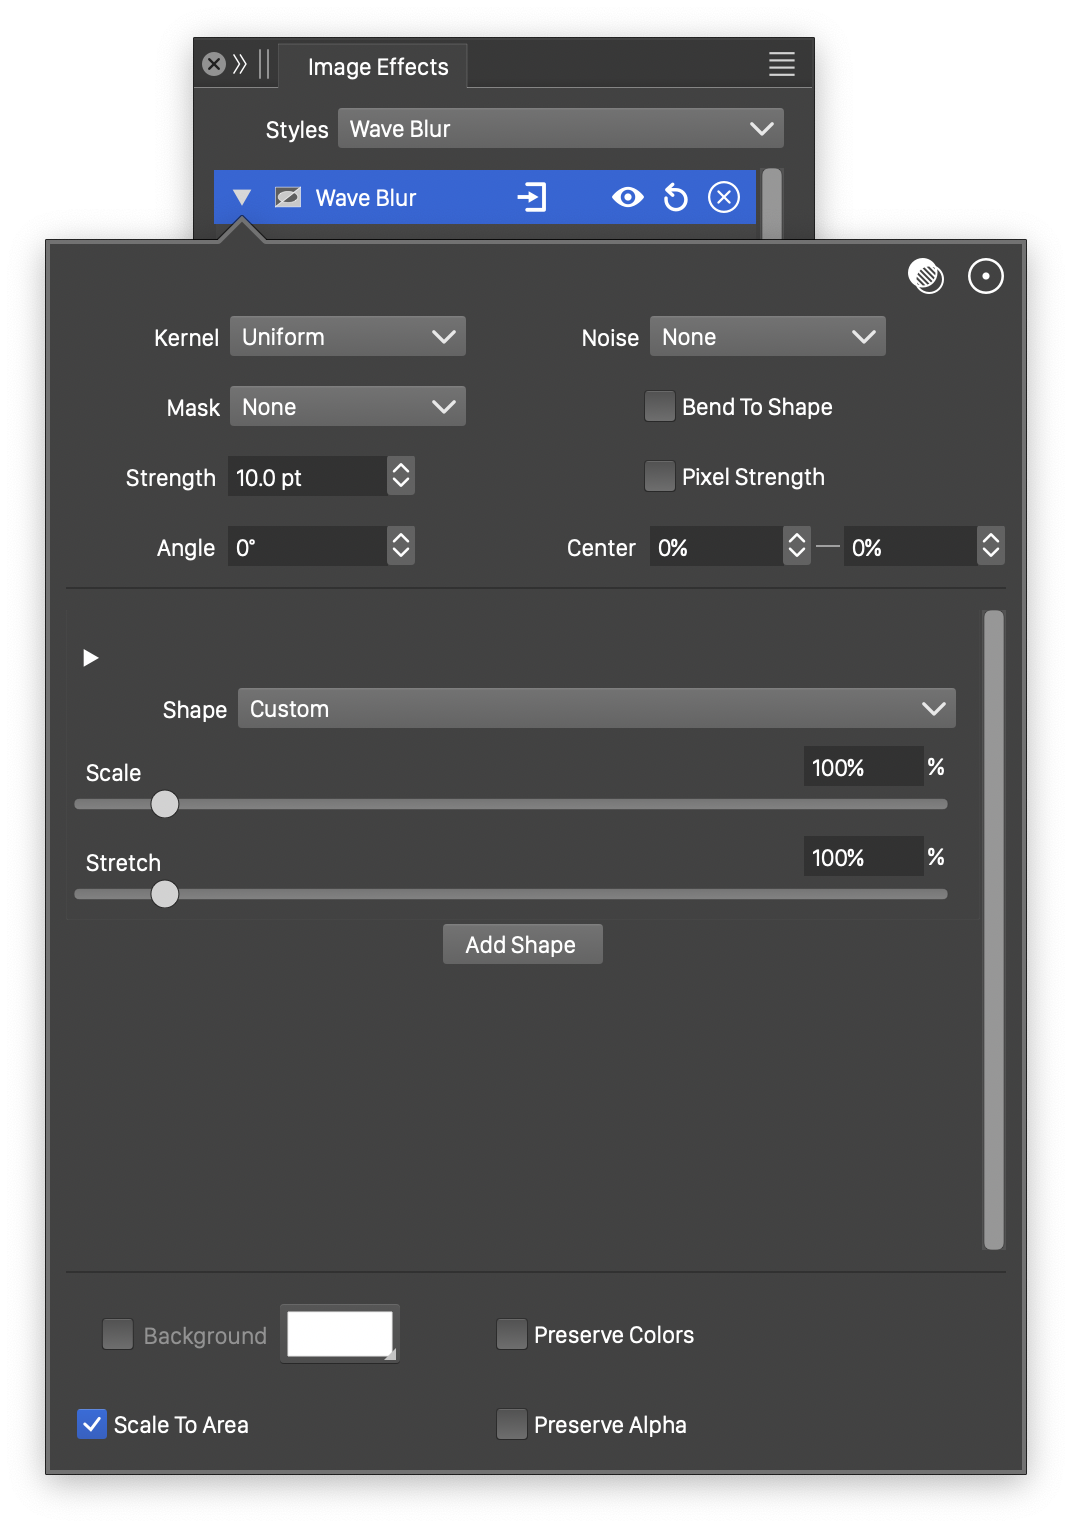
The advanced options of the Wave Blur effect are available, by clicking on the button.
- Kernel - Select the pixel averaging mode (blur kernel) used in the wave blur. The kernel type determines whether pixels are smoothed, sharpened or edges are highlighted. The following options are available:
- Uniform - Uniform averaging of colors.
- Edge - Detect edges along the wave blur shapes.
- Gaussian - Smooth pixel colors using the Gaussian kernel, emphasizing the immediate neighborhood of the pixel.
- Gaussian Edge - Detect edges along the wave blur shapes, emphasizing immediate neighborhood of the pixel.
- Sharpen - Sharpen pixel colors relative to the neighboring colors.
- Noise - Select the noise style from the list of predefined noise types, or user defined noise presets and styles. The noise is used to locally control the blur strength. To browse randomly generated synthetic noise styles, select the Browse Styles command. To edit the noise attributes, select the Edit Noise command. Selecting noise is described with more detail in the Noise chapter.
- Mask - Select a transparency mask controlling the blurring strength locally. The transparency mask is aligned with the filtered object, and the mask intensities are used to adjust the blur strength. The masking options are the same as described in the Transparency chapter.
- Center X and Center Y - Set the center of the wave blur, relative to the object frame. The wave shapes are positioned relative to the center. The center can also be adjusted visually using the primary image effect editor tool.
- Background - Check to enable the use of a background color, when colors are preserved. The background color can be selected by clicking on the color preview box. The background color option is available and used only when the Preserve Colors option is enabled. In this case, only the alpha channel is blurred, allowing the use of a color to create a halo around the image.
- Scale To Area - Enables the scaling of the shape to fit into the radius of the blurred area.
- Pixel Strength - Enables the use of pixels to set the blur strength values. The strength is set in points, but if Pixel Strength is checked, the points will be treated as pixels.
- Preserve Colors - Enables the preserving of colors. If checked, the colors are not blurred, and a background color can be used to expand an image with a halo, caused by the blurred alpha channel.
Interactive editing of the Wave Blur effect.
The wave blur may use one or more open shapes to set the blur direction from the center, at various angle. Each shape can be associated with a number of blurring strength locations along the shape.
The list of shapes and blurring strengths are shown in advanced editing mode.
- The button is used to open or close the list of blur strength adjustments of a shape.
- The button is used to remove a shape or a blur strength location.
- Shape - Set a shape used in the wave blur.
- Scale - Set an uniform scaling factor used to resize the wave shape.
- Stretch - Set a vertical stretching factor to scale the wave shape.
- Scale Location - Set the blurring strength location, along the wave shape.
- Blur Strength - Adjust the blur strength at the shape location.
- Add Scaling - Add a new blur strength scaling location to the shape.
- Add Shape - Add a new wave shape to the blur.
The blur strength scaling and locations can also be adjusted using the primary image effect editor tool.
The button from the Image Effects panel, activates the image effect tool used to interactively edit the wave blur effect attributes.
Selecting a blur shape.
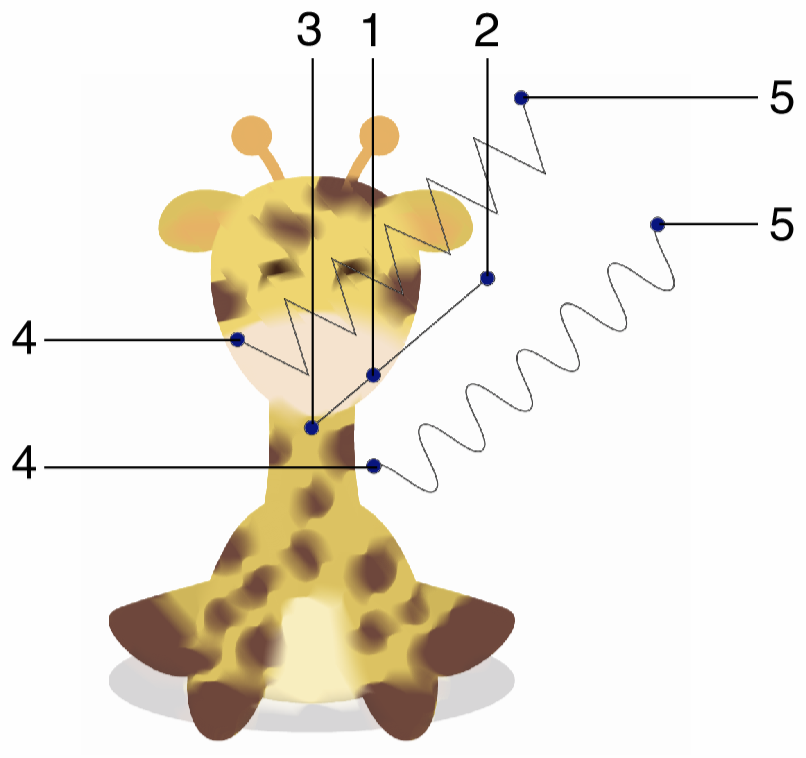
Interactive editing of the wave blur effect is done by dragging the handles to change an attribute value:
- (1) - Set the strength of the wave blur, by dragging this handle away or towards the center.
- (2) - Set the position of the wave shape around the center.
- (3) - Set the rotation of the wave blur region, by dragging this handle around the center.
- (4) - Move the blur strength location along the shape.
- (5) - Set the center of the wave blur effect.
Double clicking a blur direction shape node (2), opens the blur shape selector view. There can be multiple shapes at different angles arranged around the center. Each shape is positioned at an angle, and determines the blurring direction. the following options are available when selecting a wave blur shape.
- Shape - Set a shape used in the wave blur.
- Position - Set the angular position of this shape around the center. The shape is positioned at this angle.
- Scale - Set an uniform scaling factor used to resize the wave shape.
- Stretch - Set a vertical stretching factor to scale the wave shape.
Editing the location and scale of a blur strength adjustment.
Double clicking a blur strength node (4), opens the blur strength position and scale editor view. Adjust the scale and location of the selected node using the sliders and numeric editors:
- Scale Location - Set the blurring strength location, along the wave shape, of the selected node.
- Blur Strength - Adjust the blur strength at the shape location, of the selected node.
The wave blur shapes can be edited as regular paths using the secondary image effect tool from the icon section of the panel. When the secondary image effect tool is active, the wave blur shape nodes are shown and can be adjusted using regular path editing commands.
Editing the shapes of the Wave Blur effect.
Zoom Blur
The Zoom Blur image effect, blurs the pixel colors along radial lines positioned from the center of the blur. The Zoom Blur effect is similar to Cone Blur, with the restriction that the shape of the blur direction is always a line.
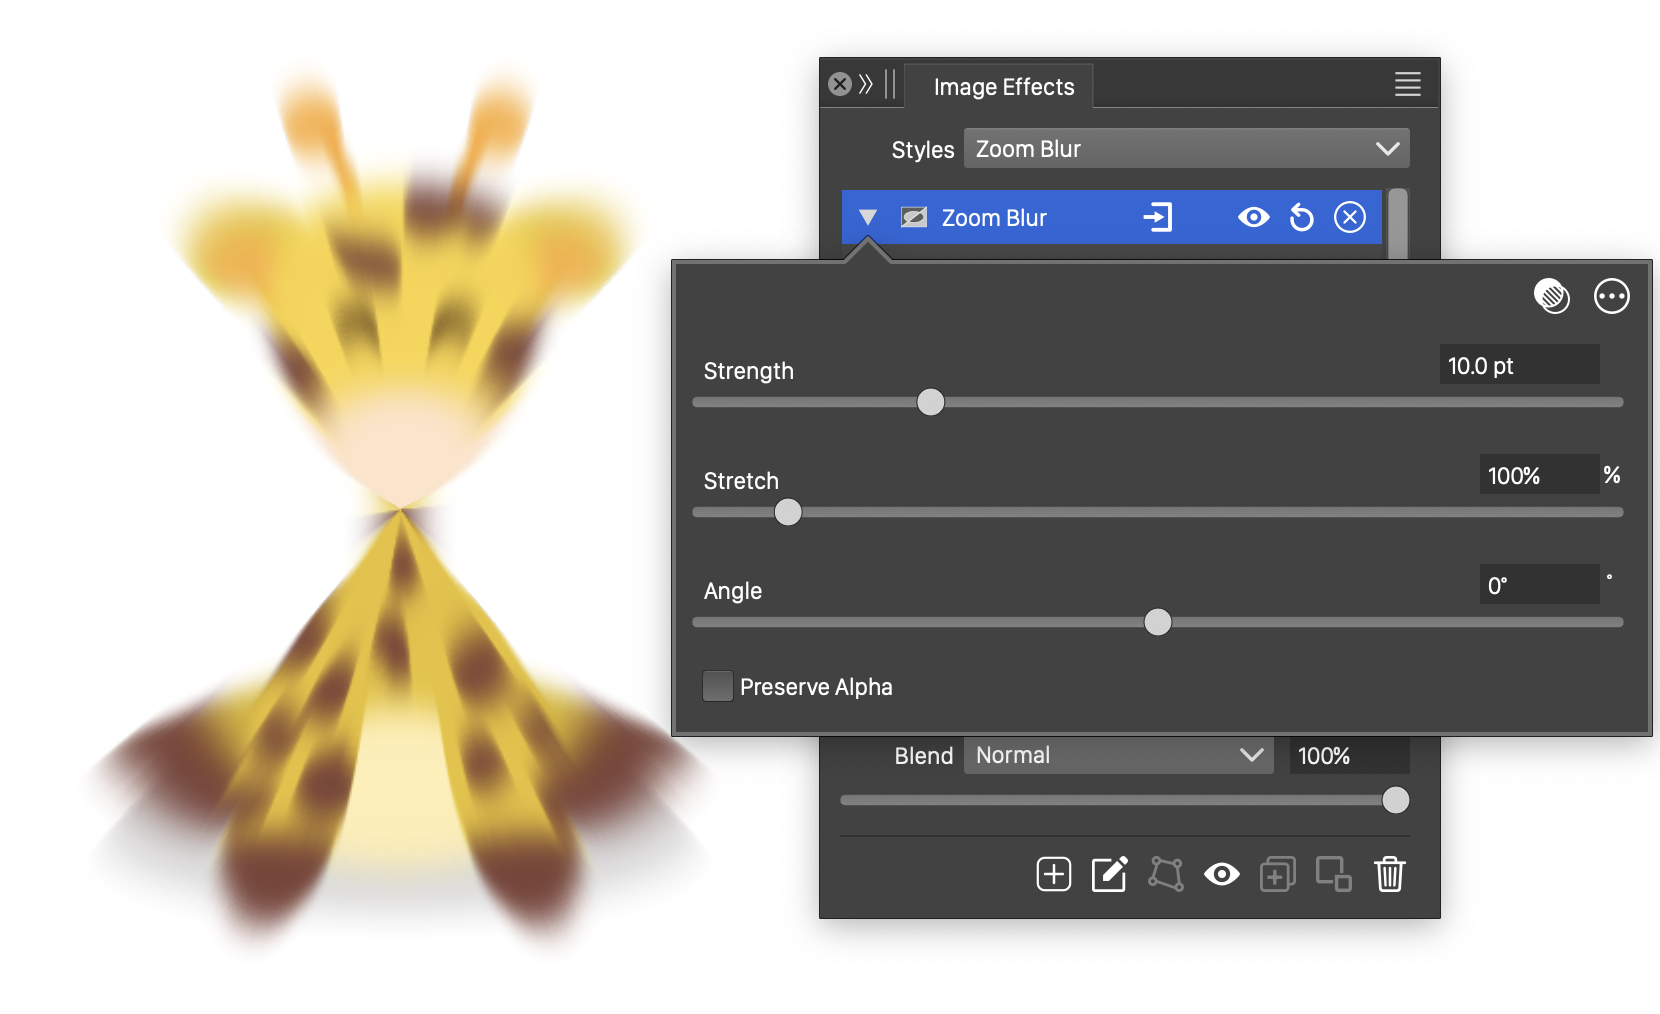
The Zoom Blur effect, with basic options.
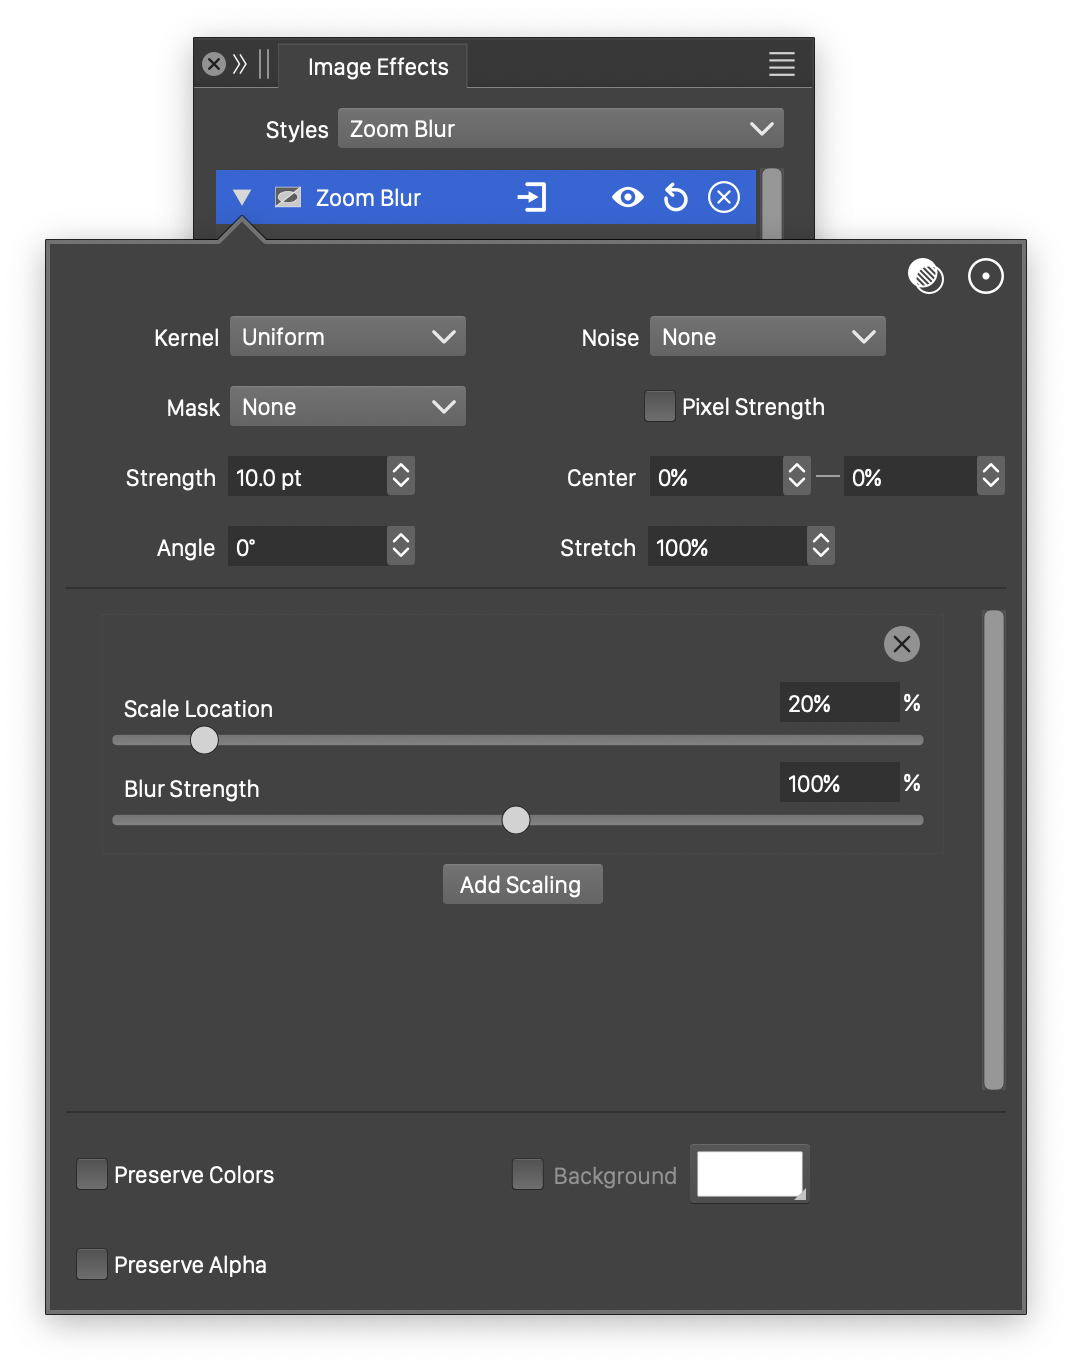
Advanced options of the Zoom Blur effect.
The Zoom Blur effect uses the following basic options:
- Strength - Set the strength of the zoom blur effect.
- Stretch - Stretch the blur intensities positioned along the lines.
- Angle - Set the rotation of the blur intensity positions.
- Preserve Alpha - Enables the preserving of the alpha channel. If checked, the alpha channel of the object is not blurred, resulting in sharp edges, but blurred content.
The advanced options of the Zoom Blur effect are available, by clicking on the button.
- Kernel - Select the pixel averaging mode (blur kernel) used in the zoom blur. The kernel type determines whether pixels are smoothed, sharpened or edges are highlighted. The following options are available:
- Uniform - Uniform averaging of colors.
- Edge - Detect edges along the zoom blur direction.
- Gaussian - Smooth pixel colors using the Gaussian kernel, emphasizing the immediate neighborhood of the pixel.
- Gaussian Edge - Detect edges along the zoom blur direction, emphasizing immediate neighborhood of the pixel.
- Sharpen - Sharpen pixel colors relative to the neighboring colors.
- Noise - Select the noise style from the list of predefined noise types, or user defined noise presets and styles. The noise is used to locally control the zoom blur strength. To browse randomly generated synthetic noise styles, select the Browse Styles command. To edit the noise attributes, select the Edit Noise command. Selecting noise is described with more detail in the Noise chapter.
- Mask - Select a transparency mask controlling the zoom blur strength locally. The transparency mask is aligned with the filtered object, and the mask intensities are used to adjust the blur strength. The masking options are the same as described in the Transparency chapter.
- Center X and Center Y - Set the center of the zoom blur, relative to the object frame. The center can also be adjusted visually using the primary image effect editor tool.
- Background - Check to enable the use of a background color, when colors are preserved. The background color can be selected by clicking on the color preview box. The background color option is available and used only when the Preserve Colors option is enabled. In this case, only the alpha channel is blurred, allowing the use of a color to create a halo around the image.
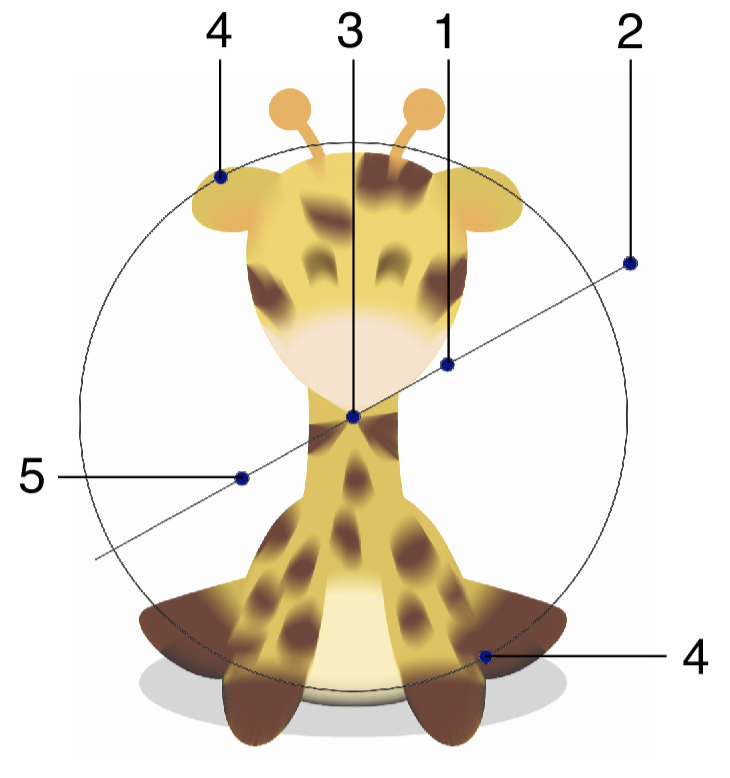
Interactive editing of the Zoom Blur effect.
- Pixel Strength - Enables the use of pixels to set the blur strength values. The strength is set in points, but if Pixel Strength is checked, the points will be treated as pixels.
- Preserve Colors - Enables the preserving of colors. If checked, the colors are not blurred, and a background color can be used to expand an image with a halo, caused by the blurred alpha channel.
The zoom blur may use one or more blur strength locations, positioned at some distance from the center, to adjust the blurring strength at that distance.
The list of blurring strengths are shown in advanced editing mode.
- Add Scale - Add a new blur strength scaling location.
- To remove a blur strength scaling, click on the button.
- Scale Location - Set the blurring strength location, along the axis, of the selected node.
- Blur Strength - Adjust the blur strength at the shape location, of the selected node.
The button from the Image Effects panel, activates the image effect tool used to interactively edit the zoom blur effect attributes.
Interactive editing of the zoom blur effect is done by dragging the handles to change an attribute value:
- (1) - Adjust the strength of the zoom blur, by dragging this handle away or towards the center.
- (2) - Adjust the rotation of the zoom blur positions, by dragging this handle around the center.
- (3) - Adjust the center of the zoom blur effect.
- (4) - Adjust the vertical stretching of the zoom blur region.
- (5) - Move the blur strength location along radial lines.
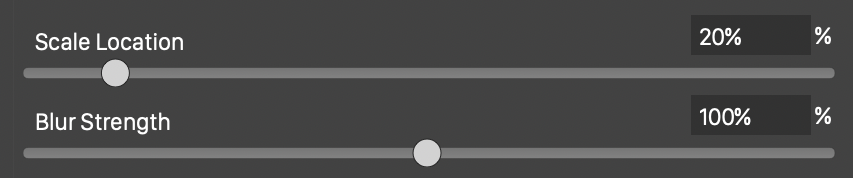
Editing the location and scale of a blur strength adjustment.
Double clicking a blur strength node (5), opens the blur strength position and scale editor view. Adjust the scale and location of the selected node using the sliders and numeric editors:
- Scale Location - Set the blurring strength location, along the axis, of the selected node.
- Blur Strength - Adjust the blur strength at the shape location, of the selected node.
- Multiple blur strength locations can be defined by clicking on the Add Scaling button of the blur options in the Image Effects panel.


