Built a funny little Truck - some steps described
-
Built a funny little Truck
This is the first Car I ever made. Before I tried to avoid cars.
The special thing about it, is that the 3D-Effect is made with Bevels.A while ago we had a discussion about beveling in VS
@VectorStyler has been working on it making it look a little better.Had the idea to do a little Project around this topic. That's how
I came up with creating a car in VS. The result surprised me in
a positive way and looks better than I expected, but see for yourself")
.
.
Will explain some steps of my procedure,e.g. which
Tools were useful for me, but not all steps.
.
.
The Bitmap Template for this Truck doesn't look like this in the original.
I found a nice way to deform a Shape of an Object in a Bitmap Template.
This is called "content aware scaling" and is often found in image editing programs.
In this case i use Xara/Magix Graphics Designer which has such a tool
to deform the Shape of that Truck according to my wishes.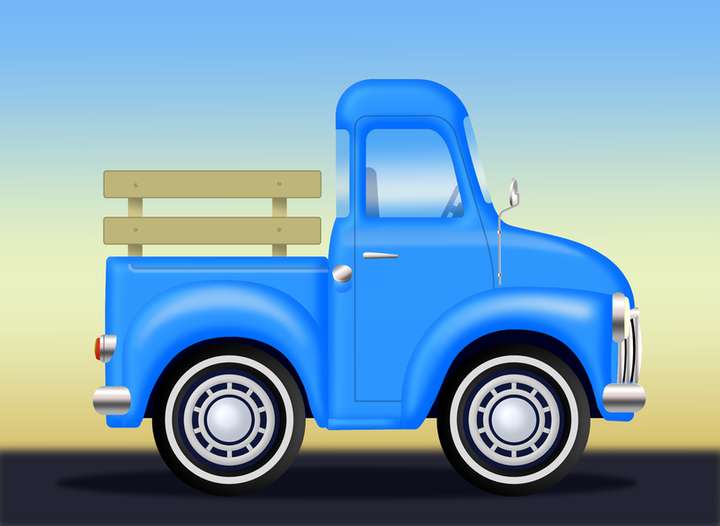
-
@Subpath That's a really cool truck! I'd be interest for sure to see your steps in how you made it.
-
thanks, i am also surprised by the result
the Steps will followI think one of the most important parts of this,
is using that "content aware scaling" to deform a bitmap template
of a car/truck in this particular way.The rest are more or less normal vector graphics techniques.
-
It definitely looks nice, but looking at it practically... it has an awfully short bed. Unless you are hauling really tall items you would probably be better off with a Jeep or an SUV?

-
Think, you will probably have to squeeze the cargo a bit.
But in real life there are certainly some trucks whose
biggest cargo is probably only their engine and
their driver.
-
-
Here now some details about this funny Truck project.
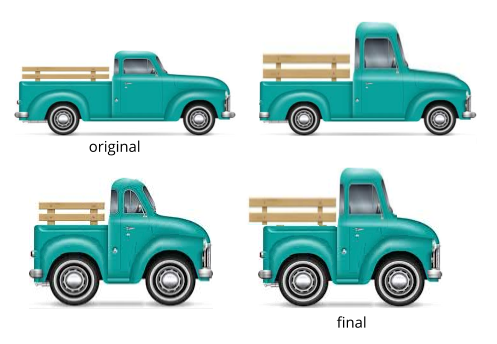
The original Truck
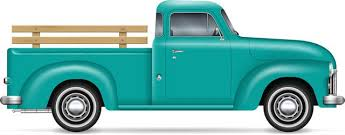
Took the original Truck and deformed/scaled it with the "Content aware scaling" tool in Xara.
Photoshop also has such a tool, as do other Photo editors.Whereby I scaled parts of the truck differently and made multiple copies of it at different scales.
In the end, I decided which parts fit best.
.
.
Some States of it
.
.
Here a Video how "Content aware scaling" work, re-uolad
.
.Then i put these parts together and imported them into VS and created
the first vectorization of the outline with simple straight lines.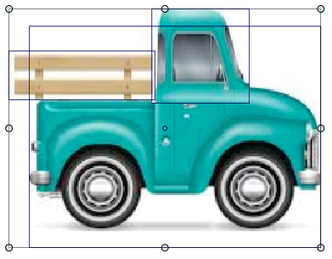

-
.
Then Bevel came into play and one of my favorite Tools in VS.
The Picker Tools!

.Since Bevel is an image effect I used the Image Effect Picker.
With this tool it is very easy to apply the bevel effect onto
other objects. (Which saves some hassle)

.Workflow speed up Tip:
Press the Ctrl-Key (PC) / Command-Key (Mac)
while using any of the Picker Tools, to switch
temporaly to the Transform Tool for faster Object selection.
.
.
-
Let's take a look at the final steps to create this little Truck.
Used a Rectangle with a Gradient for the Background.
Street and Shadow are Shapes with a little Gaussian Blur.Used the Corner Tool to round some Corners. The Gradient Tool
for chrome parts and windows.
.
.
The Style Picker Tool was a great help to transfer, very easily,
Gradients from one Shape to another.


.
.
Finally, the Lines for the Door and the loading Bed. For a bit more glossy Surface on the Fenders
i used simple Strokes with a Profile and a "Gaussian blur" Image Effect.
( Found this easier to match the Shape, than a Gradient )

.
.
Here a video that shows a few of these last steps, re-upload
.
.
That's all, hope this inspired a little bit.
Have fun being creative
-
Also remember that you can copy and paste styles and image effects which can sometimes be a lot faster depending on how you work.
I added an extra paste submenu to this menu:
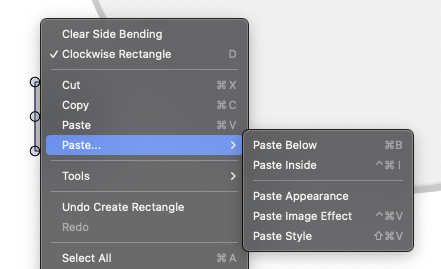
and keep some tools handy in same menu as well: