Numbers and Variables
Number variables (or just Numbers) can be used to define a named number that can be used as a variable across various attributes in the document.
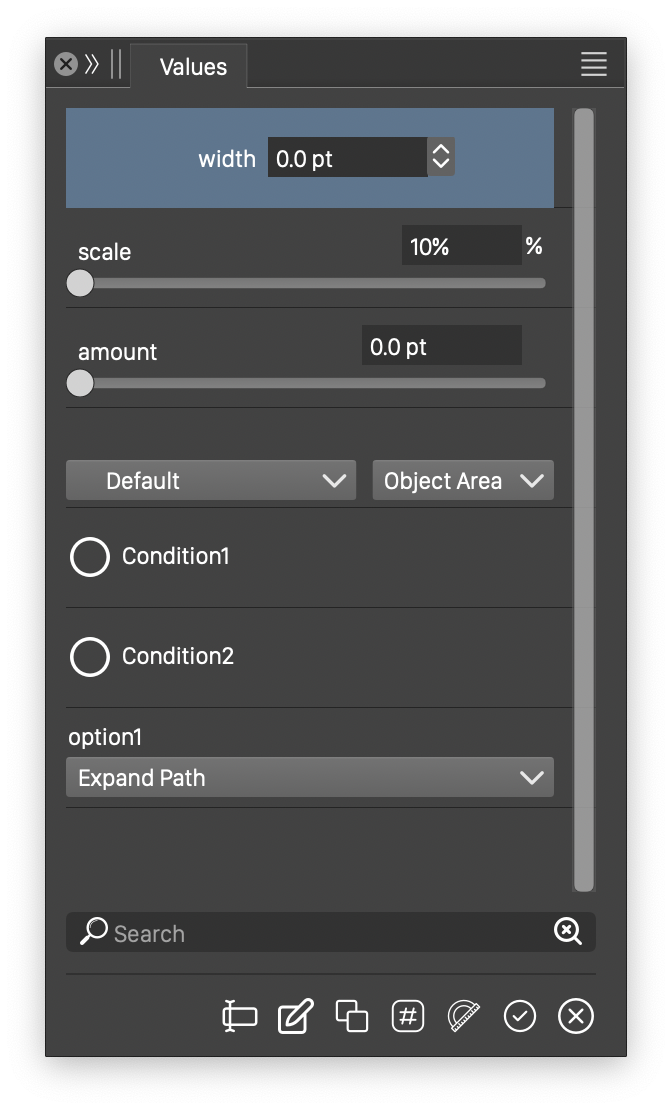
The Variable Values panel
A number is defined at a document level, having a name, value and editing options. The number name is then can be used in number fields across the user interface to set attribute values of objects.
For example the stroke width can be set using a number variable, and the same number variable can be used to set the width of a blur effect. Number variables can be used to create configurable artwork, or as parameters of symbols.
Conditions are used as on / off values at places where an attribute is edited as a check box.
Selector variables are similar to conditions, but they are multiple choice. Selector variables can be managed in the variable values panel, but they can only be created at the place of their use (if supported).
Variables
Numbers, conditions and selectors are collectively referred to as variables. Variables can be created and managed using the Variable Values panel.
The variable values panel lists all the numbers, selectors and conditions defined in the current document. These can be edited or removed using the commands of the panel icon row, or the panel menu.
The variable values can be edited directly in the panel, with each variable presenting type specific editing options.
The following options are available as panel icons:
 - Rename the selected variable.
 - Edit the options of the selected variable.
 - Duplicate the selected variables.
 - Create a new number variable.
 - Create a new number variable using a measurement number generator.
 - Create a new condition variable.
 - Remove the selected variables.
Variable panel menu
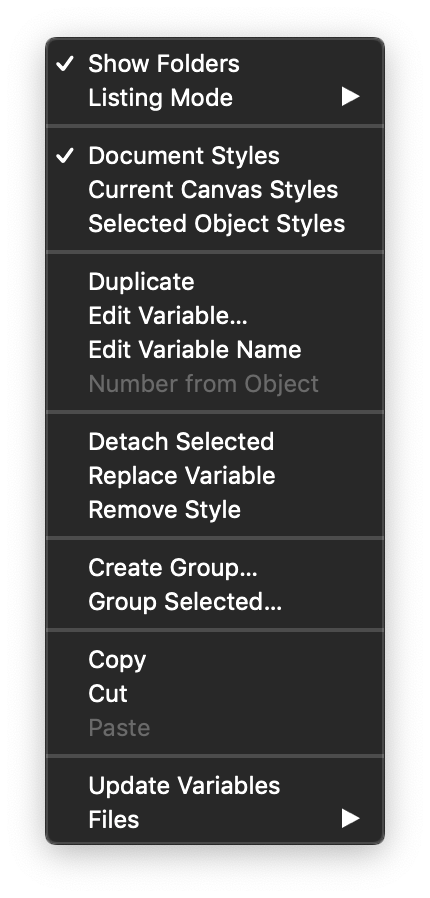
The Variable Values panel menu
The variable values panel menu contains options used to manage the set of variable definitions. These are similar to the options available from the Styles panel, as variables and styles are the same concepts internally in VectorStyler.
The following options are available from the menu:
- Show Folders - Check to show the folders of the variable (and style) definition hierarchy.
- Listing Mode - Select the sorting mode of variables in the list.
- Document Styles - Show variables defined in the current document.
- Current Canvas Styles - Show variables defined in the current canvas.
- Selected Object Styles - Show variables defined in the selected objects.
- Duplicate - Duplicate the selected variables.
- Edit Variable - Edit the options of the selected variable.
- Edit Variable Name - Edit the name of the selected variable.
- Number from Object - Create a measurement number variable from the selected object.
- Number from Function - Create a number variable that is a function of an other number variable.
- Detach Selected - Disconnect the selected variables from their place of use.
- Replace Variables - Replace a variable with an other one in all instances in the document.
- Remove - Remove the selected variables.
- Create Group - Create a folder in the variable (style) hierarchy.
- Group Selected - Group the selected variables into a folder.
- Copy - Copy the selected variables to the clipboard.
- Cut - Copy the selected variables to the clipboard and remove.
- Paste - Paste variable definitions from the clipboard.
- Update Variables - Update the variables from a file.
- Files - Import and export variables.
Number Variables

Number variable options
Number variables can be used in number fields of object attributes to set a value by a name instead of a specific number, and link the value at that field to the. number variable. Using number variables allows to have common number definitions for various attributes and a single place of changing and updating these values.
A number variable can also be inserted into a text as a variable, and if the number changes the text is updated.
A number variable can be created using the button in the variable values panel. A number variable has the following options:
- Name - Sets the name of the variable.
- Editor - Select the editing mode of the number. Numbers for different use may need different editing mode. For example numbers used as percentages are edited in a different way than numbers used as sizes or integer numbers for counts.
- Number - Set the value of the number variable.
- Minimum - Set the minimum value of the number variable.
- Maximum - Set the maximum value of the number variable.
- Units - Select the units used to convert the number to text when inserted into a text.
- Precision - Select the precision used to convert real numbers to text.
- Width - Select the decimal width used to convert integer numbers to text.
- Append Units - Check to append the unit name to the number when converting to text.
Number variables can be selected for use in numeric fields for attributes that support variables.
To use a number variable, Control + click with the mouse on a numeric field that supports number variables (for example the stroke width). A menu is opened with the list of number variables defined in the document. Select a number variable from the list to apply it as the value for the edited attribute. The attribute value will be linked to the number variable and when changing the number variable the attribute is also updated.
Editing the number variable in the variable values panel will update all attributes in the document using the variable.
Number Function Variables
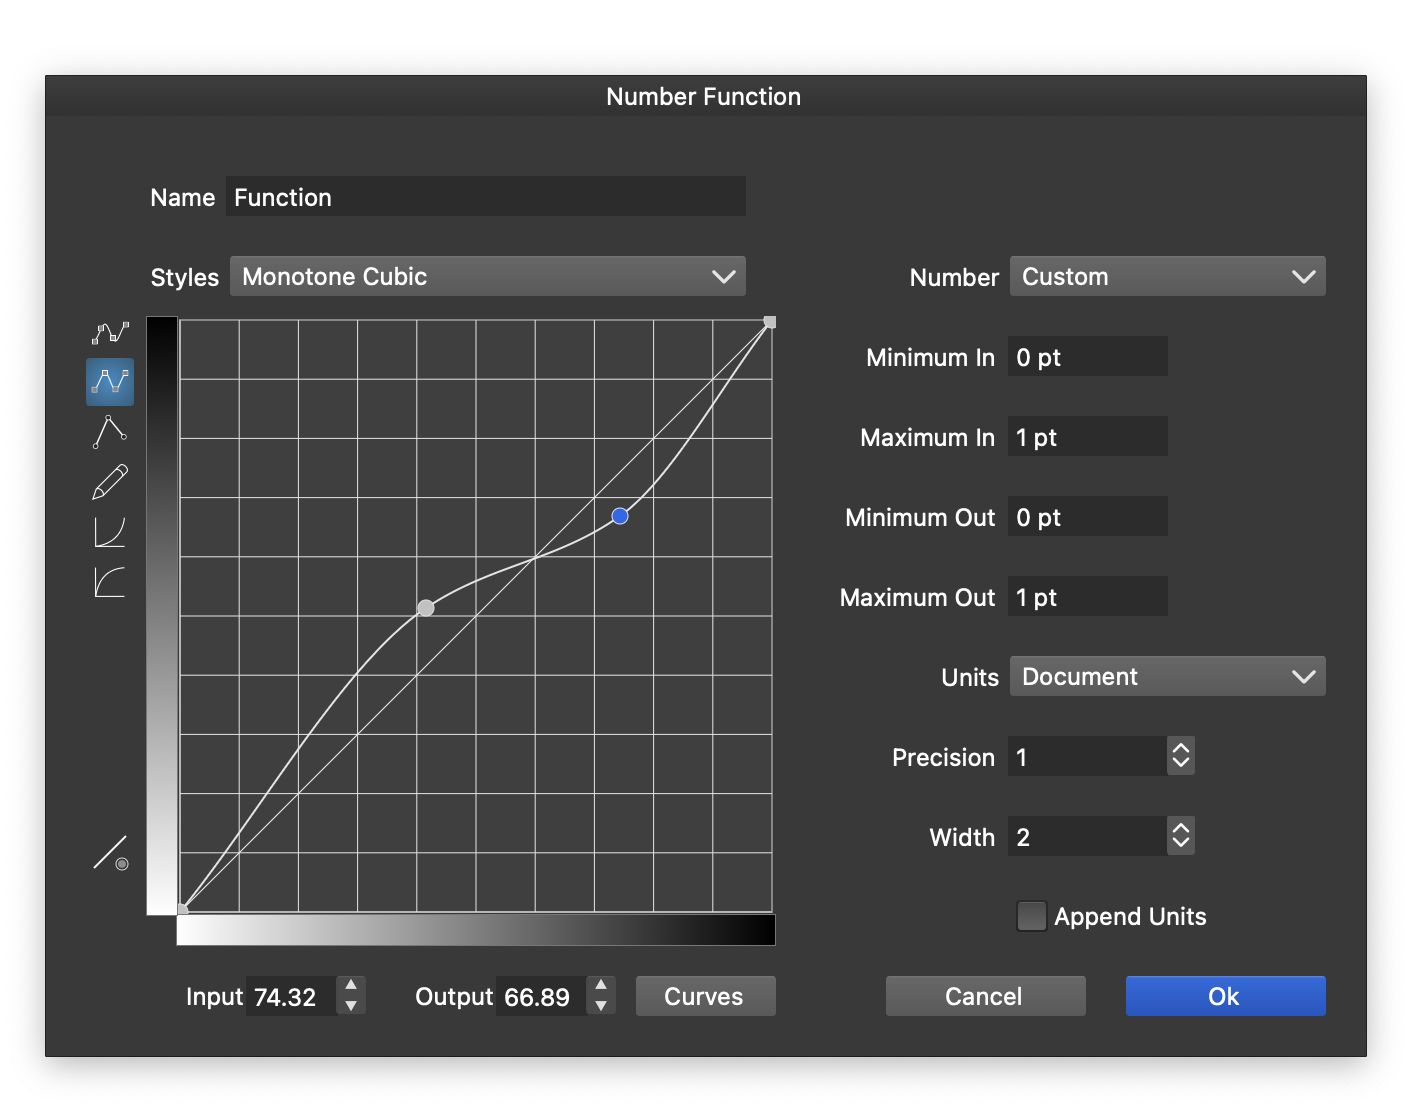
Number function options
Number variables that are a function of an other number variable can be created using the Number from Function menu of the Variables panel. These number variables use a base number variable (can also be a measurement or expression) and apply a function to the value of the base variable to create a new number variable. As the base variable value changes, the function variable is updated accordingly.
Number function variables are defined using the following options:
- Name - Set the name of the number function variable.
- The left side of the view contains a function editor that can be used to set up the function.
- Number - Select a previously defined number variable.
- Minimum In - Set the minimum value of the base variable, smaller values are adjusted to this minimum.
- Maximum In - Set the maximum value of the base variable, larger values are adjusted to this maximum.
- Minimum Out - Set the minimum value of the resulting number.
- Maximum Out - Set the maximum value of the resulting number.
- Units - Select the units used to convert the number to text when inserted into a text.
- Precision - Select the precision used to convert real numbers to text.
- Width - Select the decimal width used to convert integer numbers to text.
- Append Units - Check to append the unit name to the number when converting to text.
Expressions
Numeric fields accepting number variables can also accept mathematical expressions of these variables. An expression can be added to an attribute by Shift+Control clicking on the numeric field. A wider popover editor is opened that can be used to input single line expressions consisting of the existing number variables, numbers and basic mathematical operators.
The expression will be associated with the edited attribute and whenever a number variable changes, the expression is recalculated and the attribute value is updated.
Measurements

Measurement variable options
Another source of number values are measurements, number values extracted from existing objects. A number variable can be of measurement type, when the value of the number is not editable, but it is associated with a property of an object.
To create a measurement number variable click on the icon or select the Number from Object menu from the panel menu. The Object Measurement view is opened to setup the options of a measurement number variable, as follows:
- Name - Sets the name of the measurement variable.
- Object - Select the symbol from which this measurement is extracted. Selecting Default will use the selected object as a measurement source.
- Number - Select the number to be extracted from the object.
- Units - Select the units used to convert the number to text when inserted into a text.
- Precision - Select the precision used to convert real numbers to text.
- Width - Select the decimal width used to convert integer numbers to text.
- Append Units - Check to append the unit name to the number when converting to text.
Measurement variables can be used to extract areas or lengths of a shape, convert these to numbers in a selected unit, and insert them into a text as a variable. When the shape changes its area or length is recalculated and the number variable is automatically updated, updating text text content as well.
Number variables can be added to a text object using the Text - Insert Variable menu. The menu lists all the number variables available in the current document. Selecting a variable will insert it at the current text cursor position as a number converted to text (using the number variable options).
Selector Variables
Selector variables can be used for multiple choice attributes, to link the attribute value to a variable. When the selector variable is changed, all the attributes referring to it are updated.
Selector variables can be created only at the place of their use, as the possible choices are linked to the attribute type. Selecting a multiple choice attribute is typically done through a drop down menu, that lists the various choices. If an attribute supports variables, a Create Style menu item is added to this drop down list, and this can be used to create new selector variables.
Once a selector variable is created, it will show up in all drop down menus associated with the same attribute type. Selecting the variable for the attribute will link the attribute value to the selector variable. The selector variable value can be changed in the Values panel, that lists the available option for the specific attribute type for which the selector was created.
A common use for selector variables is the blending mode selection. Blending modes control how objects and layers are composited with the backdrop. The blending mode menu contains the Create Style item that is used to create new selector variables of blend mode type. Once a variable is created, it is is listed and can be used as a blend mode in multiple objects. Changing the variable in the panel will automatically update all objects using the variable as a blending mode.
Another example: the text on path attributes contains several multi-choice options that can be associated with variables. One of these is the (vertical) Alignment of text relative to the path. It is possible to create a selector variable that is then used to set the alignment mode for multiple text objects. Changing the selector variable will change all text objects using the variable as an alignment attribute value.
Condition Variables
A menu of condition variables
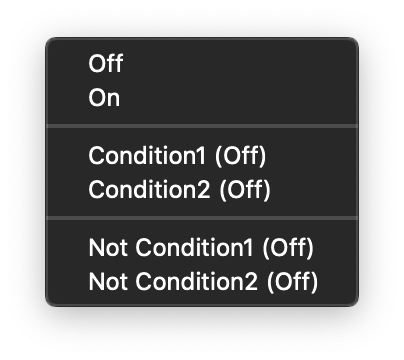
Condition variables can be used for dual choice attributes (where supported) to link the attribute value to a variable.
Condition variables can be created in the Values panel, and can be used directly from the panel to set the visibility of the selected objects (by double clicking on the condition variable).
Condition variables can also be used in dual choice (boolean) attributes that are typically selected as check boxes, or checkable menus. When selecting the attribute with a check box, Control + click on the check box to open a menu with a list of condition variable options. This menu contains the On and Off options, to set the attribute to a fixed on or off mode. The menu contains a list of condition variables and a list of options that negate these condition variables. Select these to set the boolean attribute to a condition variable, or a negated value of a condition variable.
When selecting a condition variable from a menu (typically available in panel menus), instead of a single checkable menu item as it was in previous versions, a list of condition options are opened with the same content as that described from the check box.
Conditions can be used to control object and layer visibility as follows:
- Create one or more new conditions, that will be used as object visibility conditions. Existing conditions can also be used.
- New conditions can be created using the button of the Variable Values panel.
- Select the objects whose visibility will be controlled by a condition.
- Select the condition in the Variable Values panel.
- Double click on the condition name, to set the condition as the visibility condition of the selected objects.
- These objects will be visible if the condition is enabled, and invisible otherwise.
- The objects visibility can be controlled by the check box of the condition.
- To remove the visibility condition from the selected objects, click on the button of the panel.
Conditions can be used for style activation as follows:
- Create one or more new conditions, that will be used as style activation conditions. Existing conditions can also be used.
- Open the style activation option menu, depending on the subject to be activated:
- For style groups, the conditions will be shown in the Activation Mode sub-menu of the Styles panel menu. Select the conditions, that must be enabled, to activate the style group.
- For canvases, the conditions will be shown in the menu opened with the Enable Mode button, of the Canvas Options view.
- For linked documents, the conditions will be shown in the menu opened with the Enable Mode button, of the Linked Documents view.
- The conditions are assigned to style groups, canvases, or linked documents by selecting the condition in the menu.
- Enabling or disabling the condition in the Conditions panel will activate or deactivate the style group, canvas, or linked document using the condition.


