Presets
A preset is a copy of an attribute or a design element, saved in a separate file, or in the document. Presets can be reused by copying into objects and the document. Examples of presets include: colors, gradients, shapes, effects, and others. Creating and using presets is done by copying the attribute, without creating links to the preset. If the original attribute is modified the place where the preset is used is not changed.
Presets are used when creating collections of reusable design elements, that can be shared outside of a document. For example, VectorStyler provides a set of gradient presets, that can be reused in a document. Modifying a preset will not result in any change on the previous uses of that preset.
Presets are similar to the concept of swatches and assets in other applications, with many important differences and additions.
- Presets can store not just colors, but many other attributes that may be used in a design.
- Presets can be organized into folders.
- Presets are organized by the type of the attribute. There are separate files for color presets or shape presets.
- Presets are also organized into groups. Each group can have multiple preset files with different types.
- Multiple files of the same preset type (but different file name) can be placed into a folder to merge these into a single preset group.
- Presets can be stored in the document, or in separate files.
- Each attribute type (i.e. color, gradient, shape) is stored in a separate preset file. A preset file contains multiple instances of attributes of the same type.
- A folder, containing multiple preset files, can be opened as a preset group in a separate panel.
- Preset files can be detached or attached to a preset group panel.
Preset Types
The following design elements can be stored, and reused as presets:
- Colors can be saved and organized in preset.
- Gradient colors used in gradients. Gradient colors can be stored separately from gradient shapes, to be able to reuse with different gradient shapes.
- Gradient shapes used in gradients. The geometric shape of the gradient is stored separately from the gradient color.
- Gradients, the combination of a gradient color and a gradient shape.
- Tiling pattern presets.
- Noise attributes.
- Fill attributes.
- Stroke attributes.
- Stroke caps, arrows, dashes and stripes can be saved and reused as separate preset types.
- Variable width profiles, used in strokes, brushes and bend effects.
- Object styles, encapsulating multiple object styling attributes.
- Transparency mask attributes and transparency content.
- Shapes, used in objects, gradients and other places.
- Shape filters, used to distort object shapes.
- Image filters applied on objects or groups of objects.
- Color filters applied on vector objects.
- Color palettes.
- Color variation groups.
- Color harmonies.
- Corner shapes, used in cusp corners of shapes.
- Shape corners, including the extend and shape of the corner.
- Objects saved as presets. These are similar to symbols, without the link to a symbol source. Object presets can be used to share and reuse copies of objects.
- Object content presets. An object content, including fill, stroke or brush can be saved and reused as a preset.
- Object slicing options.
- Text baseline settings presets.
- Character formatting attributes.
- Text decoration attributes.
- Paragraph numbering formats.
- Paragraph labeling formats.
- Glyphs used in text.
- Formatted text components.
- Unformatted (plain) text components.
- Tab stop settings.
- Text frame attributes.
- Text on path attributes.
- Paragraph composition attributes.
- Text wrapping attributes, defining how to flow text around objects.
- Font collections. Access to fonts in specific folders, not installed into the host operating system, are defined through font collections.
- Find and replace conditions.
- Find and replace settings.
- Style groups. Styles are described in the Styles section. Collections of styles can be exported and reused as presets.
- Guideline presets.
- Grid presets.
- Snapping settings presets.
- Action presets. Recorded actions are stored as presets.
- Object selections can be saved and reused from the Selection panel.
- Artboard sizes. User defined artboard sizes can be saved as named presets, and reused when setting up documents and artboards.
- Printer sheets, used in tiled printing.
- Color replacement groups, used in the Replace Color filter.
- Graphics file exporting format settings.
- Transfer functions used in effects.
- Brush types, storing the content of a brush without the common brush settings.
- Brush styles, stores all settings of a brush, including width and width profile.
- User defined object alignment schemes.
- Document settings.
- Printer settings.
- Canvas settings.
The Presets Panel
Presets can be created, selected and managed using the Presets panel. The Presets panel can be opened from the Window - Presets menu. The presets panel contains a grid or list view of the available presets, organized into sections by preset group and type.
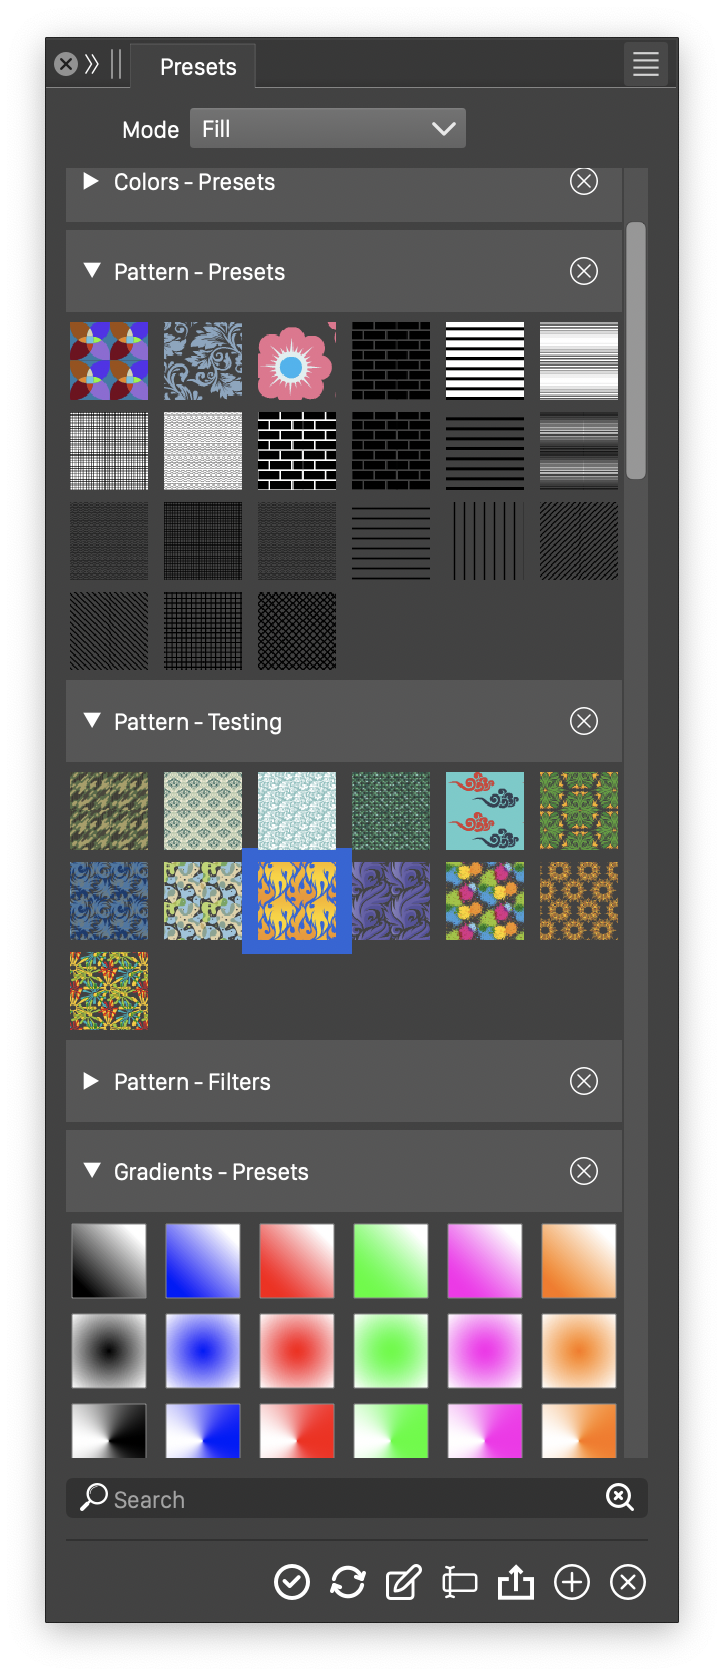
The Presets panel
The presets are listed in groups, by preset type. A preset group can contain a single preset type from a single file. Different preset files containing the preset type are listed in different groups. The preset group header consists of an open / close arrow, the preset group name (i.e. Colors - Document or Gradients - Application) and the group close button. The open / close arrow is used to open or close the preset group. The close button at the end of the group header, is used to remove the preset group from the panel.
A preset group can be removed, or detached into a separate panel. To detach a preset group into a separate panel, drag and drop the preset header from the panel onto the screen, or another preset panel. Preset groups can be removed, to simplify the content of a preset panel. Removed preset groups can be restored, using the Reveal Hidden Presets command from the panel menu.
The presets can be shown in a list or grid view. In the list view, both the preset preview (if available) and name are shown. In the grid view, only the preset preview is shown. Some presets cannot have a preview, and a standard icon is used.
The preset viewing mode is set from the Display options of the panel menu:
- Small, Medium and Large List - Show the presets in a list of previews and names.
- Small, Medium and Large Grid - Show the presets in a grid of previews.
- Show Folders - Enable or disable the display of preset folders. Preset folders can only be shown in list viewing mode.
- Show Groups - Enable or disable the display of preset group headers. When disabled, presets are shown in a continuous list, and are not separated by type or group.
- Group Folders - Enable or disable the separation of preset groups. When enabled, the Document, Presets or other preset groups are shown in separate groups. When disabled, the groups are separated by type only.
To use a preset on objects in the canvas:
- Select the object in the canvas.
- Double click on the preset in the list.
- For presets with multiple use, the Mode field can be used to select the preset target.
- For example: gradients can be set as Fill, Stroke or Transparency Mask.
To search for presets by name:
- Type the name into the search box under the preset list.
- As the name is changed, the first preset matching the name is selected.
- Select all Found - Enable or disable the selection of all presets matching the search name.
- Click on the search
 icon to select the next preset matching the search name.
 - Click on the search
 icon to clear the search name.
The icon section of the preset panel provides access to basic preset management and editing commands:
 - Apply the selected presets, to the selected objects in the document. This is the same as double clicking on a preset.
 - Update the presets from the preset file.
 - Edit the selected preset in a modal view.
 - Edit the selected preset name and description.
 - Replace the preset content with attributes from the currently selected object.
 - Create a new preset, with the selected preset type, from the selected object.
 - Remove the selected presets.
Creating Presets
Presets can be created from the preset panel, using the button, or the various Create… commands from the panel menu. Preset or style widgets throughout the user interface may also allow the creation of presets from the edited options, by showing a Create Preset command in the preset list.
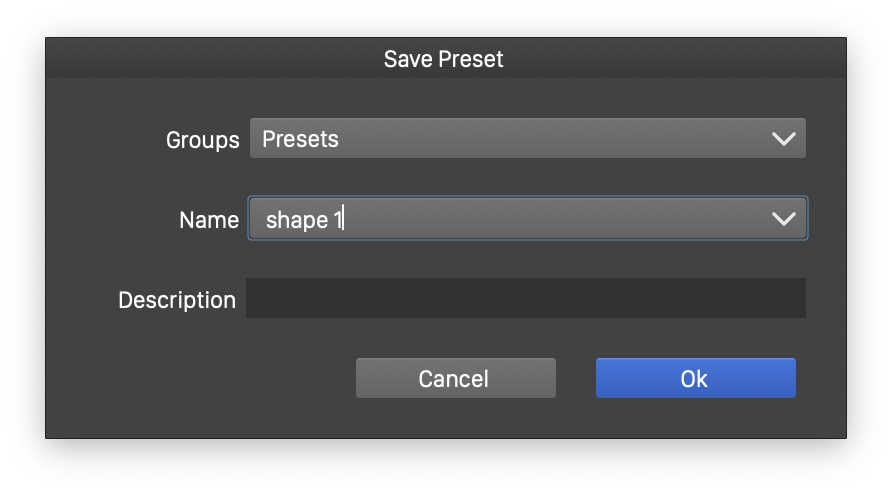
Creating a preset
In various attribute editors (gradient color, stroke profile, and others), there is a Save Preset button that can be used to create a preset. These feature specific preset creation tools are discussed in the sections describing those features.
To create a new preset from an attribute of the selected object, click on the button. A menu is opened, with various attributes that can be extracted from the selected object, to create a new preset. Select the type of attribute, to create a preset from that attribute of the object. A Save Preset view is opened, to set the preset group, name and description for the new preset.
- Group - Opens the available preset groups. The preset group selects the place where the preset is saved.
- Presets - the preset is saved as a global preset, available in all documents, and after restarting the application. The location of the preset file will be in the ~/Library/NumericPath/ folder.
- Document - the preset is saved into the document, and will be available only when editing this document.
- User defined preset groups are listed here. A user defined preset group stores the preset in a preset type specific file, inside a folder containing the preset group.
- Name - Edit the preset name. Type the name here, to create a preset with the name. Existing preset names of the same preset type can be selected, by clicking on the arrows at the end of the name editor.
- Description - Provide an option description of the preset. The preset description is shown when hovering over the preset in the list of presets.
Presets can also be created by selecting the object containing the attribute, and selecting one of the Create… commands from the panel menu. Set the group, name and description in the Save Preset view, and confirm to create the preset.
To create multiple presets of the same type, in a single step, select multiple objects. Click on the
Styles from Presets
Styles provide a dynamic updating mechanism, for objects using the styles, when the style is modified. Dynamic linking and updating is not available with presets. For a detailed description on how to use styles, see the Styles section.
The preset panel can be used to convert selected presets to styles, and to add these styles to the document style list. Presets can also be converted to styles, when applying the preset to an object. In this case, the styles are defined in the document, and the objects will use the new styles.
- To create styles from the selected presets, select the presets in the panel, and select the Define Styles, from the panel menu. The new styles are added to the document style list.
- To create styles when applying presets on objects, enable the Apply as a Style option from the panel menu.
Managing Presets
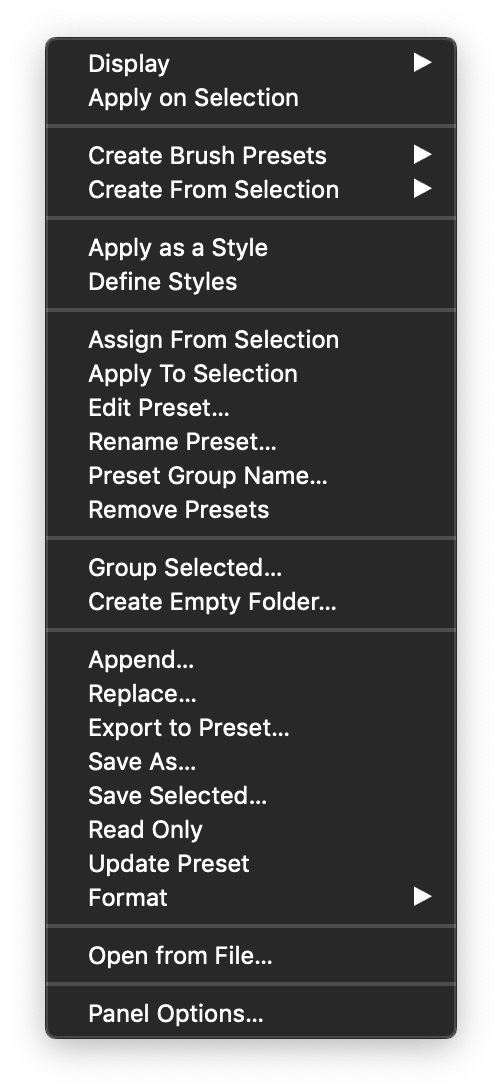
The preset panel menu
The preset panel menu contains several commands that can be used to select and organize the presets in the panel. Presets are always organized per preset type, with each preset type of a group in a separate file. A preset file contains a collection presets of a single type. Presets inside a file can be grouped into preset folders, enabling a hierarchical organization of presets.
Dragging an external preset file (of VectorStyler format) into the preset panel will merge the content of that preset file into the preset group.
The following preset selection and management options are available in the preset panel menu:
- Assign From Selection - Assigns new attributes to the selected presets, from the selected objects. Multiple presets can be updated, by selecting the presets and selecting multiple objects, to fetch the new attributes from. This command is also accessible by clicking the button.
- Apply To Selection - Applies the content of the selected presets, to the selected objects. When multiple presets and objects are selected, the presets are applied to the objects in the order of selection. This command is also accessible by clicking the button.
- Edit Preset - Edits the selected preset, by opening a modal editor view specific to the preset type. This command is also accessible by clicking the button. Some preset types do not allow editing, in these cases the presets can be changed by updating them from the selection using the Assign From Selection command or the panel button.
- Rename Preset - Opens the Preset Name editor view to rename the preset and to change the preset description.
- Preset Group Name - Opens the Preset Group Name editor view to rename the current preset group and change its description.
- Remove Presets - Deletes the selected presets. If the selected presets are not from the document preset group, the preset removal cannot be undone.
- Group Selected - Creates a new preset folder and moves the selected presets into the folder.
- Create Empty Folder - Creates a new preset folder, in the current preset type.
Preset folders organize the presets in a folder hierarchy inside a single preset file and type. Different preset types contain different folder hierarchies. For example: the color presets stored at the Presets group may have their own folder hierarchy, while the Shape presets on the same group have a different folder hierarchy.
Renaming Presets
Managing a large collection of presets and their names can be a tedious task. In some cases, multiple presets must be renamed, using a set of names available in an external source (text file, or spreadsheet). To rename multiple presets follow these steps:
- Collect the preset names in a text editor. The preset names are separated by new lines (one preset name in one line of text). The preset names can be from arbitrary source.
- Select the lines of text containing the preset names to be used.
- Copy the selected text to the clipboard.
- Switch to VectorStyler with the Presets panel open.
- Select the presets that should be renamed (this can be a long list of presets).
- Press Command+V to paste the text from the clipboard.
- The selected presets are renamed using the names in the lines of text.
When renaming presets in a batch, the number of lines of text (that is, the number of names) and the number of presets do not need to match. If there are more names that selected presets, then only the necessary names are used. If there are less names, then the preset naming will restart from the first name, using a single preset name multiple times.
Preset Files
A collection of presets of the same type, inside the same group is stored in a single file (except the document presets, that are stored in the document file). These preset files can be shared with other users, and can be kept in arbitrary locations on the user storage area. New preset files can be opened in separate preset panels, or imported into the current preset group.
The panel menu contains the following preset file management commands:
- Append - Append the content of a preset file to the current preset type and folder. The preset file must contain presets of the same type as the selected preset type.
- Replace - Replace the preset collection in the current group and type, with presets from a file. The current preset type must be the same as the preset type stored in the file.
- Export to Preset - Copy the selected presets into an other preset group. The preset group is selected in the modal view when selecting this command.
- Save As - Save the current collection of presets of a single preset type, into a separate file.
- Save Selected - Save the select presets of a single type, into a separate file.
- Read Only - Mark the current preset collection as read only. read only preset collections cannot be modified using the preset creation, editing or removal tools.
- Update Preset - Update the current preset collection, from the preset file.
- Format - Select the preset file format type. This can be binary, XML or JSON. The binary format is used for a compact and fast preset storage. The XML and JSON file formats can be used for user readable file storage.
- Open From File - Open a preset file into a new preset panel.
Panel Options
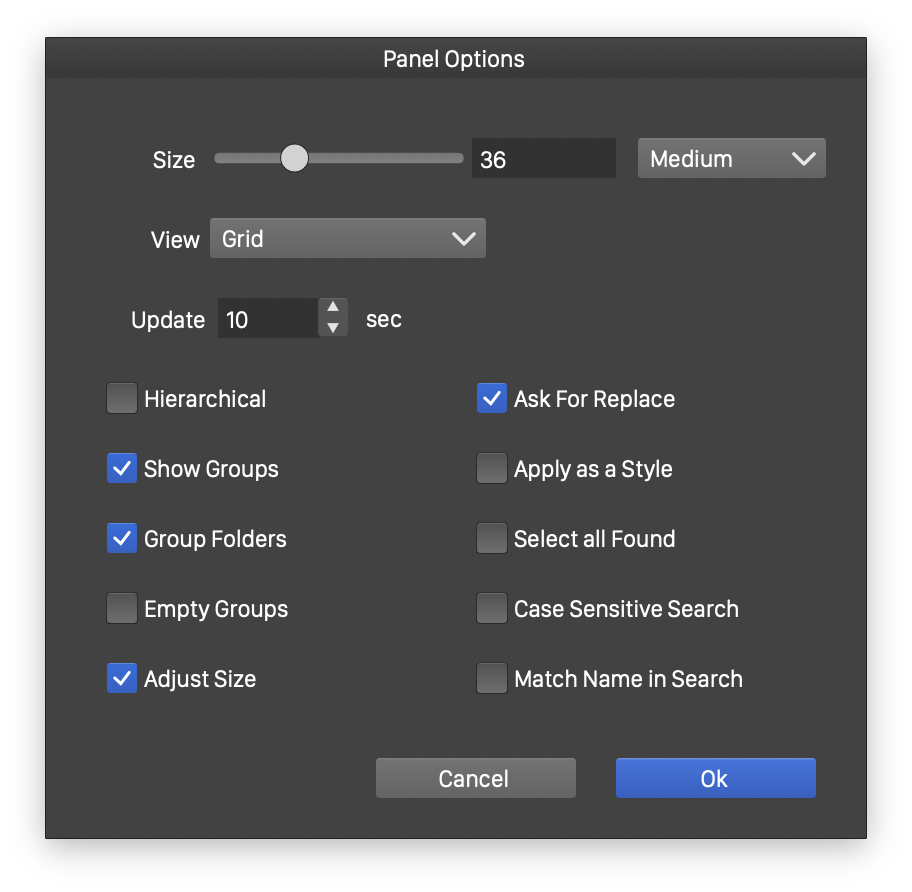
Preset panel options
The preset panel uses a number of options to configure the appearance of the panel. The preset panel options can be edited using the Panel Options command from the panel menu.
- Size - Edit the size of items in the grid or list view of presets. Predefined sizes can be selected from the drop down list next to the numeric field. Custom preset item sizes can be selected using the slider or the numeric field.
- View - Select the mode of showing the presets. This can be List or Grid.
- Update - Edit the time in seconds to check the preset files for changes. The presets are updated from the file, only when the file time stamp has changed. Presets can be updated manually, using the button, or the Update Preset command from the panel menu.
- Hierarchical - Enable or disable the hierarchical listing of presets. This option is available only for List viewing mode. When disabled, the preset folders are not shown.
- Show Groups - Enable or disable the showing of preset group headers in the preset list.
- Group Folders - Enable or disable the possibility to open or close preset groups in the panel.
- Empty Groups - Enable or disable the showing of empty preset groups.
- Adjust Size - Enable or disable the adjusting of preset preview sizes, in grid viewing mode, to fit the available space in the preset panel.
- Ask for Replace - Enable or disable the verification of a preset name against existing preset names. A preset saved with a name will overwrite an existing preset with the same name. When this option, is enabled, the overwriting must be confirmed. Otherwise, the overwriting is automatic.
- Apply as Style - Enable or disable the selection of presets on objects by first creating a style and then applying the style. When enabled, a new style is created from the preset, and the style is applied to the object. The style is created if one with the same name does not already exist.
- Select all Found - Enable or disable the selection of all presets matching the preset search name.
- Case Sensitive Search - Enable or disable the case sensitive comparison of preset names with search names.
- Match Name in Search - Enable or disable the selection of presets exactly matching the search name.
Preset Manager
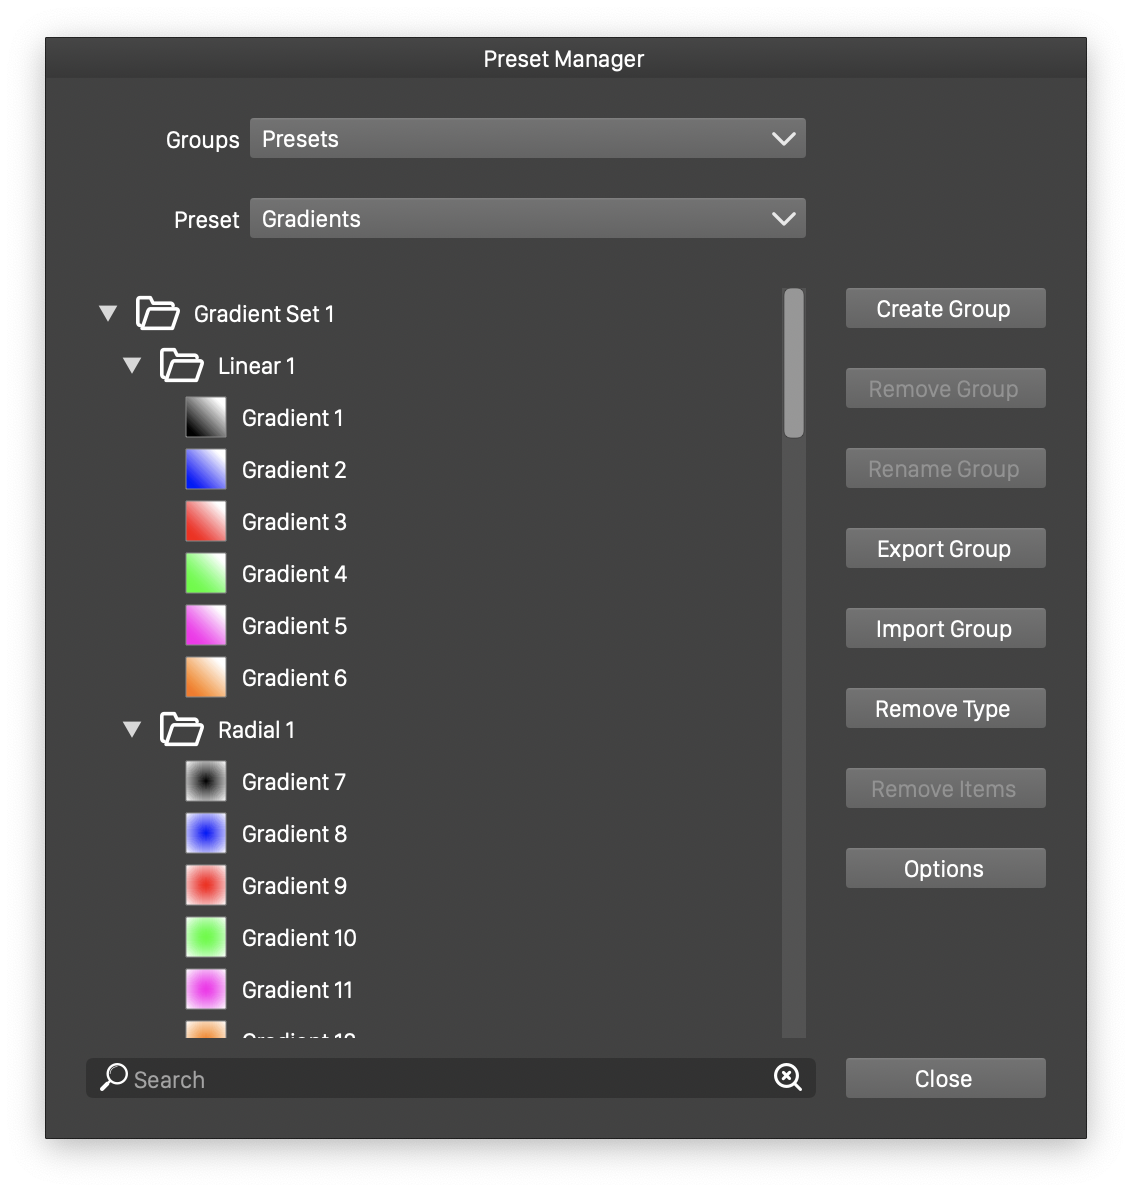
The Preset Manager view
The Presets panel contains a restricted subset of the preset types supported by VectorStyler. Preset types can also be created in other places or panels, that are not suitable as an object attribute. Examples of such preset types are: action presets, font collection, bristle brush tip shapes, snapping options, and many more.
The complete set of preset groups and preset types can be managed using the Preset Manager command from the Styles menu. The preset manager can be used to create or remove preset groups, edit and organize content of a preset type, import preset files into a preset collection, remove presets from preset types.
The preset manager view contains the following fields:
- Groups - Opens a list of all the preset groups currently active in the application. These are the Document, Presets and user defined preset groups. New preset groups can be created using the Create Group button.
- Preset - Opens a list of all the preset types stored in the selected preset group. A preset type contains a collection of presets of a single type, stored in a file. For example, colors and shapes will be in different preset types, and in different files.
- The list of presets in the selected preset type is shown in the list below the Presets field. This list provides a hierarchical view of presets in a single preset type, allowing the browsing and editing of preset folders.
- The search box below the preset list can be used to search for presets by name.
- Create Group - Create a new, user defined preset group, by specifying a name and a folder for the preset group.
- User defined preset groups are stored in folders selected by the user. A preset group may contain multiple preset files, each preset file storing a single preset type. Users can organize their presets in custom folders, to allow easy access and copying of preset files.
- The Name field of the Create Group view is used to set the name of the new preset group, while the Folder field is used to select the folder, by clicking on the
 icon.
icon.
- Remove Group - Deactivate the preset group from the application. Available for user defined preset groups only. The files associated with the preset group, remain available in their folder, but this group is not listed anymore in the panels and user interface of the application.
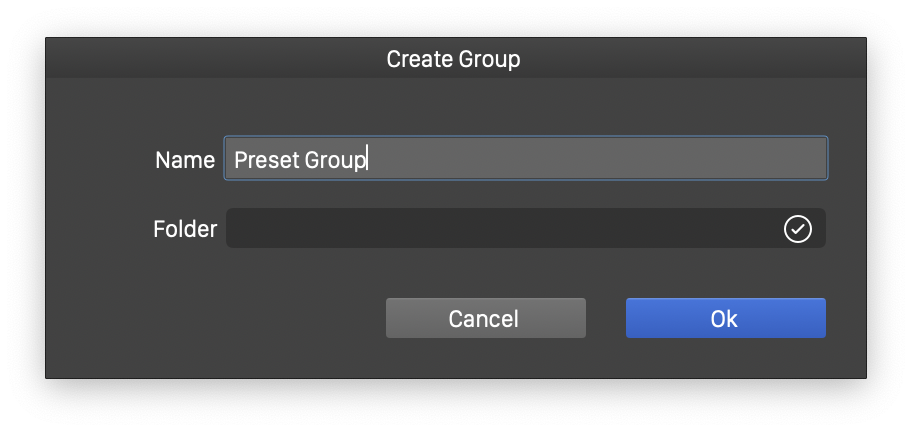
Creating a preset group.
- Rename Group - Renames the current preset group. The preset group name is used when selecting the preset group, or in group headings in the Presets panel.
- Export Group - Export all preset types in the current group into a user selected folder. The user selected folder will contain several preset files, each containing presets of a type.
- Import Group - Import the preset files of a folder into the current preset group, by merging similar preset types.
- Remove Type - Remove the selected preset type from the current preset group, by removing the preset file and all presets the preset type.
- Remove Items - Remove the selected presets from the current preset type.
- Options - Open a menu of preset viewing and editing options. This menu contains similar commands and options as the Presets panel menu.
The editing changes made by the Preset Manager cannot be undone. Once the editing of presets is completed, click the Close button to exit the preset manager and continue with the current document


