Text Frames
A text frame is an object containing parts of a text flow. A text flow is a single contiguous flow of text, over multiple text frames. A text flow can be created by importing a text file, or by typing text into a text frame.
A text frame may contain multiple fill and stroke attributes, just like any other object. The shape of the text frame determines the region used to format the text. The text is broken into multiple lines and positioned according to the shape of the text frame. The shape of the text frame can be of any type and form, and it can be changed using the regular shape editing tools.
The direction of a text flow in multiple frames can be horizontal (by default) or vertical. The direction must be the same in all frames of a single text flow. Different text flows can be set in different directions. The direction of the text flow can be set using the Vertical Text command from the Text menu.
Some highlighted features when flowing text into frames are:
- Flow text in horizontal or vertical direction. The same applies to shape text as well.
- Place text frames of a text flow in different artboards and canvases.
- Rearrange links between text frames, to rearrange the order of flow.
- Flow text into frames with any closed shape. Edit the frame shape using the regular shape editing tools.
- Change one or more text frames into text on path mode, to flow text along the shape.
- Wrap text around other objects with arbitrary shapes.
- Align text vertically inside a frame (for horizontal flow) to Top, Center, Bottom or Justified.
- Setup columns and rows for a text frame.
- Balance text between multiple columns inside a text frame.
If a text frame content does not overlow, the size of the text frame can be adjusted automatically, to fit the size of the text content using the Text -> Fit Text Frame command.
Creating Text Frames
When creating new text frames, a new independent text flow is created. To extend an existing text flow with new frames, use the frame linking tool described below.
To create a new text frame:
- Select the Text
 tool from the application toolbox.
 - Draw a rectangle for the initial text frame shape. The text frame position, size and shape can be adjusted later.
- The text cursor is shown in the top left corner of the newly drawn text frame.
- Start typing the text, or paste it from the clipboard.
- Additional frames (with new flows) can be drawn, while the text frame tool is active, by clicking outside of the edited text frame.
Importing Text
New text frames are also created when importing text from a file:
- Select the Import command from the file menu.
- Select a file in TXT or RTF file format.
- TXT files contain plain text, RTF files contain formatted text.
- After confirming the file selection, a new text frame is created at the center of the document view.
- Adjust the size and position of the new text frame using regular object transform tools.
- If the document view is rotated, the new text frame will be rotated relative to the document coordinates.
Linking Frames
A single text flow can be arranged into a sequence of text frames. These frames can be on different canvases or artboards. The Frame Linking  tool can be used to create new frames in a text flow, or to rearrange frames inside a flow.
- Select the Frame Linking tool from the application toolbox.
- Click on a text frame to start adding new frames or to rearrange the text flow.
- Two small icons indicate the incoming and outgoing flow direction, with lines to the previous and next frames if they are on the same canvas.
- The
 icon is shown around the start of the text frame (top left), depending on the horizontal / vertical direction and the frame shape. This icon indicates that there is a frame before this frame and the text in this frame is the continuation from the previous frame.
 - The
 icon is shown around the end of the text frame (bottom right), depending on the horizontal / vertical direction and the frame shape. This icon indicates that there is outgoing flow that may or may not be continuing in an other frame.
 - Click on one of these icons to insert a new frame into the text flow before or after the current frame.
- The text frame drawing cursor is shown, create the new text frame by drawing a rectangle.
- Alternatively, click on an existing object with a shape, to flow the text into that object.
Text Frame Options
The text frame options of the selected text frame object can be edited using the Text Frame Options command from the Text menu.
The text frame options can be saved and reused as styles or presets. When using text frame styles on one or more text frames in a document, editing the style (with the Styles panel, or Document Styles command) will update all text frames using the style.
The existing text frame styles and presets are listed in the Styles field. To create a new text frame style from the current options, select the Create Style command from the Styles list. To create a new text frame preset from the current options, select the Create Preset command from the Styles list.
The text frame options view is split into three sections:
- Options - containing common text frame options.
- Columns - containing the column and row options of the frame
- Baseline - containing the text baseline settings.
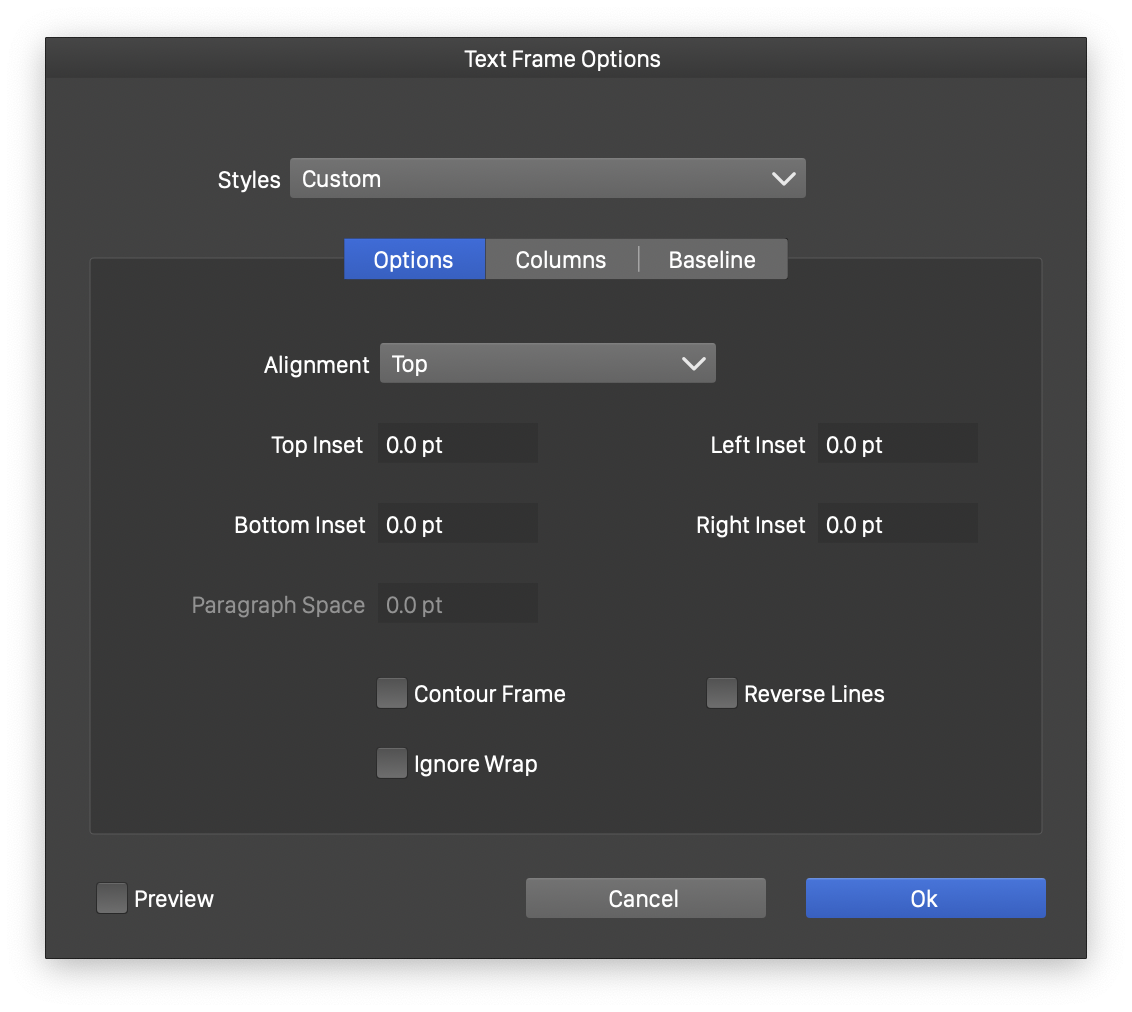
The Text Frame options view.
The Options section contains the following common text frame settings:
- Alignment - selects the vertical alignment of the (horizontal) text in the text frame. The alignment can be Top, Center, Bottom or Justified, to position the lines of text inside the frame at the corresponding place. The alignment options can be used also with non-rectangular frame shapes.
- Top Inset - edits the margin at the top of the text frame.
- Bottom Inset - edits the margin at the bottom of the text frame.
- Left Inset - edits the margin at the left side of the text frame.
- Right Inset - edits the margin at the right side of the text frame.
- Paragraph Space - edits the amount of paragraph spacing added between the paragraphs inside the text frame. The paragraph spacing is used when stretching space between lines to vertically justify the text inside the text frame.
- Contour Frame - when enabled, ignores the holes in complex shape frames and uses only the outer contour of the shape. This option is disabled by default, causing the text flow to avoid holes inside composite shaped frames.
- Ignore Wrap - ignores the text wrap options defined in other objects.
- Reverse Lines - reverses the flow of text from top-down to bottom-up. For vertical text, the flow direction will be left to right.
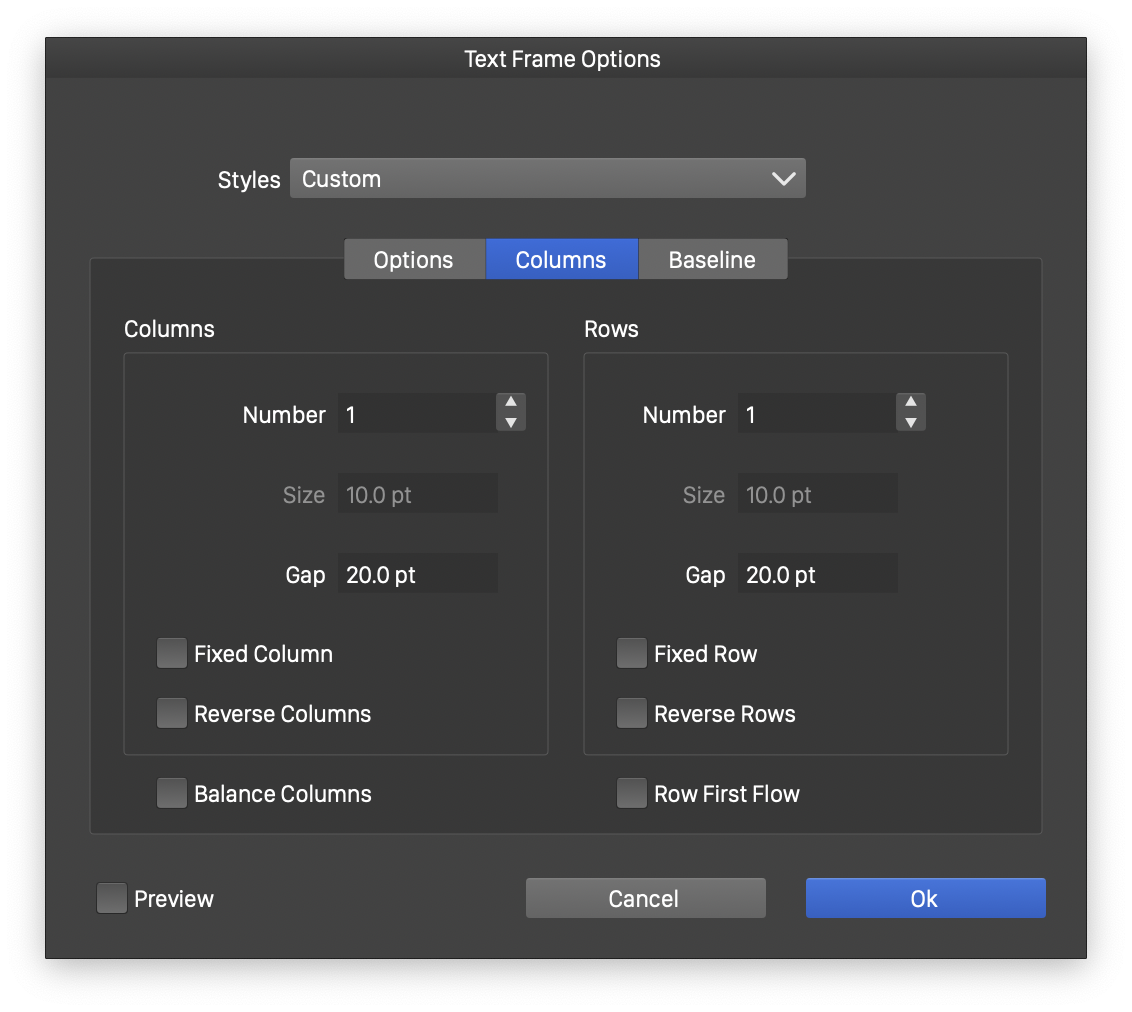
The Text Frame columns options view.
The Column section contains the following column and row settings:
- Columns - sets the number of columns, and spacing between the columns.
- Rows - sets the number of rows, and spacing between the rows.
- The columns and rows of a frame are set using similar fields.
- Number - sets the number of columns or rows in the text frame.
- Fixed Column - enables the fixed column size mode. The text may flow outside of the frame, to allow for the given number of fixed sized columns.
- Fixed Row - enables the fixed row size mode. The text may flow outside of the frame, to allow for the given number of fixed sized rows.
- Size - the extent of the column or the row, available only in fixed size mode.
- Gap - the gap between columns or rows.
- Balance Columns - enables the balancing of text between columns and rows inside a frame.
- Row First Flow - sets the direction of the text flow to fill columns of one row first, before moving to the next row. This option controls the text flow when both the column and the row number are larger than one.
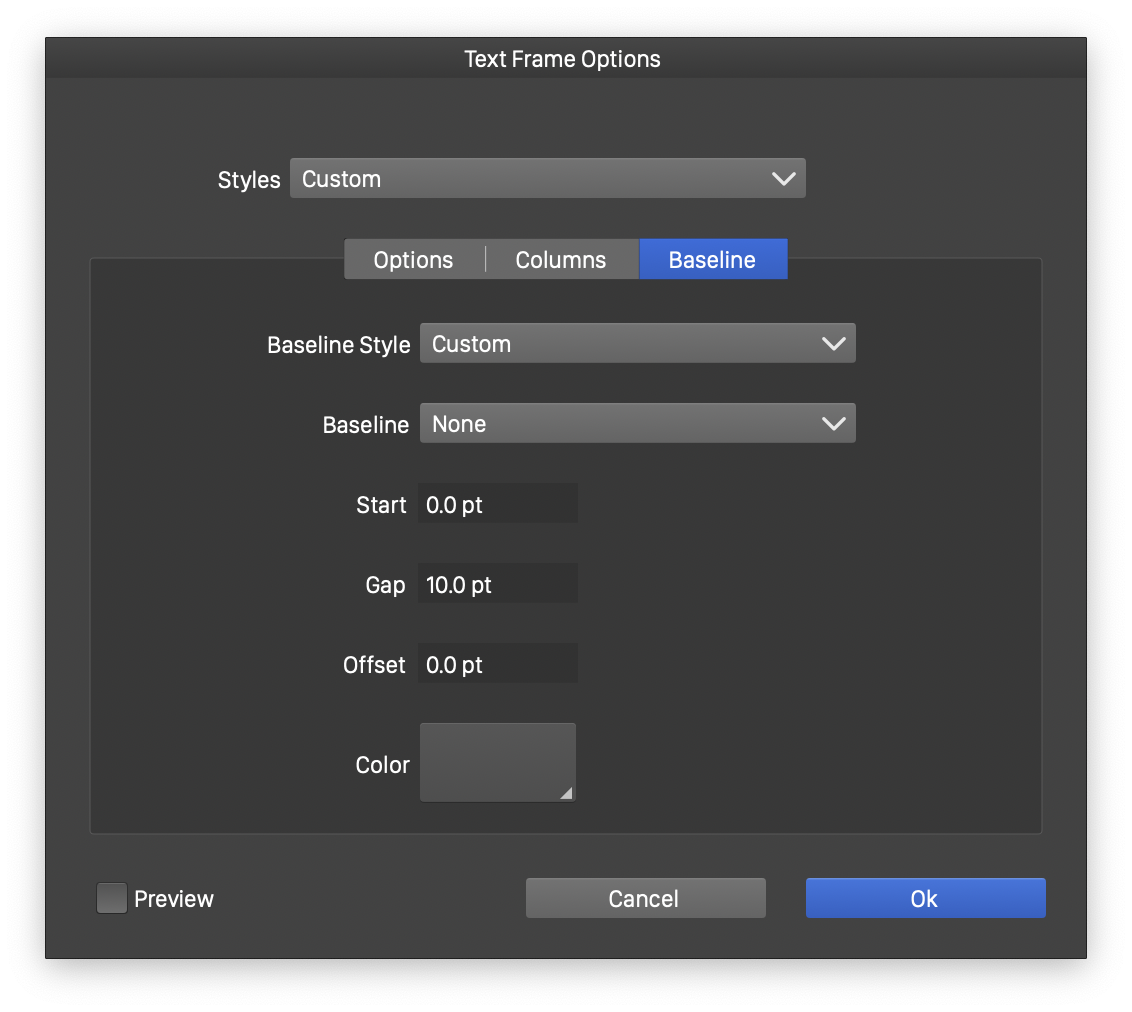
The Text Frame baseline options view.
The Baseline section contains the following text frame settings:
- Baseline Style - opens a list of baseline styles and presets. Baseline styles can be used to setup matching baselines in different frames.
- Baseline - selects the baseline mode inside the text frame:
- None - there are no baseline alignments inside this text frame.
- Absolute - the baseline is set at absolute positions using the Start and Gap values. Different frames with the same absolute baseline start and gap will have matching baselines.
- Relative - the baseline positions are relative to the frame, and move with the frame.
- Inset - the baseline positions are relative to the frame adjusted by the inset values set in the Options section.
- Start - sets the position of the first baseline.
- Gap - sets the distance between baselines.
- Offset - sets the offset of the baseline.
- Color - sets the color of the baseline used to indicate the text baselines. The text baselines are not printed or exported.
Text Wrap Options
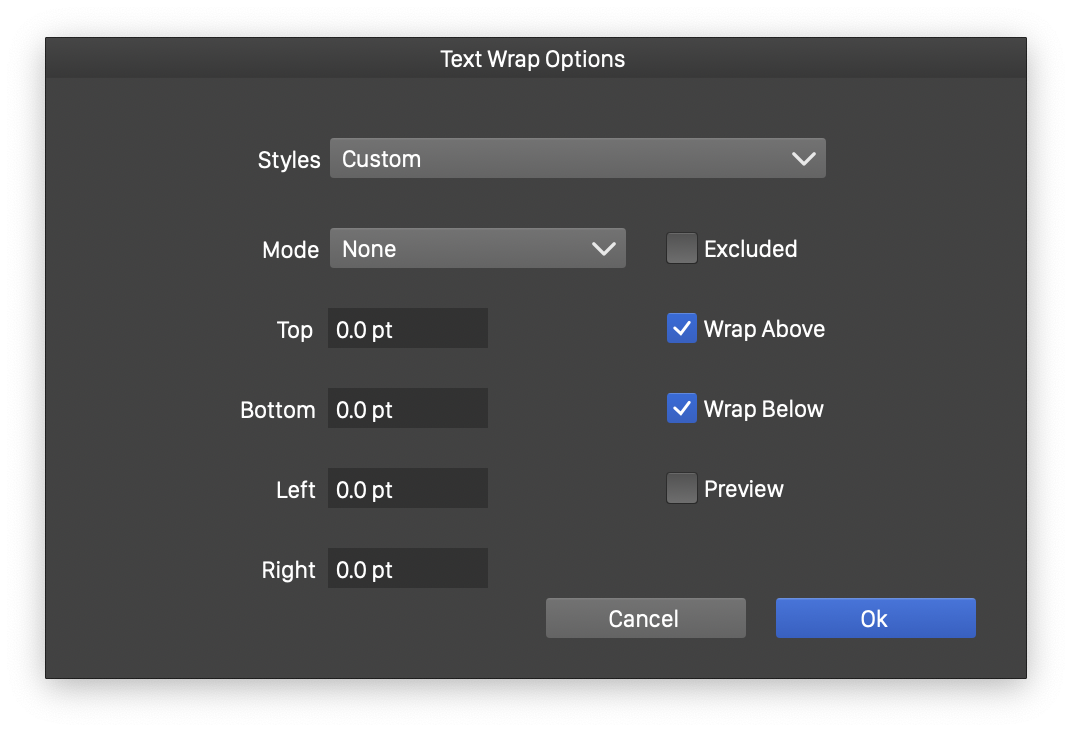
Text flown in one or more frames can be wrapped around objects overlapping these frames. The text wrapping options, associated with each object, determine how the text will flow around the object and the shape of the object. By default, an object has no text wrapping options, and it may overlap the text in a frame.
The text wrapping options of a selected object can be set using the Text Wrap Options command from the Text menu, or from the Text Wrap panel, opened from the Window - Text menu. The options provided by the text wrap command and the panel are as follows.
The Text Wrap Options view.
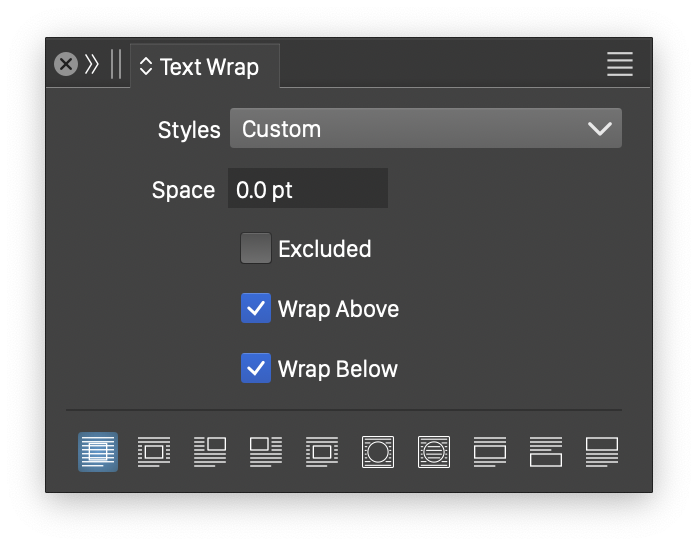
The Text Wrap panel.
- The text wrap options can be saved as styles or presets, and applied to multiple objects, by selecting a style or preset from the Styles field. To create a text wrap style, select the Create Style command from the Styles list. When using text wrap styles, modifying the style will modify the text wrap settings of all objects using that style. To create a text wrap preset, select the Create Preset command from the Styles list.
- Mode - Select the text wrapping mode around the object. The same option can be set from the Text Wrap panel, by selecting one of the icons at the bottom of the panel:
 None - Removes the text wrap options from the object, overlapping the text and the object.
 Box - The text flows around the bounding box of the object.
 Before Shape - The text flows around the outer edge of the object shape, before the object.
 After Shape - The text flows around the outer edge of the object shape, after the object.
 Largest Space - The text flows around the outer edge of the object shape, before or after, where the largest space is available.
 Outside - The text flows around the outer edge of the object shape.
 Inside - Text flows around the object shape, filling empty holes inside the shape.
 Block Text - Blocks the text around the object. Text can flow above or below the object.
 Flow After - Blocks the text around the object. Text can flow only below the object.
 Flow Before - Blocks the text around the object. Text can flow only above the object.
- Top Space - Edit the amount of space at the top margin of the object.
- Bottom Space - Edit the amount of space at the bottom margin of the object.
- Left Space - Edit the amount of space at the left side of the object.
- Right Space - Edit the amount of space at the right side of the object.
- Excluded - Enable or disable the exclusion of the object shape from the text frame shape. When enabled, the object shape is excluded from the text frame shape, using the Exclude path operator. The flow around the shape will be similar to the Inside mode.
- Wrap Above - Enable or disable text wrapping of the object is above the text frame, in the object stacking order.
- Wrap Below - Enable or disable text wrapping of the object is below the text frame, in the object stacking order.
The Text Wrap panel menu provides access to some of these options, including commands to create text wrap styles or presets.
Text Conversion
As mentioned in the introduction of this chapter, there are two types of text objects:
- A text shape is a shape, that can be used in objects and it is generated from text. This is similar to point text in other applications.
- A text frame contains a part of a text flow, inside the region defined by an object shape.
In some cases, it may be necessary to convert one text type to an other. For example, a short text introduced as a text flow may need to be converted to a text shape, to allow the use of shape effects. A text shape may be converted to a text frame, to allow line breaking at the frame margin.
To convert between text shape and text frame types:
- Select the text frame that must be converted to a text shape.
- Select the Convert to Shape Text command from the Text menu.
- Depending on the formatting options used, the text frame is converted to a similar text shape.
- To convert a text shape to a frame, select the object with the text shape.
- Select the Convert to Frame Text command from the Text menu.
- A text frame is created with the same text inside the frame, as it was in the text shape.


