Character Formatting
The character formatting options determine the type of font used in the text, and how characters (or glyphs) of text are arranged in the text flow. The character formatting options can be set from the Character panel, or using the Character Options command from the Text menu. A limited set of character options are also available in the Context panel and in the Properties panel.
A sequence of characters in a text can be formatted with local character options, different from the surrounding text.
To set the character options of a sequence of characters:
- Highlight the portion of the text where the character options will be selected.
- Select the character options in the Character panel, or using the Character Options command from the Text menu.
- The highlighted text will use the changed character options.
- Only the modified character options are applied to the highlighted text. The other options will be inherited from the surrounding text.
In some cases, text containing parts with custom character formatting must be returned to a base formatting, used in the surrounding text or paragraph. This can be done by clearing the character overrides of the text:
- Highlight the portion of the text where the character options should be restored to default.
- Select the Clear Character Overrides command from the Text menu.
- Alternatively, click on the
 button in the Character panel.
 - To clear overrides in the whole text, select all the text with Command+A, or select the text object, and then use the clear override commands.
Character Panel
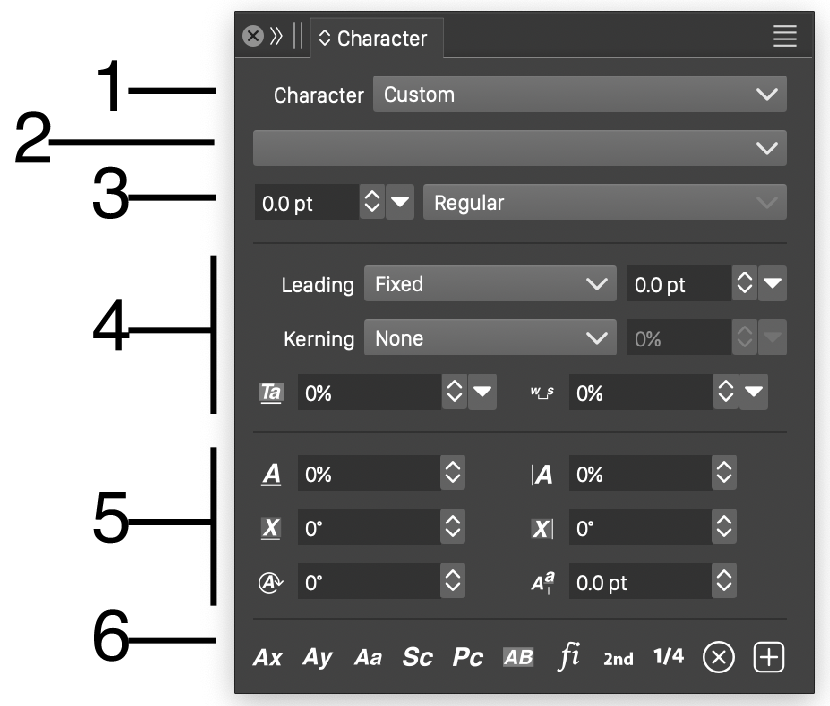
The Character panel
The Character panel, accessed from the Window - Text menu, contains character formatting options that can be applied on the selected text.
The Character panel provides access to the following options:
- (1) The Style field opens a menu of character styles and presets. Character options can be saved as a style or a preset, and reused on other text selection. These styles are similar to the well known character style concept.
- (2) The font is selected from the drop box under the Style field. The current text font name is shown in the drop box. To select a font, click on the drop box and scroll in the list to find the font. The details of font selection and management are discussed in the Fonts section.
- (3) The font style is selected using the drop box. The font size can be set in the numeric field, or a predefined size can be selected, using the
 icon next to the numeric field.
 - (4) The character spacing options are as follows:
- Leading row is used to set the character leading, the spacing between lines of text. The leading can be:
- Auto - For automatic leading, here the line spacing is calculated based on the leading amounts from the font, plus the user defined value.
- Fixed - The line spacing is set to a fixed amount.
- Height - The line spacing is set to the line space amounts provided in the font file, plus a fixed amount.
- Kerning row selects the kerning mode for the characters. The kerning is a glyph specific spacing, between pairs of glyphs. The following options are available:
- None - There is no kerning between glyphs.
- Font - The kerning pairs, defined in the font, are used to space pairs of characters. This can be increased or decreased, using the amount in the numeric field.
- Optical - The kerning pairs are calculated using an optical method over the shape of the two glyphs. The resulting kerning can be increased or decreased, using the amount in the numeric field.
 - Set the tracking between characters. The tracking is a fixed amount of spacing, increasing or decreasing the space between characters.
 - Set the spacing between words.
- Leading row is used to set the character leading, the spacing between lines of text. The leading can be:
- (5) The transformation of characters:
 - Edit the horizontal scaling of the glyphs.
 - Edit the vertical scaling of the glyphs.
 - Edit the horizontal skewing of the glyphs.
 - Edit the vertical skewing of the glyphs.
 - Edit the rotation angle of the glyphs.
 - Edit the baseline offset of the glyphs.
Section (6) of the character panel contains additional options to format the characters of the highlighted text:
 - Enable or disable the subscript mode of the characters. In the subscript mode, the character size is reduced and the characters are positioned below the baseline. The subscript options can be edited using the Character Options command.
 - Enable or disable the superscript mode of the characters. In the superscript mode, the character size is reduced and the characters are positioned above the baseline. The superscript options can be edited using the Character Options command.
 - Enable or disable the all capitals mode. When enabled, all characters are converted to capitals.
 - Enable or disable the small capitals mode. When enabled, the character glyphs are mapped to small capital glyphs if available in the selected font. If small capitals are not available, regular capitals are used with scaled down size.
 - Enable or disable the petite capitals mode. When enabled, the character glyphs are mapped to petite capital glyphs if available in the selected font. If petite capitals are not available, regular capitals are used with scaled down size.
 - Enable or disable the line breaking inside the highlighted text. Line breaking is enabled by default. When disabled, the highlighted text is not broken into lines.
 - Enable or disable the use of standard ligatures, if the selected font provides support for ligatures. Standard ligatures are sequences of glyphs, that are replaced with a single, more suitable glyph, to achieve fine typography. For example, in some text the fi pair of characters can be replaced with a specially rendered glyph.
 - Enable or disable the use of ordinals, if the selected font provides support for it. Ordinals are ligatures replacing text like 1st or 2nd, to a typographically more suitable glyph.
 - Enable or disable the use of fractions, if the selected font provides support for it. Fractions are ligatures replacing text like 1 / 2 or 1 / 4, to a typographically more suitable glyph.
- - Clear the character overrides in the selected text. The selected text character options will return to their default value.
 - Create a new character style from the current character options.
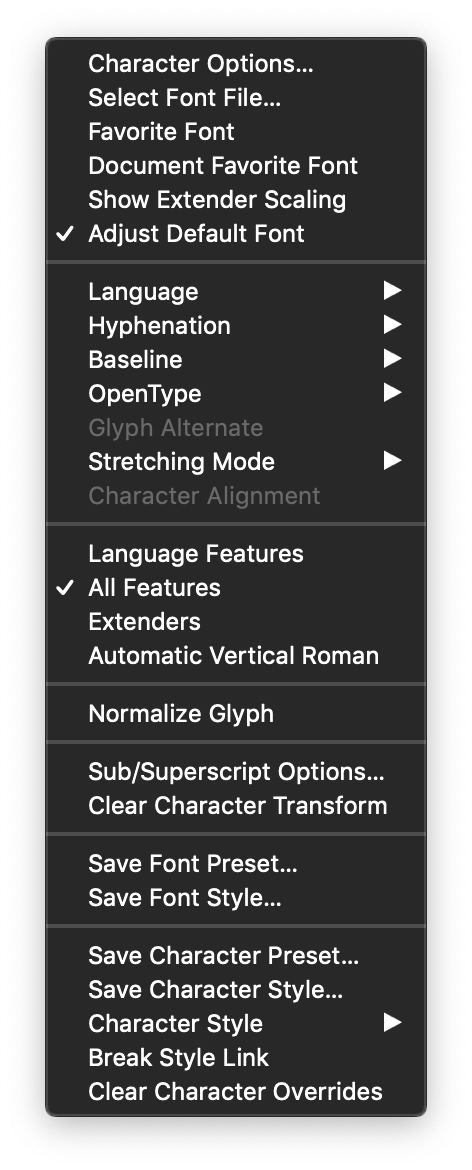
The Character panel menu
The Character panel menu contains a set of additional commands and options to format the highlighted text:
- Character Options - Open the Character Style view, to edit more character formatting options.
- Select Font File - Set the font for the highlighted text from a font file, that may not need to be installed in the host operating system.
- Favorite Font - Enable or disable the favorite mode of the current font. Favorite fonts can be marked an listed in a separate font collection, to reduce the number of choices when selecting fonts.
- Document Favorite Font - Check to store the current font as a favorite font in the document.
- Show Extender Scaling - Check to show the extender scaling amount, instead of the word spacing in the character panel.
- Adjust Default Font - Check to select default font when changing the font of the selected text.
- Language - Open a list of languages, to select the language of the highlighted text. The text language is used in selecting font features, and in spell checking the text.
- Hyphenation - Open a list of languages, for which a hyphenation dictionary is available. Hyphenation can be selected separately from the text language.
- Baseline - Open a list of baseline options, if available from the selected font. Baseline options are OpenType features, used in positioning text.
- OpenType - Open a list of OpenType features, to enable or disable selected features. The OpenType feature must be available in the selected font, to have an impact on the text appearance. All OpenType features are listed here, and if a feature is not available in the font. Features that are not available are shown between [] brackets.
- Glyph Alternate - Select a glyph alternate for the highlighted characters, if available in the current OpenType font.
- Stretching Mode - Open a list of glyph stretching modes, defined in the paragraph stretching options. The stretching mode determines the glyph stretching amount, when compositing a paragraph of text into a frame.
- Character Alignment - Select baseline alignment mode for Japanese characters.
- Language Features - Enable or disable the listing of language specific features in the OpenType font.
- All Features - Enable or disable the listing of all OpenType features.
- Extenders - Enables the use of automatic extenders, typically needed in Arabic languages.
- Automatic Vertical Roman - Check to automatically rotate roman character in vertical text, using the character mapping of the paragraph format.
- Normalize Glyph - Cleanup overlapping parts of the glyphs. This option can be used with certain variable OpenType fonts, with text shapes, to cleanup parts of the glyph shape that is self intersecting.
- Sub/Superscript Options - Edit the subscript and superscript options of the highlighted text. These options are described with more detail in the corresponding section of the Character Style view.
- Clear Character Transform - Remove individual character transformations.
- Save Font Preset - Create a new preset with the selected font name and style.
- Save Font Style - Create a new style with the selected font name and style. The font selection can be saved as a style or preset, to allow an easier selection of fonts, from a limited set of styles and presets.
- Save Character Preset - Create a new preset with the current character options. Character option presets enable the reuse of character formatting options, without linking to a common style.
- Character Presets - Opens a list of available character formatting presets. Select a character formatting preset, to use it on the highlighted text.
- Save Character Style - Create a new style with the current character options. Character styles can be used in text formatting to set common formatting attributes in multiple text frames and different places in the text. Changing a character style will update all text formatting using the style. The character styles can be accessed and managed using the Character Style panel.
- Character Styles - Opens a list of available character styles. Select a character style, to use it on the highlighted text.
- Break Style Link - Detach the character formatting options of the highlighted text from the character style used in the text. The character formatting options will not change, but they will not be linked anymore to the character style definitions. Changing the character style, will not change the formatting of text with detached styles.
- Clear Character Overrides - Clear the character overrides of the highlighted text, setting the character formatting options to their default value from the surrounding text.
Character Tool

A single character stretched and rotated using the character tool.
The Character  tool can be used to select and move, stretch or rotate individual characters. The Character tool can be found in the group of other text tools, in the application toolbox.
To move, stretch or rotate individual characters:
- Select the Character tool.
- Click on the character, to select a single character.
- A bounding box and two rotating handles are drawn around the selected character.
- The upper-right corner of the selection box is used to uniformly scale the character.
- The upper-left corner of the selection box is used to stretch the character vertically.
- The lower-right corner of the selection box is used to stretch the character horizontally.
- The rotation handles, extending from the middle of the top and right margin of the box, are used to rotate the character.
- Dragging the character with the mouse will change the character position.
- The scaling and stretching amounts of the character, will change the spacing occupied by the character, when formatting a text flow or shape.
- The movement and rotation will have no impact on the formatting of the text shape or flow. The movement and rotation are only used to display the character at a new position and angle.
Text Decoration
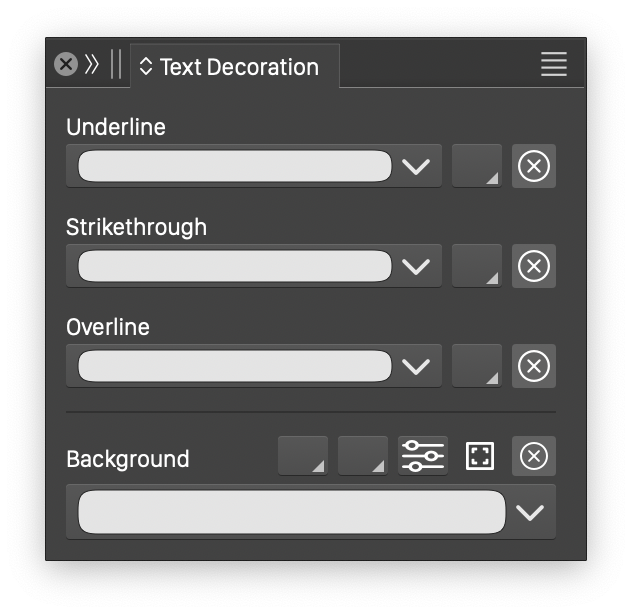
The Text Decoration panel.
The Text Decoration panel can be used to select underline, strikethrough, overline and background styles, of the highlighted text. These options are also available in the Character Options command. The Text Decoration panel can be opened from the Window - Text menu.
Changes made in the Text Decoration panel are applied on the selected text.
Selecting the underline style:
- The underline style is selected from the list of styles at the Underline field.
- Default - Revert to the default underline style of the surrounding text.
- None - Remove the underline style.
 - Open a fill style selector view, to select the fill style of the underline.
 - Removes the local fill style from the underline options, and reverts to the default text fill style for the underline.
- The Underline Options command from the panel menu, edits the detailed underline options in the Underline view.
- The Underline view content is similar to the Underline section of the Character Style view.
- The Underline view can be used to create new text lining presets and styles using the Save Preset and Save Style buttons.
- The styles and presets will be listed in the Underline field of the panel.
Selecting the strikethrough style:
- The strikethrough style is selected from the list of styles at the Strikethrough field.
- Default - Revert to the default strikethrough style of the surrounding text.
- None - Remove the strikethrough style.
- - Open a fill style selector view, to select the fill style of the strikethrough.
- - Remove the local fill style from the strikethrough options, and reverts to the default text fill style for the strikethrough.
- The Strikethrough Options command from the panel menu, edits the detailed strikethrough options in the Strikethrough view.
- The Strikethrough view content is similar to the Strikethrough section of the Character Style view.
- The Strikethrough view can be used to create new text lining presets and styles using the Save Preset and Save Style buttons.
- The styles and presets will be listed in the Strikethrough field of the panel.
Selecting the overline style:
- The overline style is selected from the list of styles at the Overline field.
- Default - Revert to the default overline style of the surrounding text.
- None - Remove the overline style.
- - Open a fill style selector view, to select the fill style of the overline.
- - Remove the local fill style from the overline options, and reverts to the default text fill style for the overline.
- The Overline Options command from the panel menu, edits the detailed overline options in the overline view.
- The Overline view content is similar to the Overline section of the Character Style view.
- The Overline view can be used to create new text lining presets and styles using the Save Preset and Save Style buttons.
- The styles and presets will be listed in the Overline field of the panel.
Selecting the background style:
- The background style is selected from the list of styles at the Background field.
- Default - Revert to the default text background of the surrounding text.
- None - Remove the background of the text.
 - Open a fill style selector view, to select the fill style of the text background.
 - Open a fill style selector view, to select the fill style for the stroke of the background.
 - Open the stroke options view to select the stroke options for the background region outline.
 - Select the background region as an object, to be editable using the object styling panels.
- - Remove the text background from the selected text.
Character Selection
The Text menu contains a set of commands used to change the characters, their formatting options, or to insert special characters into the text.
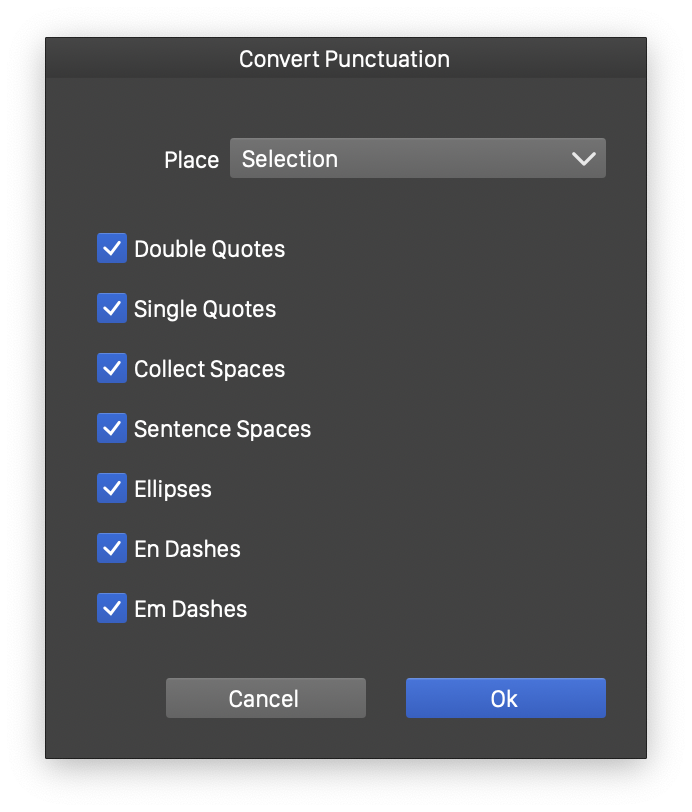
The Convert Punctuation view.
- Convert Punctuation - Convert the various punctuation styles in the selected text, selected flow, or the whole document. Converting punctuations can be used to detect and replace quotes, spaces and dashes to typographically suitable characters.
- Change Case - Convert the highlighted text to the selected letter casing:
- UPPER CASE - all characters will be upper case.
- lower case - converts all characters to lower case.
- Title Case - converts the selected text to title case, capitalizing the first character of each word.
- Sentence case - converts the selected text to sentence case, capitalizing the first character of each sentence.
- Insert Character - Open a list of special characters to be inserted at the current location in the text. Position the text cursor at a location, and select one of the special characters to insert it into the text.
- Insert Shape - Open a list of object names with the Inline Shape role. Inline shapes are regular objects, using the Inline Shape role. Inline shapes can be inserted as glyphs into a text shape or flow, and will act as a regular character with a special glyph shape. Inline shapes can be used to create special glyphs and characters.
- Insert Object - Open a list of object names with the Inline Object role. Inline objects are regular objects, using the Inline Object role. Inline objects can be inserted as glyphs into a text shape or flow, and will act as a regular character with a special glyph image, using the object shape and style.
- Script - Open a list of languages, used to select the script mode of the OpenType font. The current font must have the selected OpenType script support.
- Language - Open a list of languages, used to select the language mode of the OpenType font. The current font must have the selected OpenType language support.
- Hyphenation - Open a list of hyphenation languages, to select the hyphenation mode of the highlighted text.
- Baseline - Open a list of baseline modes supported by the current OpenType font.
- OpenType Features - Open a list OpenType features, that can be enabled or disabled for the selected text. An enabled feature must be supported by the current OpenType font, to have an effect on the text formatting.
- Leading - Open a list of leading modes and values, to select the interline spacing.
- Kerning - Open a list of kerning modes and values, to select the glyph specific inter-character spacing.
- Unerline - Open a list of underline options, presets and styles to set the underline of the highlighted text.
- Strikethrough - Open a list of strikethrough options, presets and styles to set the strikethrough of the highlighted text.
- Overline - Open a list of overline options, presets and styles to set the overline of the highlighted text.
- Background - Open a list of text background options, presets and styles to set the background fill of the highlighted text.
Character Styles
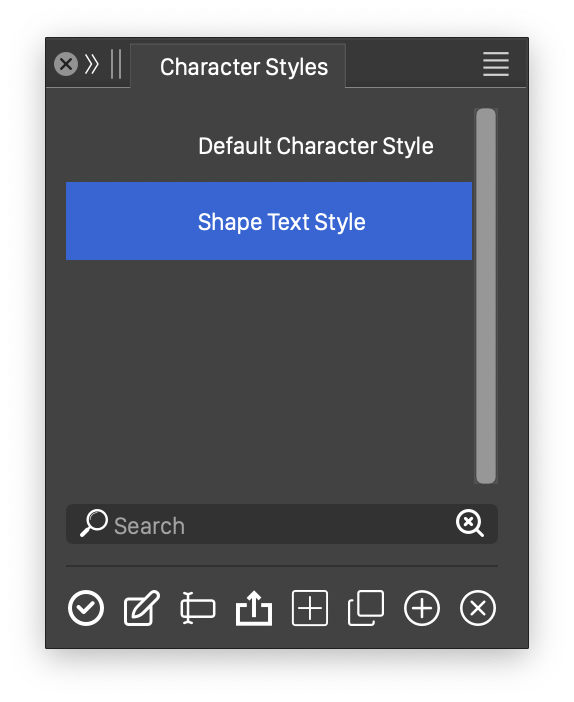
The Character Styles panel.
The typical process of working with various character formatting options, is to create character styles. Character styles can be defined in a single place and used throughout the document. When a character style changes, all occurrences of that style are changed (excluding overrides).
Character styles work in a similar way as other styles described in the Styles section, with the difference that for character styles, a separate panel is used. This similarity means, that object roles can also be used to define character styles.
The various style types (including character and paragraph styles) share the same folder structure. Character styles can be organized into folders, but this will be the same folder structure used in the Styles and Paragraph Styles panel.
The Character Styles panel can be opened using the Character Styles command from the Window - Text menu.
The content of the Character Styles panel is similar to the Styles panel, described in the Styles section.
- The panel contains the list of character styles defined in the current document.
- Selecting a character style will only highlight the style for editing, and will not apply it to the text.
- Double click on a character style to apply on the selected text.
 - Apply the selected character style to the highlighted text.
 - Open the Character Style editor view.
 - Open the style name and shortcut editor.
 - Change the selected style values from the currently selected objects. This button can be used to change the attributes stored in any style type.
 - Create a new character style from the character formatting options used in the selected text.
 - Create a copy of the selected character style.
 - Create a new character style set to the default formatting options. The new style can be edited later, using the button.
 - Delete the selected styles.
The panel menu contains options and commands used to manage the character styles. These are similar to the Styles panel menu, described in the Styles section.


