Layers Panel
In VectorStyler, each canvas contains a hierarchy of layers, while a document may contain multiple canvases. When a new document is created, the initial canvas will contain a single layer. This layer is the place of initial object drawing. A canvas can contain multiple layers, and it is also possible to place objects on a canvas. A layer may contain other sub-layers, and multiple objects. An object (a group or other container), may contain multiple other objects. An object cannot contain layers, but objects may refer to layers as symbols or transparency masks.
The hierarchy of layers containing other layers or objects, and objects containing other objects, forms the content of an illustration or design. These layers and objects are rendered in their order of appearance, using their selected style, opacity, transparency and composition modes.
The hierarchy of layers and objects can be managed using the Layers panel, opened from the Window menu, or with the Option+L shortcut. The Layers panel shows a list of layers and objects of the current canvas. Layers and objects can be opened, to reveal sub-layers or member objects. The layer and object list can be changed and edited using the commands accessible from the Layers panel icon section, or the panel menu.
In VectorStyler, a canvas contains its own layer hierarchy. Artboards can be placed at arbitrary locations on a canvas, and share a single layer hierarchy with the canvas. Artboards do not contain layers or objects, they are just indicators (or markers) used when printing and exporting.
Holding Option (Alt) and hovering on an object or layer in the Layers panel will show that object or layer in isolated mode.
The Layer and Object Hierarchy
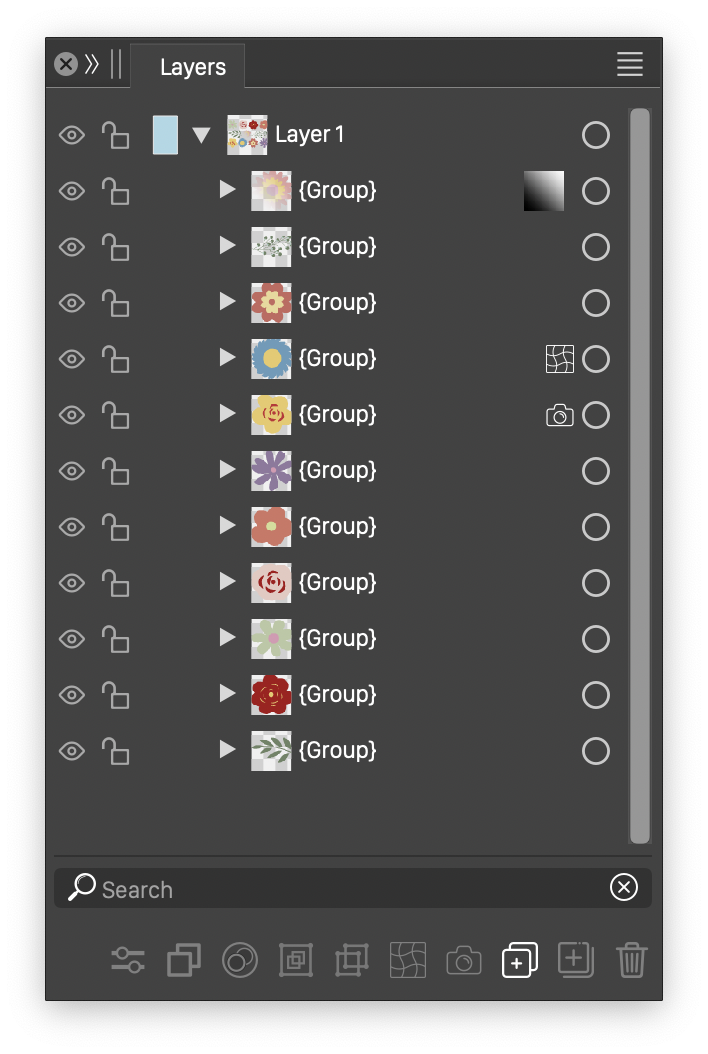
The Layers panel.
In the Layers panel, each layer and object is shown as a list item, displaying a small preview of the content, the layer or object name, and several quick access options of the layer or object.
When pressing a shortcut while in the Layers panel (last click was in the panel), the action associated with the shortcut is executed on the selection made in the Layers panel.
A layers panel item, as seen in the figure, contains the following visual elements:
- (1) The visibility tool can be used to show or hide the layer or object.
- (2) The lock tool can be used to lock or unlock the layer or object.
- (3) The color of the layer in outline mode. Also used to identify the layer. All list items of objects inside a layer start with the layer color. The layer color visual is shown in varying sizes to indicate the layer and object hierarchy. Click on the color label to select another color.
- (4) The arrow tool used to open or close a layer, or group containing other objects. When closed, the objects inside the layer or group are not listed in the panel.
- (5) The preview of the layer or object. A double click, or long press on the preview opens a much larger preview of the object or layer.
- (6) The name of the layer or object. The name can be edited, by clicking again on the selected layer or object. A double click on the layer or object name will open the layer or object options view, used to edit the name, opacity, blending mode and other options.
- (7) The transparency tool is shown only if the layer or object has a transparency mask. Clicking on the transparency tool will open a menu of transparency options.
- (8) The selection tool can be used to select the layer or object using regular object selection.
- In addition to the above features, the Layers panel option view contains the Show Selection option, that can enable an icon in each layer panel row that can be used to isolate objects.
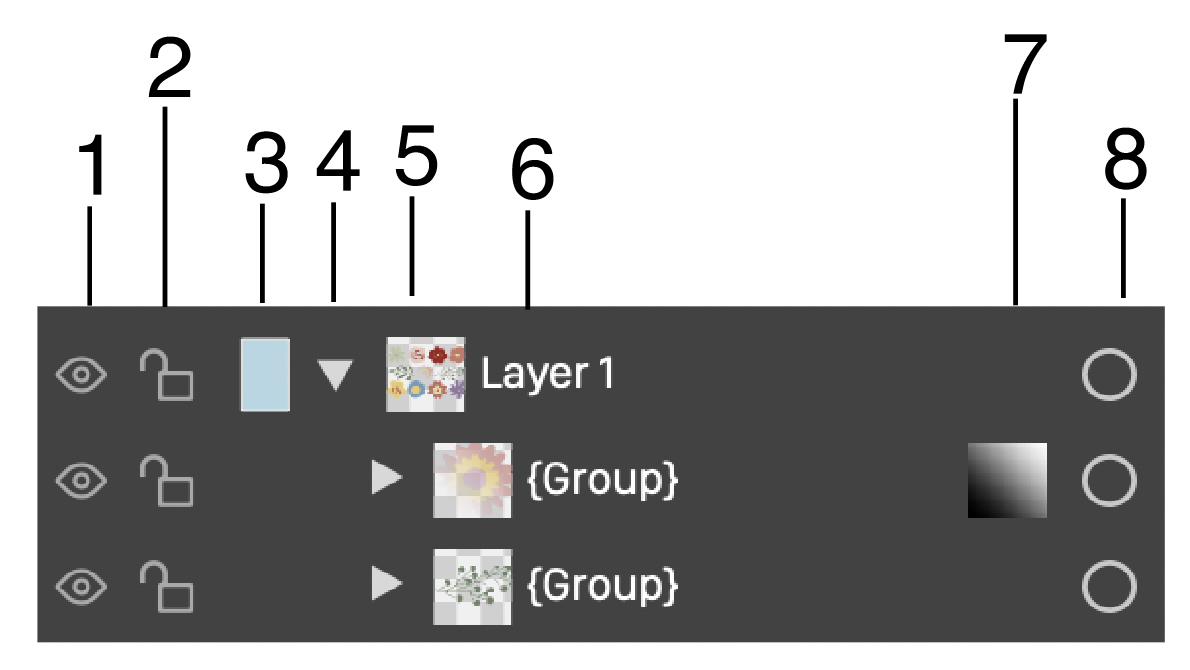
A layer and two objects in the layers panel.
The lock, visibility and selection tools can also be used, by pressing and dragging the mouse over multiple objects or layers. In this case, the selected lock or visibility is changed for all the objects under the mouse, or all these are selected for the selection tool.
Objects and layers can be rearranged, by dragging and dropping in the layers panel:
- To drag and drop one or more selected objects, or layers, press the mouse on the list items and start dragging.
- Dragging the selection over an object, or layer will highlight the object, indicating that the selected objects will be dropped inside the object or layer.
- Dragging the selection close to the margin between two objects in the list, will show a highlight between the objects, indicating that the selected objects will be dropped between the two objects.
- Dragging and dropping the selection over the current canvas will place the object onto the current layer of the canvas.
- Holding the Command (Mac) or Control (Windows) key when pressing the mouse on an object, to initiate a drag and drop operation, will create symbolic references to that object.
- Holding the Control initiates the dragging and dropping of object styles from one object to another.
- Dragging a graphics file into the Layers panel will import the file and create an object with the content of the file.
Objects can be dropped inside an object in the layer panel, creating a clipping group.
Layer Panel Options
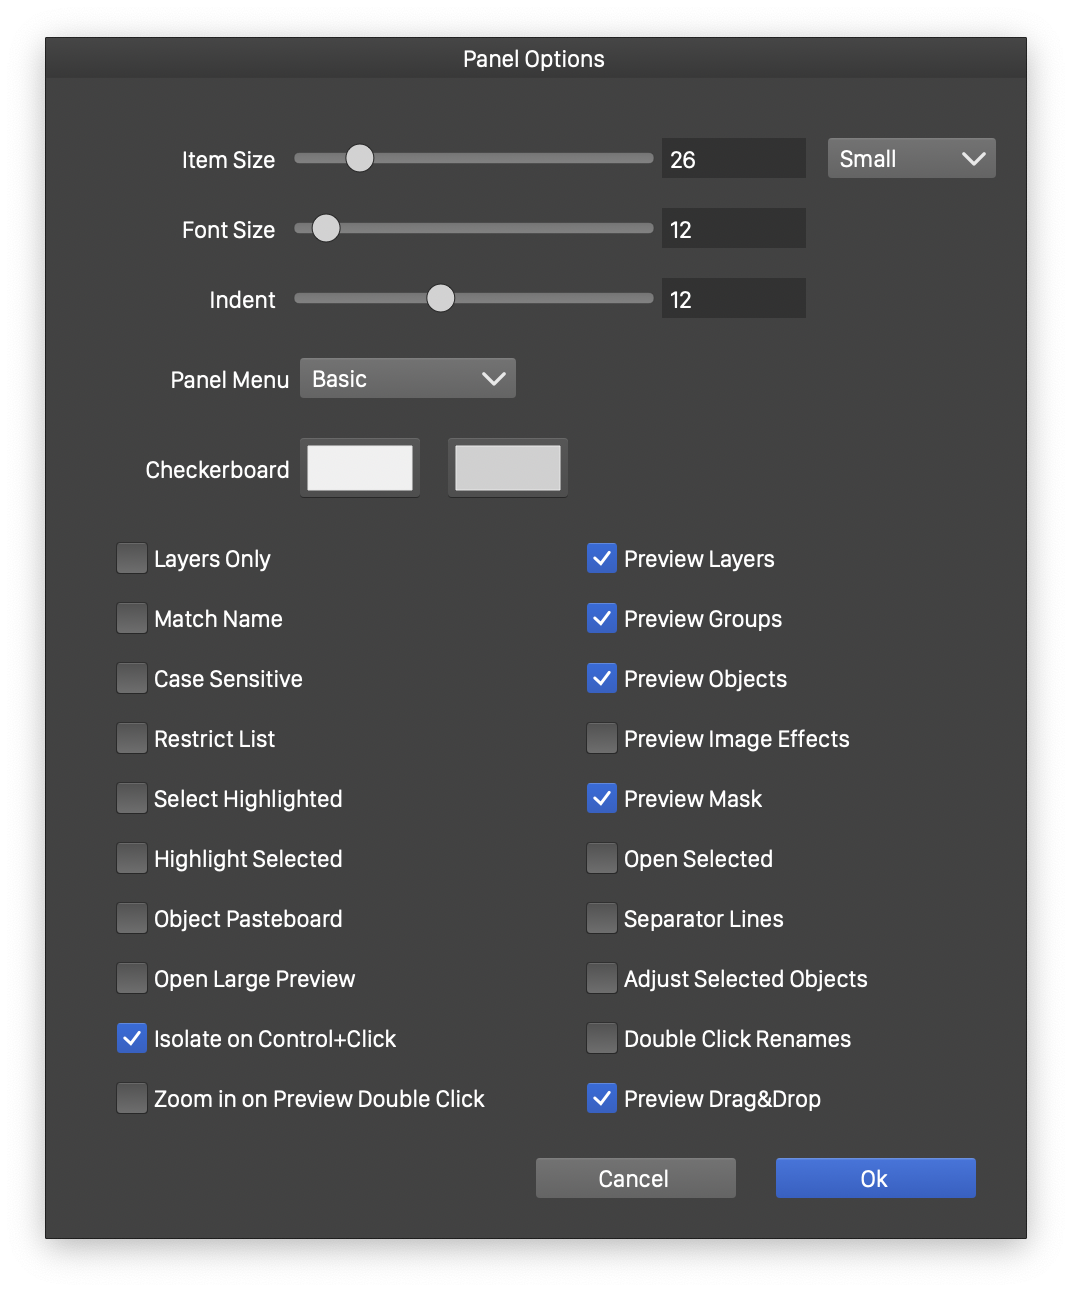
Layer panel options.
Various aspects of the Layers panel can be configured, using the Panel Options command from the panel menu. Configuring the layers panel includes setting the list item sizes, enabling or disabling previews and setting highlight and search options.
- Item - Set the size of a list item in the layers panel. Predefined sizes are Small, Medium or Large. In addition, any user selected size is accepted.
- Text - Set the size of a font used to show the layer and object names.
- Indent - Set the amount of rightward indentation, when showing member objects of groups or layers.
- Panel Menu - Select the Layers panel menu detail.
- Checkerboard - Select the colors used in the checkerboard background of the preview icons in the Layers panel.
- Layers Only - Enable or disable the layers only list. When enabled, the layers panel will list only the layers of the current canvas. This option is disabled by default.
- Match Name - Enable or disable the use of exact matching when searching for object names. This option is used when searching for objects by name in the layers panel. When enabled, only objects with a name matching the search name are selected. Otherwise, objects whose name contains the search string are also selected.
- Case Sensitive - Enable or disable the use of case sensitive comparison of the object names with the searched name.
- Restrict List - Enable or disable the use of restricted object and layer list, when searching for objects by name. When enabled, and objects are searched by name, the layers panel will list only the objects containing (or matching) the name. This option is disabled by default.
- Select Highlighted - Enable or disable the selection of objects highlighted in the layers panel. When enabled, the objects selected in the layers panel will be selected in the document also.
- Highlight Selected - Enable or disable the highlighting of selected objects in the layers panel. When enabled, the objects selected in the document will be highlighted in the layers panel.
- Object Pasteboard - Enable or disable the copy and paste of objects. When enabled, the copy / paste key shortcuts will copy and paste objects. When disabled (by default) the object names are copied and pasted.
- Open Large Preview - Check to enable a large preview when clicking on the object or layer preview icon in the Layers panel.
- Isolated on Control+Click - Enable or disable the object isolation when Control+clicking on the object in the Layers panel. When disabled, the Control+Click will select the same objects on the canvas also.
- Zoom In on Preview Double Click - Check to enable zooming into the object or layer when double clicking preview icon.
- Show Visibility - Check to show the layer visibility icon.
- Show Locking - Check to show the layer locking icon.
- Show Isolation - Check to show a an object or layer isolation icon in each row of the layers panel. This icon can be used to quickly isolate an object or layer.
- Preview Layers - Enable or disable the display of a small preview for layers.
- Preview Groups - Enable or disable the display of a small preview for groups.
- Preview Objects - Enable or disable the display of a small preview for objects.
- Preview Image Effects - Enable or disable the preview of image effects in the Layers panel previews.
- Preview Mask - Enable or disable the display of a small preview of transparency masks.
- Open Selected - Enable or disable the automatic opening of layers, when selected.
- Separator Lines - Enable or disable the display of separator lines between objects in the layers panel list.
- Adjust Selected Objects - Adjust the clicked option (locking, visibility, selection) of all selected objects (enabled) or only the clicked one (disabled).
- Double Click Renames - Enable or disable the object renaming when double clicking on an item in the Layers panel. When disabled, double clicking opens the object or layer options view.
- Preview Drag&Drop - Check to show a larger preview image when dragging and dropping an object or layer in the Layers panel.
- Show Layer Color - Check to show the layer color selection knob.
- Show Selection - Check to show the layer or object selection knob.
Selecting objects from the Layers panel
The Layers panel is used to browse the hierarchy of layers and objects of the current canvas. In the layers panel, objects and layers are selected by clicking on the list item. Multiple objects and layers can be selected using the Shift and Command (Mac) or Control (Windows) keys, as in other lists in the user interface.
In the default configuration of VectorStyler, highlighting the objects in the layers panel will not select the objects on the canvas. That is, the selection made on the canvas and the selection made in the panel are two different selections. This difference is used by several features of the layers panel. For example, the Shape From Selection command picks the shape of the objects selected in the layers panel, from the object selected in the canvas.
To make canvas selection in the layers panel, use the  selection buttons, shown at the end of every layer and object item in the list. Pressing and dragging the mouse over multiple selection buttons in the layers panel, will select all these objects in the canvas.
The canvas versus layers panel selection mechanism can be configured, to accommodate the user working style and preference. By default, the selections made in the canvas and the layers panel are independent. These two selections can be synchronized, in one or both directions, depending on the configuration made by the user.
- Select the Panel Options command from the Layers panel menu.
- Select Highlighted - Enable or disable the selection of objects in the canvas, when they are selected in the panel. By enabling this option, selecting layers or objects in the layers panel, will select them in the canvas as well (but not the other way around).
- Highlight Selected - Enable or disable the selection of objects in the layers panel, when they are selected in the canvas. By enabling this option, selecting objects in the canvas, will select them in the layers panel as well (but not the other way around).
- Enabling both options will make the canvas selection and layers panel selection the same.
Searching for Objects
Objects can be searched by name, using the search box in the layers panel.
- To search for an object by name, type the name into the search box. The first object found is highlighted.
- To find the next object with that name, press enter while in the search box, or click the
 icon.
icon. - To search backwards, hold the Option (Mac) or Alt (Windows) key and click the icon.
- The search options can be configured using the Panel Options command from the panel menu.
- The object name can be matched exactly, or searched for a text inside the name.
- The object name matching can be case sensitive, or case ignoring.
- When searching for objects, the Restrict List mode can be enabled to show only the objects that match.
- The search text can be cleared by clicking the
 icon.
icon.
Layer Panel Commands
The lower section of the Layers panel contains a number of commands used to manage the layer and object hierarchy. The following commands can be selected:
 - Open the object or layers options view, to edit the selected object or layer options. These options are described in the Object Options section.
 - Duplicate the selected objects or layers.
 - Create a clone for each selected object or layer.
 - Group the selected objects or layers. When grouping layers, a new layer is created that will contain the selected layers.
 - Expand the selected object groups or layers into its constituent objects.
 - Create or edit the shape effects applied on the selected objects. If a layer or an object has shape effects, a similar icon will be shown after the object name in the layers and objects list.
 - Create or edit the image effects applied on the selected objects. If a layer or an object has image effects, a similar icon will be shown after the object name in the layers and objects list.
 - Create a new layer, by opening a layer options view to setup the new layer.
 - Create a new member layer under the selected layer.
 - Delete the selected objects and layers. Dragging and dropping the objects or layers on this icon will also delete them.
Layer Panel Menu
The layers panel menu can be configured to show more or fewer number of commands. This layers panel menu detail can be selected in the Panel Menu field of the panel options.
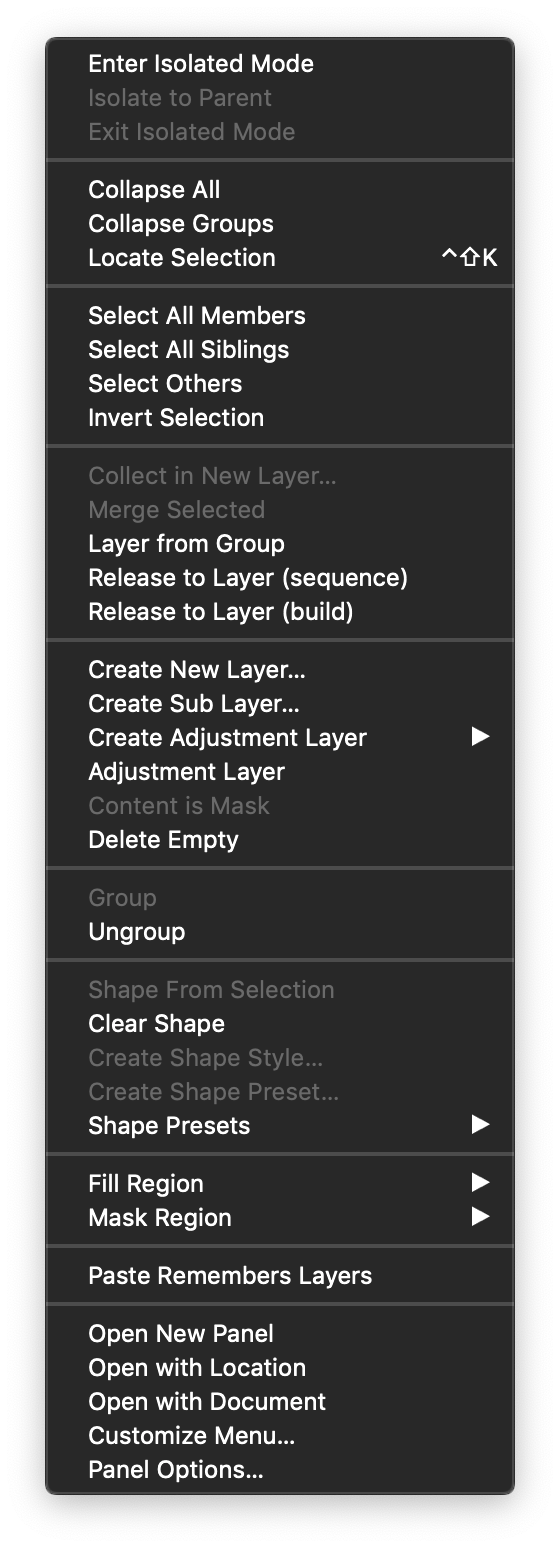
The Layers panel menu.
The Layers panel menu contains various commands, that can be used to manage or modify selected objects in the panel. The following commands are accessible from the Layers panel menu:
Isolated Mode
- Enter Isolated Mode - Enter into isolated editing of a layer or a group. In isolated mode, all objects and layers outside the isolated location, are rendered in a dimmed mode. Only objects inside the isolated layer or group are selectable.
- Isolate to Parent - Set the isolated group to the container group of the current isolated object. This command is used to move the isolated editing to one level up, in the object hierarchy.
- Exit Isolated Mode - Exit the isolated mode, and return to the editing on the whole canvas.
Panel Customization
- Paste Remembers Layers - Copying and the pasting objects will remember the layers they were copied from.
- Customize Menu - Customize the menu shown when right clicking in the layers panel.
- Panel Options - Open the panel options view, used to edit the various options of the Layers panel.
Layer Selection
- Collapse All - Collapses all opened layers and objects.
- Collapse Groups - Collapse opened groups.
- Locate Selection - Select the objects in the layer panel that are selected on the canvas.
- Select All Members - Select all member objects of the selected groups or layers.
- Select All Siblings - Select all objects of the same group or layer.
- Select Others - Select other objects at the same level as the selected object.
- Invert Selection - Select objects that are not selected.
Object Options
- Edit Options - Open the Object Options for object selection, or Layer Options view for layer selection. The object and layer options are described in the Object Options section.
- Rename Objects - Rename the selected objects, using an automated naming scheme. The Renaming Objects section contains more on how to rename multiple objects using the Rename Objects command.
- Render as Image - Enable or disable the image rendering mode of the selected objects or layers. When enabled, the object is composited into an image, and the image is rendered onto the canvas. The object image is cached and reused if the object is not changed. This option is disabled by default. This option can be used to speed up the rendering of complex object groups or layers.
- Remove Image Effects - Remove all image effects from the selected objects or layers.
- Active Shapes - Enable or disable the use of the object shape in shape effects, for non-visible objects. When enabled, shapes of objects that are not visible, are take into account when computing a group bounding box and applying shape effects on that group. This option is disabled by default.
- Local Styles - Open the style override editor view on the selected layer or object. A layer or object may contain redefinitions of styles (style overrides) used inside the layer or object. The appearance of objects and symbols, inside a layer or group, can be modified using local style overrides.
- Object Role - Open a sub-menu of object role options, for the selected layers or objects. Object roles can be used to setup symbols and styles, that remain linked to the originating object. The Symbols and Styles chapter contains the description on how to use object roles to define new symbols and styles.
- Shape from Selection - Set the shape of objects selected in the layers panel, to the shape of object selected in the document. This command can be used to set clipping shape for layers or groups, or to just change the shape of an object.
Arranging Layers
- Expand Layers - Expand the selected layers into objects.
- Collect in New Layer - Create a new layer and move the selected objects and layers into the new layer. The Layer Options view is shown to setup the new layer.
- Merge Selected - Merge the content of the selected groups into a single group.
- Layer from Group - Convert the selected groups to layers.
- Release to Layers (sequence) - Release the selected group(s) to separate layers.
- Release to Layers (build) - Copy the selected group contents to separate layers.
- Place Before - Place the objects selected on the canvas before the objects selected in the panel.
- Place After - Place the objects selected on the canvas after the objects selected in the panel.
- Place Inside - Place the objects selected on the canvas inside the objects selected in the panel.
Creating Layers
- Create New Layer - Create a new empty layer, by setting the layer options in the Layer Options view.
- Create Sub Layer - Create a new empty layer inside the selected layer.
- Create Adjustment Layer - Open a sub-menu of image effects, suitable to be used for adjustment layers. Selecting an image effect, will open the image effect editor view, to set the options of the effect. If the image effect options are confirmed, a new adjustment layer is created, using the image effect. Adjustment layers can also be created by enabling the Adjustment Layer option of a layer or object. The Image Effects chapter contains more details, on image effects and their options.
- Adjustment Layer - Enable or disable the adjustment layer mode of the selected layer or object. Any object or layer can be turned into an adjustment layer, applying one or more image effects on the backdrop of the layer or object.
- Content is Mask - Enable or disable the use of object or layer content, as a mask for the adjustment image effect. This option is available only when the selection contains an image or object with enabled Adjustment Layer option.
- Delete Empty - Delete the empty objects and layers from the selected objects and layers.
Managing Objects
- Arrange - Open a sub-menu containing various object and layer stacking arrangement commands. These commands are described in more detail in the Arranging Objects section.
- Duplicate - Duplicate the selected objects or layers.
- Clone - Clone the selected objects or layers.
- Reference - Create a new object containing a reference link to the selected object.
- Delete - Delete the selected objects.
- Detach Clone - Separate a clone object from its clone source object, making the clone an independent copy.
- Clone Source Link - Open a menu of available clone source objects, to select and change the source of the clone object. Clone source objects can be defined using object references with the Clone Source role.
- Cloned Properties - Open a menu of object property options, to enable or disable the cloning of a specific object option. Working with cloned objects is described in the Cloning Objects section.
- Group - Create a group from the selected objects.
- Ungroup - Ungroup the selected group objects.
- Style Mixer - Open a menu of various object style mixing options. When multiple objects are selected, their fill and stroke styles can be adjusted using color and style blending schemes. The Color Filters chapter contains more details on how to use style mixers.
- Color Filters - Open a menu of various color filtering commands. These are the same color filters, as the ones found on the Color Filters section of the Effects menu, but applied to object selections made in the Layers panel.
Color filters are used to adjust the colors of objects, using various color changing scheme. The Color Filters chapter contains more details on how to use color filters.
Changing Shapes
- Shape Styles - Open a menu of available shape styles, that can be used as the shape of an object. If a layer or a group is selected, selecting a shape style will set a clipping shape.
- Shape References - Open a menu of available objects with the Shape role. These shapes can be used to set the shape of objects, or the clipping shape of layers or groups.
- Clear Shape - Remove the clipping shape from selected layers or objects.
- Create Shape Style - Create a new shape style, from the shape of the selected object. Shape styles can be used to set the shape of objects, from the Layers or Shape panels.
- Create Shape Presets - Create a new shape preset, from the shape of the selected object. Shape presets can be used to set the shape of objects, from the Layers or Shape panels.
- Shape Presets - Open a menu of available shape presets. These shapes can be used to set the shape of objects, or the clipping shape of layers or groups.
Managing Styles
- Fill Region - Open a menu of options used to set the fill reference region of an object. By default, the fill region of an object is determined by the object shape. This can be changed to an other mode, or an other shape, creating fill regions that are seamlessly matched between multiple objects.
Fill regions can be used to position fill styles at matching locations, in multiple objects. The Object Styling section contains a detailed description on how to set fill regions.
- Mask Region - Open a menu of options used to set the transparency mask reference region of an object. By default, the transparency region of an object is determined by the object shape. This can be changed to an other mode, or an other shape, creating transparency regions that are seamlessly matched between multiple objects.
Transparency regions can be used to position transparency masks at matching locations, in multiple objects. The Object Styling section contains a detailed description on how to set transparency mask regions.
- Create Style - Create a new object style from the selected object. Object styles contain the various fill and stroke styles, transparency masks and effects of an object. Object styles can be reused on multiple objects. Styles are linked to a common definition. When using styles, the changes to an object style will be mirrored on all objects using that style.
- Create Style Preset - Create a new object style preset from the selected object. This is similar to the linked object styles, except that when using presets, changes on the preset are not mirrored on all objects using that preset.
Multiple Panels
- Open with Location - Open a new Layers panel, fixed to the current editing context. By default, the current editing context is the current canvas. If a layer or group is isolated, the current editing context will be the content of that layer or group. Multiple Layers panel instances can be used to access objects from an other canvas, or from a specific layer or group, while having the current canvas in the main layers panel.
- Open with Document - Open a new Layers panel, fixed to the current document. When multiple documents are opened, a separate layers panel can be fixed to a document that may become inactive (but still remain opened). Opening layers panel instances on inactive documents can be used to copy and reuse objects from that document.
Using Multiple Layer Panels
Multiple instances of the Layers panel can be opened, to access different parts of the same document, or content from an other open document. Objects can be dragged and dropped from these panels, into the main layers panel, or into the current document canvas.
- To open a new Layers panel on the current canvas, select the Open with Location command from the panel menu. Make sure, that no isolated editing mode is active.
To easily reuse objects and symbols from a Reference canvas, go to the reference canvas, and open a layers panel using the Open with Location command. Then go to the artwork canvas, to drag and drop objects from the layers panel showing the reference canvas content.
- To open a new Layers panel on a specific layer or object content, select the layer or object and enter isolated mode, by selecting the Enter Isolated Mode command from the panel menu. Once in the isolated mode, the Open with Location command will open a new layers panel, fixed to the same layer or object content. The isolated mode can be exited in the main panel and document, by double clicking on an empty area of the canvas, or selecting the Exit Isolated Node command from the main layers panel. In this case, the new layers panel will show only the content of the specific layer or group, while the document editing can proceed with the whole canvas, or other canvases.
- To open a new Layers panel on an other document, open that document in VectorStyler.
- It is important to note, that in VectorStyler, multiple documents can be kept open in different document views.
- These documents can be accessed by clicking on the document name in the document view title region.
- Once the document is open, select the Open with Document command from the main Layers panel menu.
- A new layers panel is opened, fixed to the current document.
- Now switch to an other document, by selecting its name, or by opening it.
- The extra layers panel will keep showing the content from the previous document, allowing the reuse of objects by drag and drop into the current document canvas.


