Aligning Objects
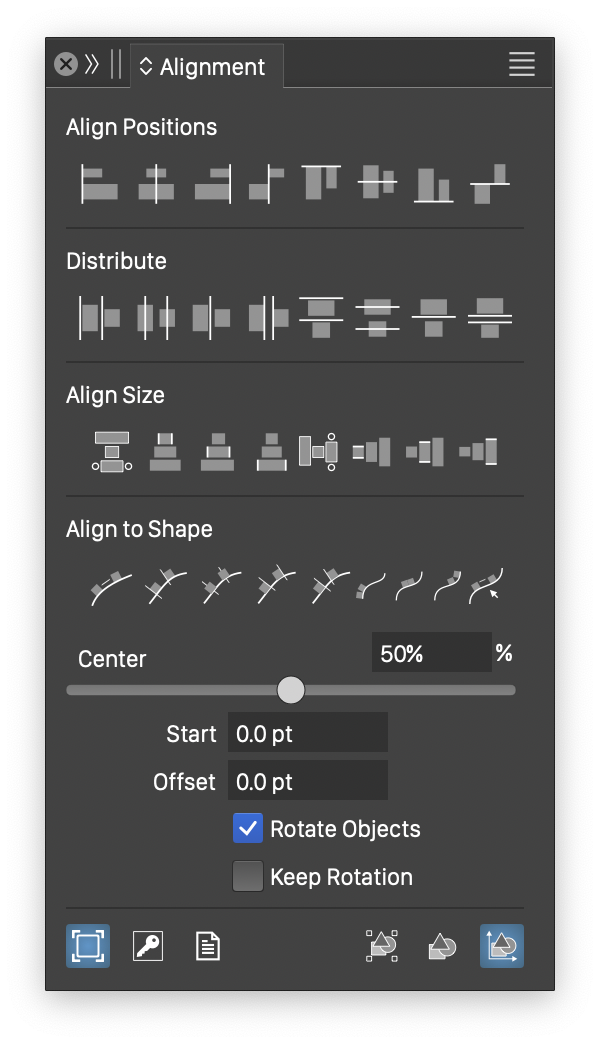
The Alignment panel.
The position of objects can be aligned relative to other object positions, the selection boundary, or the current artboard. The Alignment panel (from the Window menu) is used to align and distribute objects, align object sizes and align objects along a shape.
In VectorStyler, the object alignment and distribution options are called axial alignment, as they align objects along an axis. The angle of the alignment axis can be the viewing angle (the document view can be rotated to any angle), or a user specified angle in the Alignment panel. In VectorStyler, it is possible to create custom axial alignment types, for example to align left margins of an object to the right margin of an other object.
The content of the Alignment panel is organized as follows:
- Section 1 contains predefined object alignment options.
- Section 2 contains predefined object distribution options.
- Section 3 contains predefined object size alignment options.
- Section 4 contains options to align objects along a shape.
- Section 5 contains alignment options used by all alignment types.
The content of the Alignment panel can be customized, by disabling or enabling some of the options from the panel menu.
To keep the relative position of overlapping objects while aligning, and only align non-overlapping objects, enable the Overlapping Mode option in the Alignment panel menu.
Aligning Objects
The object positions can be aligned using the options at the Align Positions section (top row) of the Alignment panel. To align the selected objects, click on one of the alignment mode icon. All alignment options consider the current viewing angle, or the alignment angle set in the Angle field. The following alignment modes are available:
 - Align the objects to the left.
 - Align the objects to the center horizontally.
 - Align the objects to the right.
 - Align the right side of an object to the left side of the next object.
 - Align the objects to the top.
 - Align the objects to the center vertically.
 - Align the objects to the bottom.
 - Align the top of an object to the bottom of the next object.
Additional alignment modes can be defined using the More Options command from the panel menu. The spacing between the aligned objects can be set in the Space field.
Distributing Objects
When distributing objects, the objects are positioned to fill the area defined by the selection bounding box, by uniformly spacing a selected axis of the objects, or the space between the objects. The object distribution options can be found in the Distribute section (second row) of the Alignment panel. The following distribution options are directly accessible:
 - Distribute the objects horizontally by equally spacing the left margin of the objects.
 - Distribute the objects horizontally by equally spacing the center of the objects.
 - Distribute the objects horizontally by equally spacing the right margin of the objects.
 - Distribute the objects horizontally by equally spacing the right margin of an object to the left margin of the next object.
 - Distribute the objects vertically by equally spacing the top margin of the objects.
 - Distribute the objects vertically by equally spacing the center of the objects.
 - Distribute the objects vertically by equally spacing the bottom margin of the objects.
 - Distribute the objects vertically by equally spacing the top margin of an object to the bottom margin of the next object.
Additional object distribution options can be defined using the More Options command from the panel menu. The distribution axis angle is the current view angle, or the angle set in the Angle field.
Align Object Sizes
The selected objects can be resized to the same size in a selected direction, using the object size alignment options. The resulting object size can be the smallest, medium, largest size, or the size of a key object from the selection. The object size alignment options can be found in the Align Size section (third row) of the Alignment panel. The following size alignment options are available:
 - Resize the objects horizontally to the width of the key object.
 - Resize the objects horizontally to the smallest width of the selected objects.
 - Resize the objects horizontally to the medium width of the selected objects.
 - Resize the objects horizontally to the largest width of the selected objects.
 - Resize the objects vertically to the height of the key object.
 - Resize the objects vertically to the smallest height of the selected objects.
 - Resize the objects vertically to the medium height of the selected objects.
 - Resize the objects vertically to the largest height of the selected objects.
The viewing angle, or the angle set in the Angle field is used to determine the direction of horizontal and vertical resizing. Additional size alignment options can be defined using the More Options command from the panel menu.
Align to Shape
Objects can be aligned and distributed along a shape, using the various align to shape options from the Alignment panel. These options can be found in the Align to Shape section of the panel. When aligning objects along a shape, objects are rotated and positioned to match the direction and positions of locations along the shape.
To align objects along a shape, first select the objects, and then select the shape to align objects to. The alignment shape must be the last selected object. The following alignment options are available:
 - Align the objects along the path, with equal spacing between the right margin of an object and the left margin of the next object.
 - Align the objects along the path, with equal spacing between the left margin of the objects.
 - Align the objects along the path, with equal spacing between the center of the objects.
 - Align the objects along the path, with equal spacing between the right margin of the objects.
 - Distribute the objects along the path, to the length of the path, with equal spacing between the objects.
 - Align the objects left along the length of the path.
 - Align the objects center along the length of the path.
 - Align the objects right along the length of the path.
 - Activate the Align to Shape tool, used to interactively adjust the position of objects along the path.
- Start - Edit the offset along the path to the position of the objects (depending on left, center or right alignment).
- Offset - Edit the distance of the object centers from the path.
- Rotate Objects - Enable or disable the rotation of objects to the shape direction.
- Keep Rotation - Enable or disable the rotation relative to the current object rotation.
Additional shape alignment options can be defined using the More Options command from the panel menu.
Block Stretching
A combination of other alignment operators, block stretching can be used to align, resize and distribute the selected objects into a block.
To use the block stretching alignment modes, check then Block Stretching option in the alignment panel menu. The following options are available.
 - Resize, distribute and align horizontally to the reference object width.
 - Resize, distribute and align horizontally to the smallest object width.
 - Resize, distribute and align horizontally to the medium object width.
 - Resize, distribute and align horizontally to the largest object width.
 - Resize, distribute and align vertically to the reference object height.
 - Resize, distribute and align vertically to the smallest object height.
 - Resize, distribute and align vertically to the medium object height.
 - Resize, distribute and align vertically to the largest object height.
Positioning Aligned Objects
The Align to Shape tool, activated using the button from the Alignment panel, can be used to interactively position the selected objects along the path.
- Starting with the selected objects aligned to a path, and the key object, click the button to activate the object positioning tool.
- Press the mouse on an object, aligned to the path and start dragging the object.
- The aligned objects position along the path is shifted as the mouse is dragged.
- Release the mouse at the desired location along the path.
Alignment Options
The Alignment panel contains additional alignment options, used when positioning or resizing objects.
- Angle - Edit the alignment axis angle. The horizontal and vertical alignment, distribution and resizing options take into account this angle when aligning objects.
- Space - Edit the spacing between reference axes used for alignment. For example, when aligning objects to the left, a nonzero spacing can be used to set the distance between the left side of consecutively selected objects. By default, the spacing is set to zero, resulting in exact alignment of the reference axes.
- Sticky Groups - Enable or disable the positioning of whole groups, when a single object inside a group is aligned to other objects outside of the group. When an object inside a group, selected with the
 mode, is aligned to other objects, the original object may move or rotate relative to the other group members independently. When the Sticky Groups option is enabled, the whole group is positioned and rotated, when an alignment mode is selected, even if the other objects of the group are not selected.
 - Viewing Angle - Enable or disable the alignment of objects relative to the viewing angle. When disabled, the objects are aligned relative to the angle set in the Angle field. When enabled, the current document view angle is added to the alignment angle set in the Angle field.
 - Align the selected objects to the bounding box of the selection.
 - Align the selected objects to the key object. The key object can be picked, by clicking on one of the selected objects, while the alignment mode is active.
 - Align the selected objects to the artboard frame.
 - Align objects in the order of selection.
 - Align objects in their stacking order.
 - Align objects in geometric order.
The Alignment Panel Menu

The Alignment panel menu.
The Alignment panel menu contains a number of additional options, used to customize the content of the panel and the various alignment operations. Some of the options accessed from the menu, are also available in the panel.
- More Options - Open a modal view of alignment options. The alignment options can be used to define new alignment schemes, by aligning custom locations of the object area.
- Align Positions - Show or hide the Align Positions section of the Alignment panel.
- Distribute - Show or hide the Distribute section of the Alignment panel.
- Align Sizes - Show or hide the Align Size section of the Alignment panel.
- Block Stretching - Show or hide the Block Stretching section of the Alignment panel.
- Align to Shape - Show or hide the Align to Shape section of the Alignment panel.
- Proportional Sizing - Enable or disable the the proportional sizing of objects when size alignment is used.
- Overlapping Mode - Check to keep relative position of overlapping objects.
- Use Content Box - Check to align to the content box of text frames.
- Sticky Groups - Enable or disable the positioning of whole groups, when a single object inside a group is aligned to other objects outside of the group.
- Viewing Angle - Enable or disable the alignment of objects relative to the viewing angle.
- Rotate Objects - Enable or disable the rotation of objects to the shape direction.
- Keep Rotation - Enable or disable the rotation relative to the current object rotation.
- Selection Order - Select the alignment order to be the selection order of the objects.
- Object Order - Select the alignment order to be the stacking order of the objects.
- Geometric Order - Select the alignment order to be the geometric order of the objects along the alignment axis.
- Align to Selection - Select the alignment reference frame to the bounding box of the selection.
- Align to Key Object - Select the alignment reference frame to the bounding box of the key object. The key object can be picked by clicking on a selected object.
- Align to Artboard - Select the alignment reference frame to the bounding box of the active artboard.
More Alignment Options
The alignment options view can be used to define new axial, shape or size alignment types, by selecting the locations inside the objects that will be aligned. To setup custom alignment types, select the More Options command from the Alignment panel menu.
- The user defined alignment options are saved, accessed and managed as presets, from the Preset field.
- To save the current alignment settings as a new alignment mode, select the Save Preset item.
- To remove the previously selected, user defined alignment mode, select the Remove Preset item.
- To access an existing, user defined alignment preset, select in the list opened from the Preset field.
- The user defined alignment preset also contains the selection order. This can be set in the Ordering field.
- There are three alignment types, that can be customized: Axial, Shape and Size. This alignment type can be selected in the Type field.
- Depending on the selected alignment types, the Alignment options view content may be as follows:
Axial Alignment Options

The detailed options for Axial alignment mode.
The following axial alignment options are available, when creating custom axial alignment types:
- All alignment options may consider the current view angle and the angle set in the Angle field of the Alignment panel.
- The Horizontal section contains values used when aligning horizontally.
- The Vertical section contains values used when aligning vertically.
- Source and Target - Edit the location of the alignment reference, from the start to the end of the object frame, in the given alignment direction (horizontal or vertical). When aligning objects, the Source location of an object frame is aligned with the Target location of the previous object frame. For example, setting source to 0% and target to 50%, will align the next object left (or bottom) side to the center of the previous object in the alignment order.
- Space - Edits the amount of spacing between the reference source and target locations of the aligned objects.
Shape Alignment Options
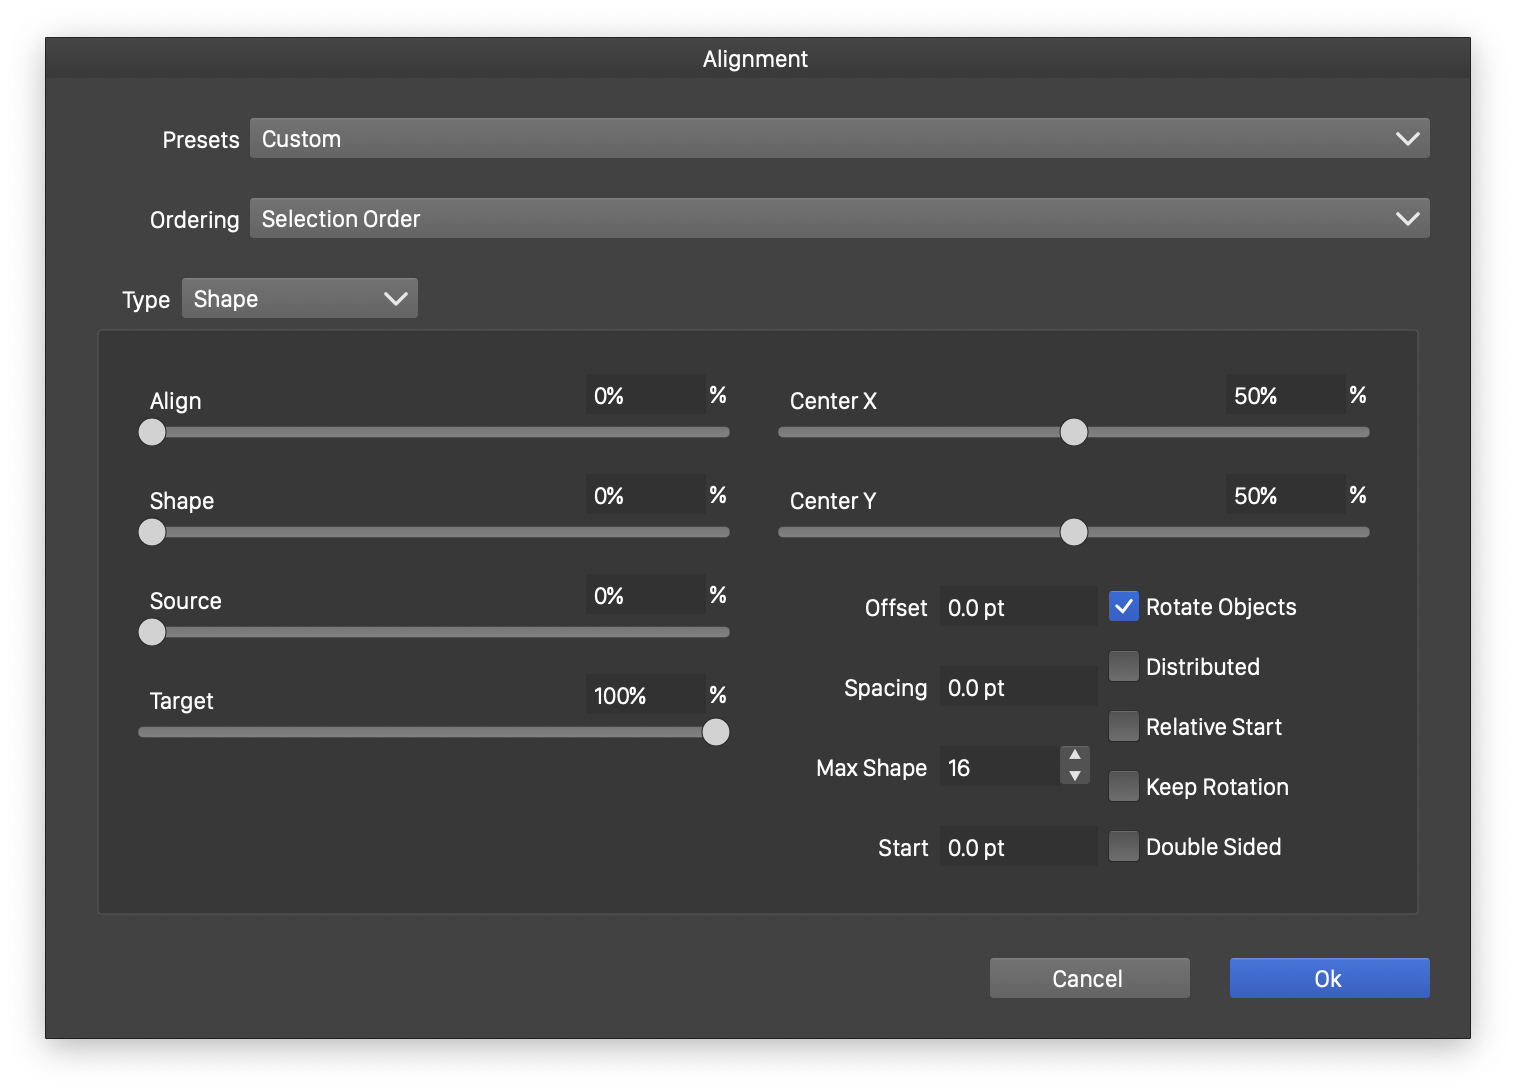
The detailed options for Shape alignment mode.
When objects are aligned to a shape, the alignment is made between a reference object location and a shape location.
- Align - Edit the object location aligned to the path.
- Shape - Edit relative offset of the shape location where an object is positioned.
- Source and Target - Edit the relative alignment of object margins, as they are positioned along the path.
- Center X and Center Y - Edit the location inside the object frame, that is positioned on the shape.
- Offset - Edit the distance of the aligned object location from the shape.
- Spacing - Edit the amount of spacing between objects.
- Max Shape - Edit the maximum number of paths extracted from the alignment key object. When aligning to a shape, the alignment key object can be a group of shapes, aligning the objects along multiple shapes.
- Start - Edit the starting position along the alignment shape. The starting position can be interactively adjusted, using the tool from the Alignment panel.
- Rotate Objects - Enable or disable the rotation of objects to the shape direction.
- Distributed - Enable or disable the distribution of objects along the length of the shape. When disabled, objects are aligned to reference positions. When enabled, the reference locations are distributed along the shape.
- Relative Start - Enable or disable the use of relative starting location along the shape.
- Keep Rotation - Enable or disable the rotation relative to the current object rotation.
- Double Sides - Enable or disable the use of both sides of a shape. When a large number of objects are aligned to a shape, the length of the shape may not be sufficient to accommodate all objects. In such cases, the alignment continues on the other side of the shape.
Size Alignment Options
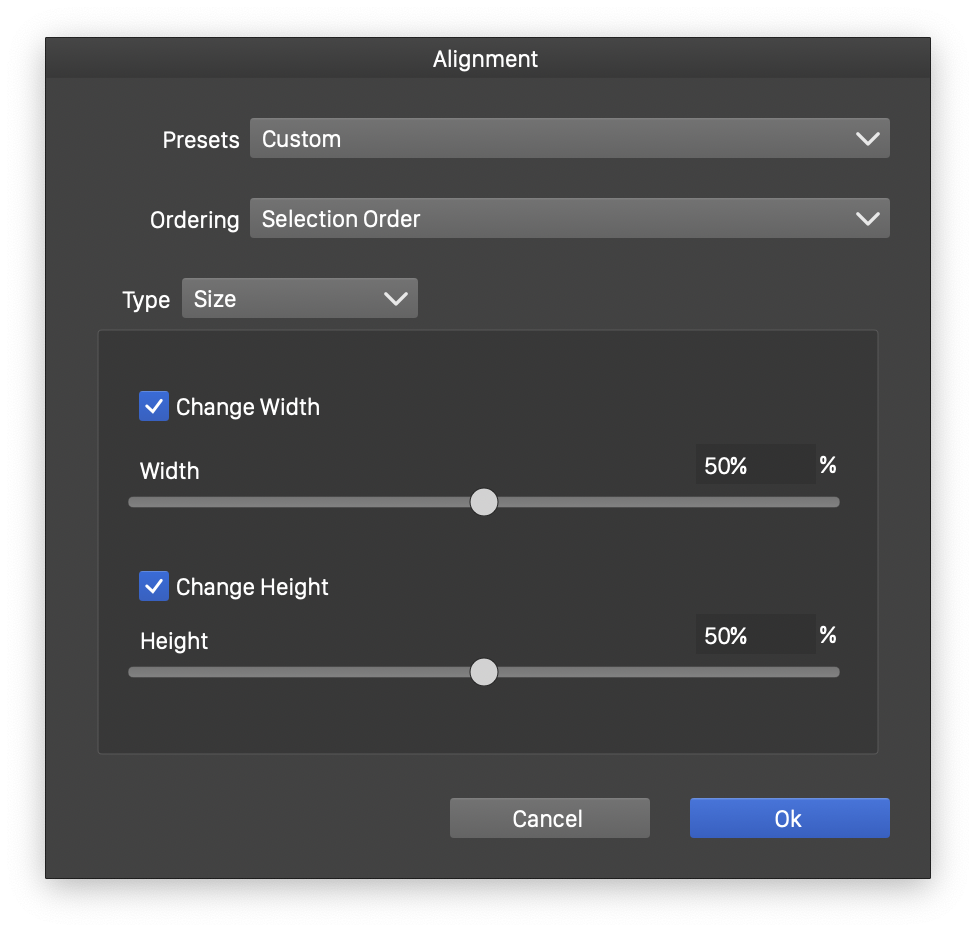
The detailed options for Size alignment mode.
When resizing objects using the size alignment options, the key object size can be selected relative to the smallest or largest object size, or an amount between these.
- Width - Select the width of the objects, as a transition between the smallest and largest width, among the selected objects.
- Height - Select the height of the objects, as a transition between the smallest and largest height, among the selected objects.


