Vector Halftones
The Vector Halftones effects are used to create resolution independent halftone pattern style effects on objects. Halftone patterns were traditionally used in printing to simulate color intensities and tones using varying sizes of dots.
Vector halftones bring this printing effect as a scalable and customizable vector effect on any object or layer in VectorStyler. Vector halftones can be defined to approximate tone by varying shape sizes or stroke widths, or by selecting the color of user defined dot shapes from the backdrop.
In some aspects, vector halftones are similar to repeaters, but in vector halftone only a shape is repeated and it results in much lighter graphics elements that are faster to work with than object repetitions of repeaters.
Vector Halftones consists of automatically generated copies of shapes, adjusted for size and rotation to simulate the backdrop image tone. Vector halftones are non-destructive and both the halftone and the backdrop layer remain editable. The halftone shapes are arranged based on a selected halftone geometry, and the shapes can be colorized from the backdrop or by using a colorization scheme similar to repeaters.
Important features and options to consider when working with vector halftones:
- The vector halftone type determines how the tone simulation is generated (regular, width, stippling, etc).
- The halftone geometry determines how the shapes (simulating dots) are positions or how the shapes with varying width are generated.
- The halftone color mode determines how the backdrop is sampled for intensities.
- Vector halftone effects will show up in the Appearance panel, where they can be selected (for editing) or removed.
- It is possible to setup multiple halftone effects in a single layer using the Appearance and Halftone panels. These halftones can simulate different color channels with different halftone options.
- The Halftone
 tool can be used to interactively edit the halftone. When multiple halftones are present on an object, the halftone tool will edit the active halftone selected in the Appearance panel.
 - A vector halftone can use multiple shapes and select shapes based on the backdrop intensity.
- Vector halftones can use shape effects to distort the halftone shapes or the position of the halftone dots.
- The resulting collection of shapes can be distorted using shape effects without expanding the halftone.
- A vector halftone effect can be expanded into editable shapes.
Overview
Creating, managing and adjusting vector halftones is described in the following sections:
- Halftone Panel - Describes how to use the Halftone panel to create and adjust vector halftones. The Halftone panel is the easiest way to work with halftone options.
- Halftone Options - Describes how to edit all the halftone options using the modal view. The Halftone Style view provides access to all options available for halftone objects.
- Group Halftones - Describes how to work with halftone groups and color separations.
- Editing - Describes how to use the interactive halftone editor tool adjust the attributes of vector halftones.
Creating Vector Halftones
To apply a vector halftone on an object:
- Open the Halftone panel from the Window - Effects menu.
- Select the object to apply the halftone to.
- Select the halftone options in the panel.
- Click on the
 button, to create the new vector halftone effect.
 - Continue to Adjust the halftone options in the panel to get the desired effect.
The vector halftone will show up in the Appearance panel as an object content, and can be moved, duplicated or removed in that panel.
Editing Vector Halftones
To edit a vector halftone effect:
- Open the Halftone panel from the Window - Effects menu.
- Select the object to containing the vector halftone effect.
- If the object has multiple halftones, select the halftone to be edited in the Appearance panel.
- Adjust the halftone options in the panel, or in the modal view to get the desired effect.
- Use the Halftone tool to interactively adjust the halftone geometry.
- If the vector halftone effect uses a custom shape, the shape can also be replaced using the Pick Halftone Shape command available in the Halftone panel menu or in the Styles - Halftone menu.
Expanding Vector Halftones
The vector halftone effect can be expanded into separate shapes, as follows:
- Select the object containing the vector halftone.
- Select the Expand Halftone command from the Styles - Halftone menu.
- The halftone shapes are expanded into a group of objects.
- To access individual shapes, ungroup the resulting group of objects.
Vector Halftones Examples
Vector halftones can be used to simulate tone and color using an arrangement of shapes of varying sizes or stroke widths. For example, the dot shapes of a regular vector halftone can simulate the backdrop tone by adjusting the shape size, or by sampling the color of the backdrop.
Vector halftones can be further customized with different shape types, using multiple shapes, randomizing or smoothing dot positions, removing dots, adjusting corner sizes or opacities based on backdrop intensities, and changing dot positions of halftone shapes using distortion effects.
In the following examples, various vector halftone geometries are used to simulate the same image, with some additional options.
A regular vector halftone
In this example, a small circle is used to create a vector halftone representing monotone variations of image tones. This effect can be achieved using the following steps:
- Select the image and create a halftone effect using the button in the Halftone panel.
- For the halftone Style select Regular.
- The halftone Geometry is set to Grid.
- Set the regular halftone Shape to Default.
- The Size of the halftone dot variation should be set to 1 and 8 points.
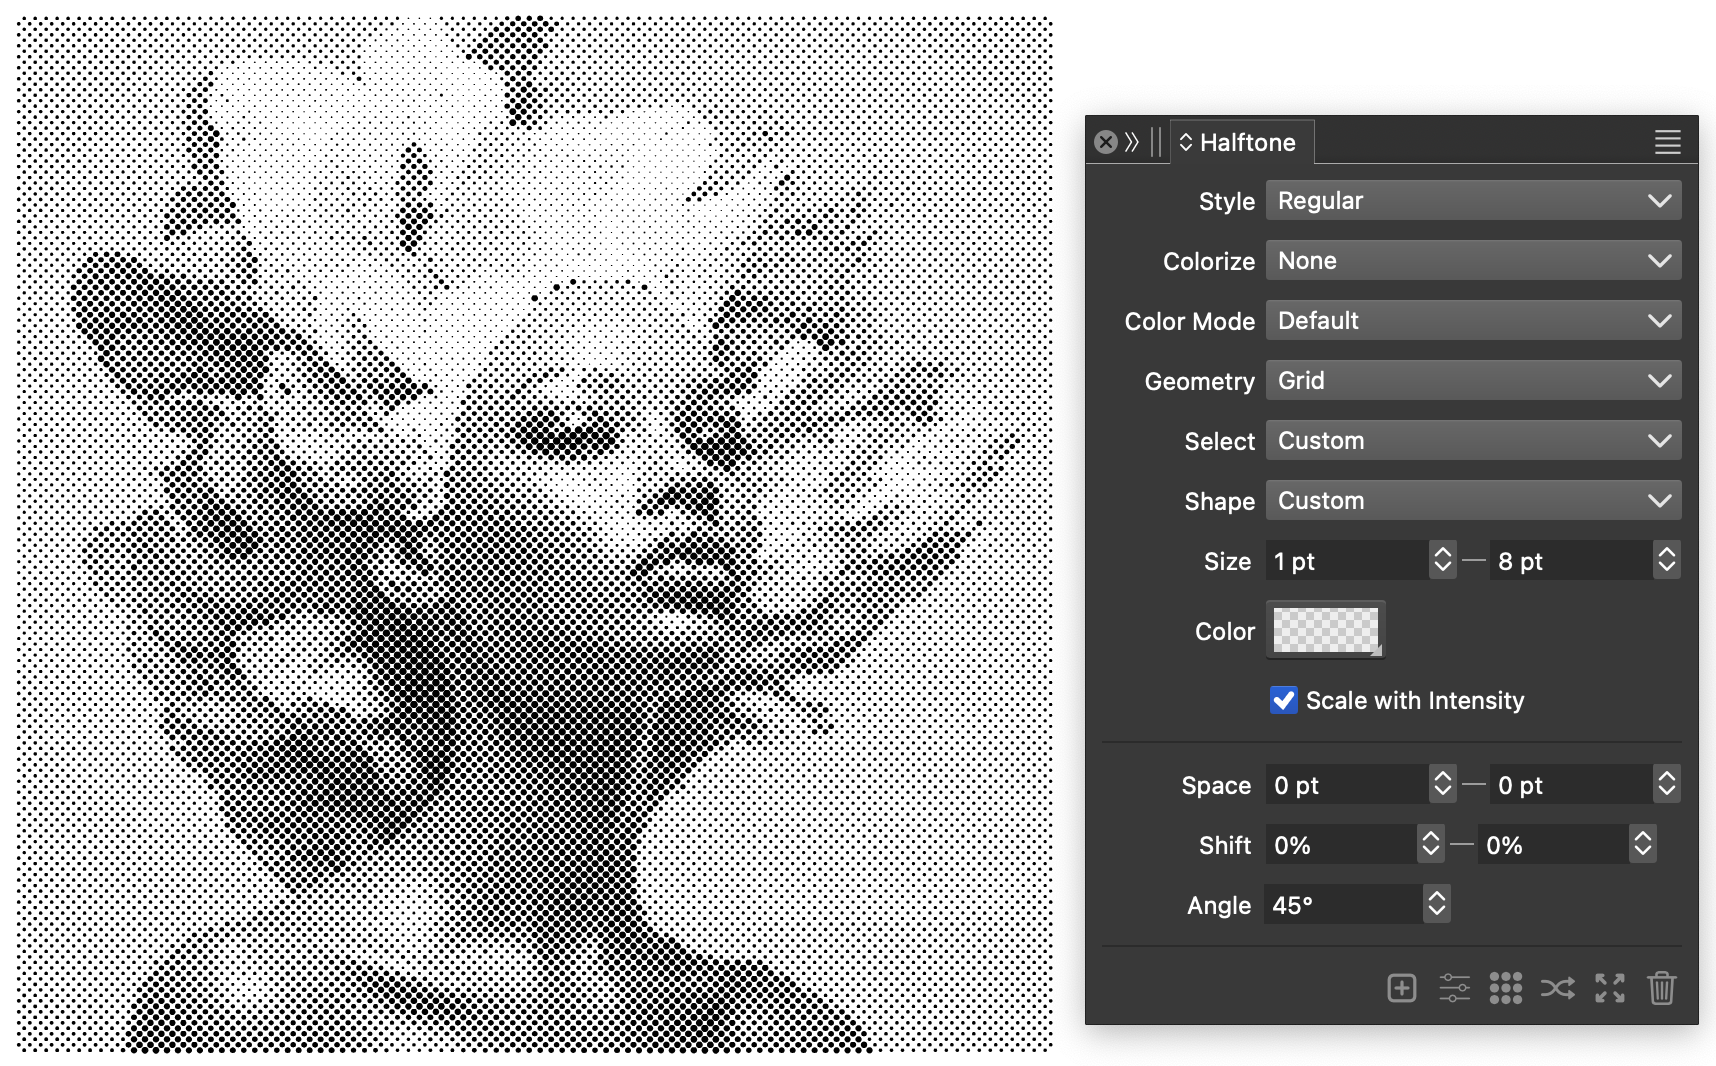
A regular vector halftone on an image object.
Width halftones
In this example, variable stroke width is used to create a vector halftone effect. The width of the stroke is sampled from the backdrop to simulate the color intensities.
This effect can be achieved using the following steps:
- Select the image and create a halftone effect using the button in the Halftone panel.
- For the halftone Style select Width.
- The halftone Geometry is set to Lines.
- The halftone Width should be set to vary between 0 and 8 points.
- The halftone Angle is set to 45 degrees, and it can be adjusted to create halftones of different angles.
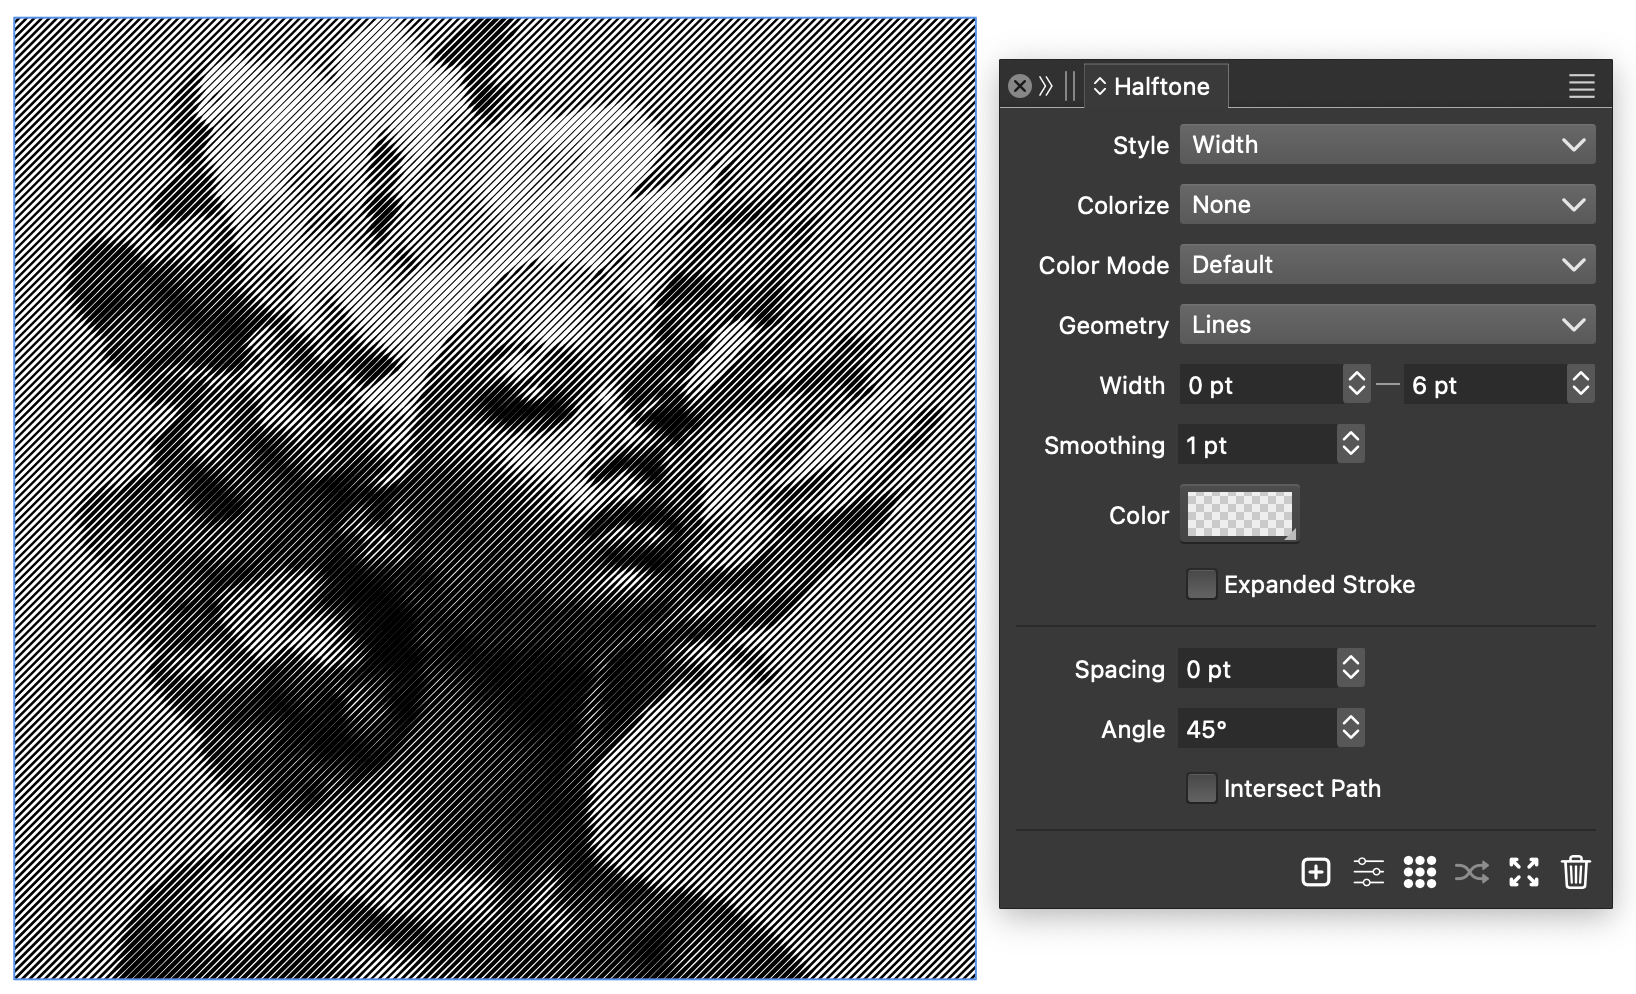
Using variable stroke width to create vector halftone.
Stippling halftone effects
In the stippling effect, randomly placed small dots with varying density are used to simulate the tones of the backdrop image.
This effect can be achieved using the following steps:
- Select the image and create a halftone effect using the button in the Halftone panel.
- For the halftone Style select Stippling.
- For the halftone shape, select Default.
- Set the Size of the halftone dots to 1 points.
- Set the Radius density variations to 1 and 6 points, the point density will vary between these distances based on the backdrop intensity.
- Set the Dark and Light intensities to 0 and 100 respectively, to map the full range of tones.
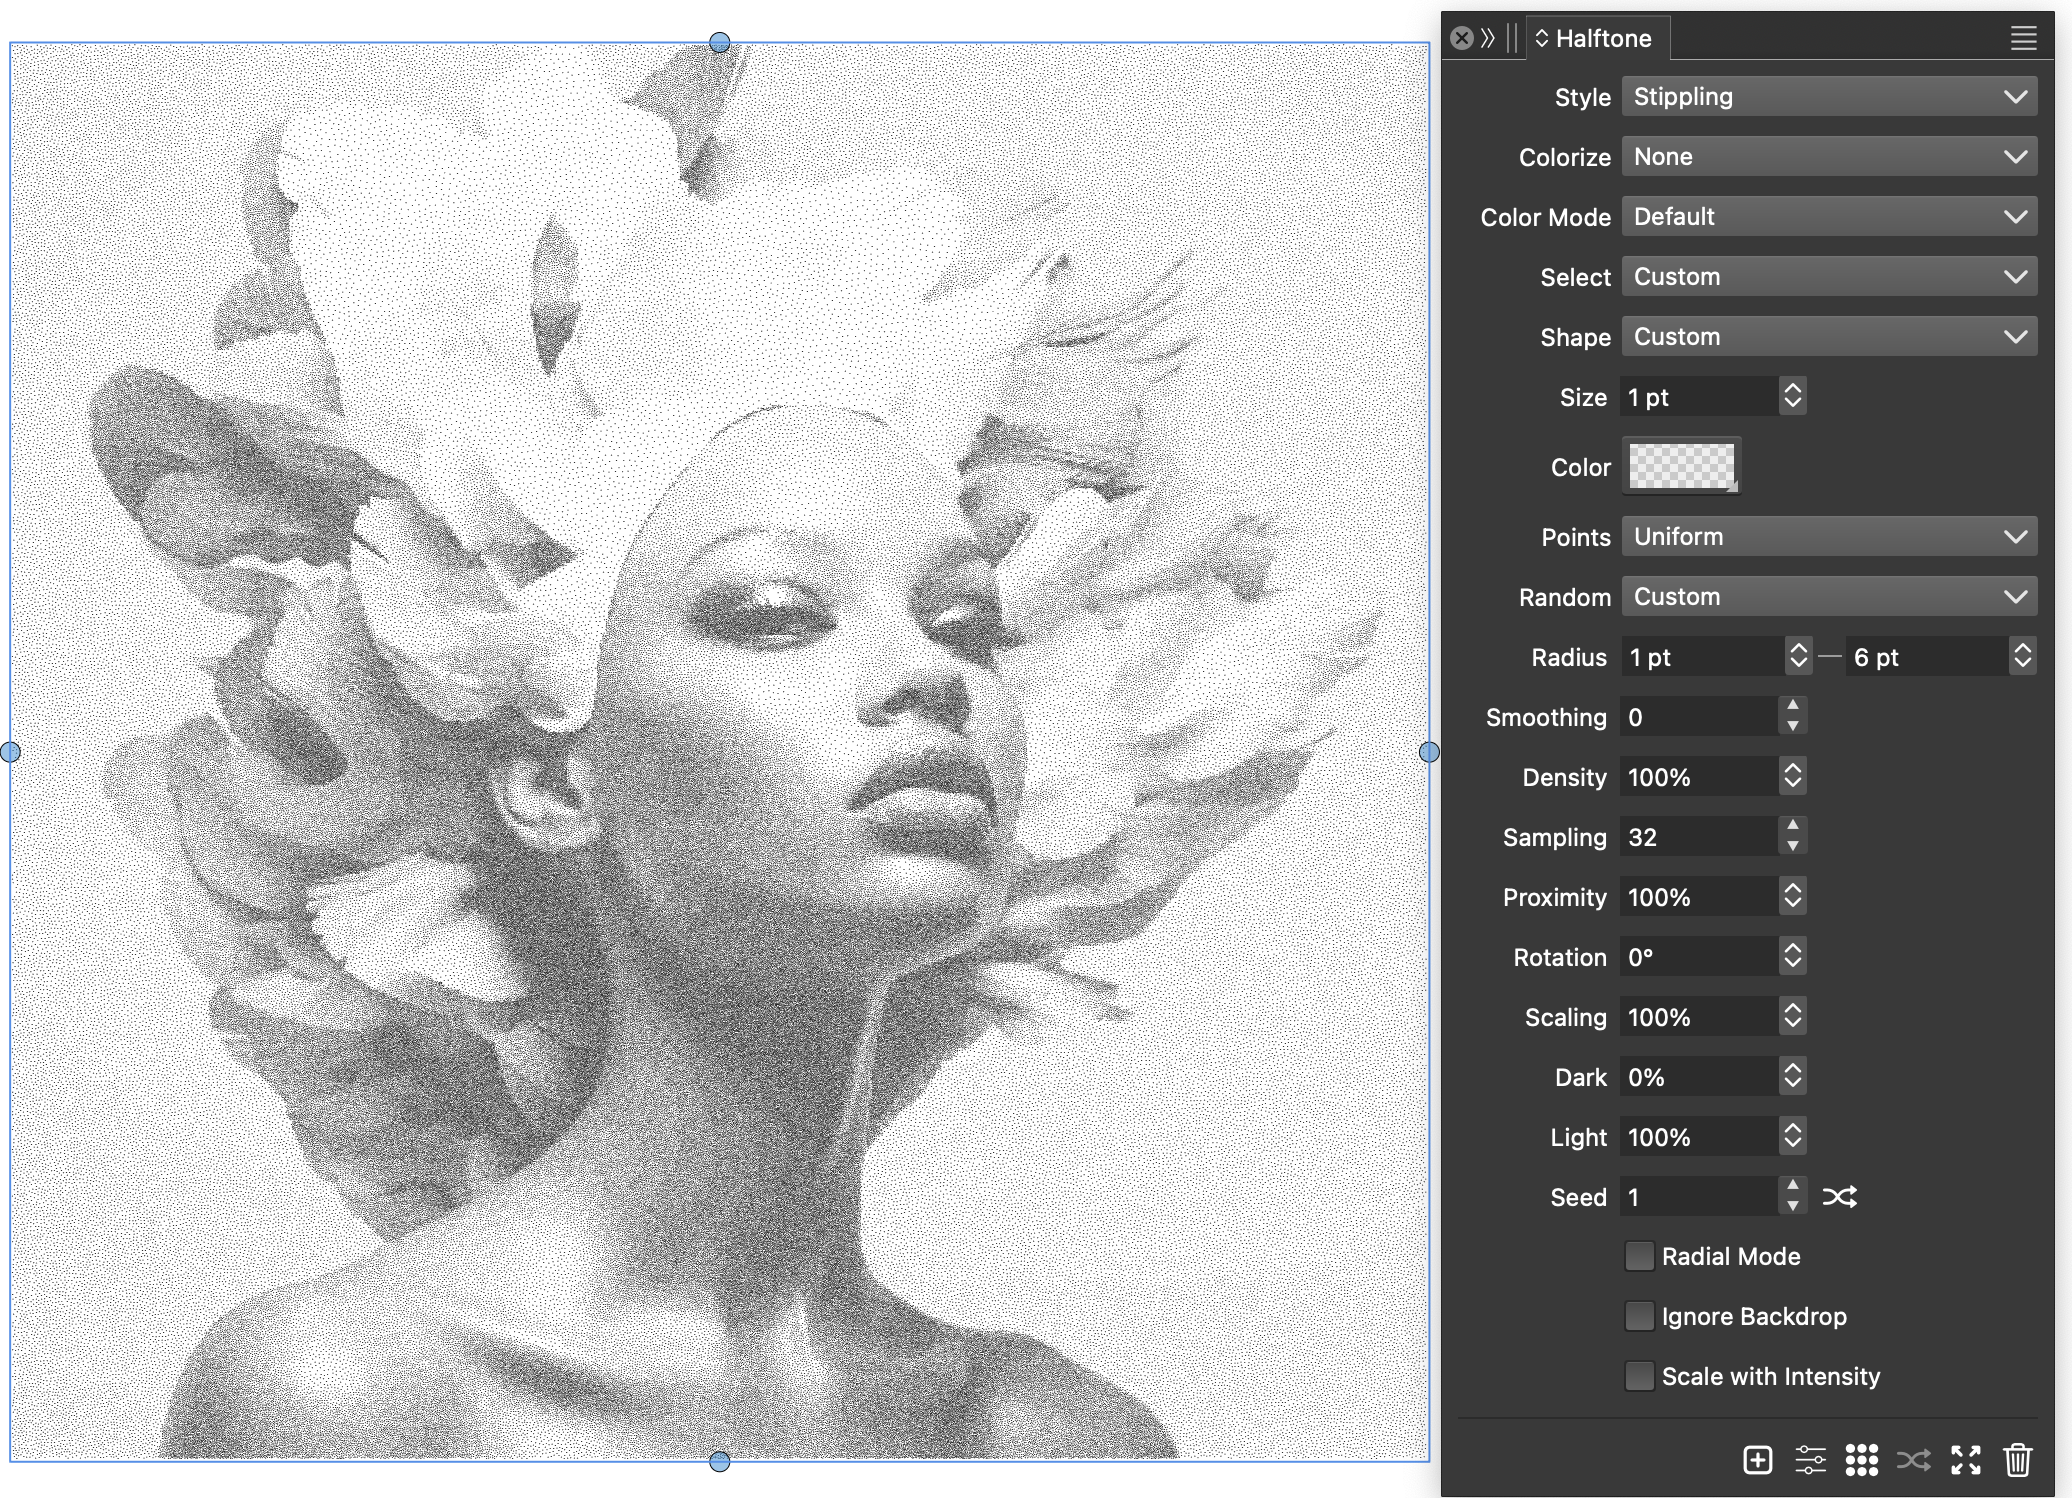
Vector halftone added over an editable text.
Recursion halftones.
In recursion halftones, the halftone dot sizes are determined by the similarity of color tones in the backdrop. Halftone dots are arranged in a rectangular gird, and neighboring grid cells are merged if they cover similar color tones. Recursion halftones are typically used with backdrop coloring to reveal the actual image colors.
This effect can be achieved using the following steps:
- Select the image and create a halftone effect using the button in the Halftone panel.
- For the halftone Style select Regular.
- For the halftone Geometry select Recursion.
- For the Colorize field, select Backdrop Content to use the colors from the image.
- Merging of the cells is only limited by the tone matching between neighboring cells.
- To further limit the cell merging, set the maximum cell size to a nonzero value in the Maximum field.
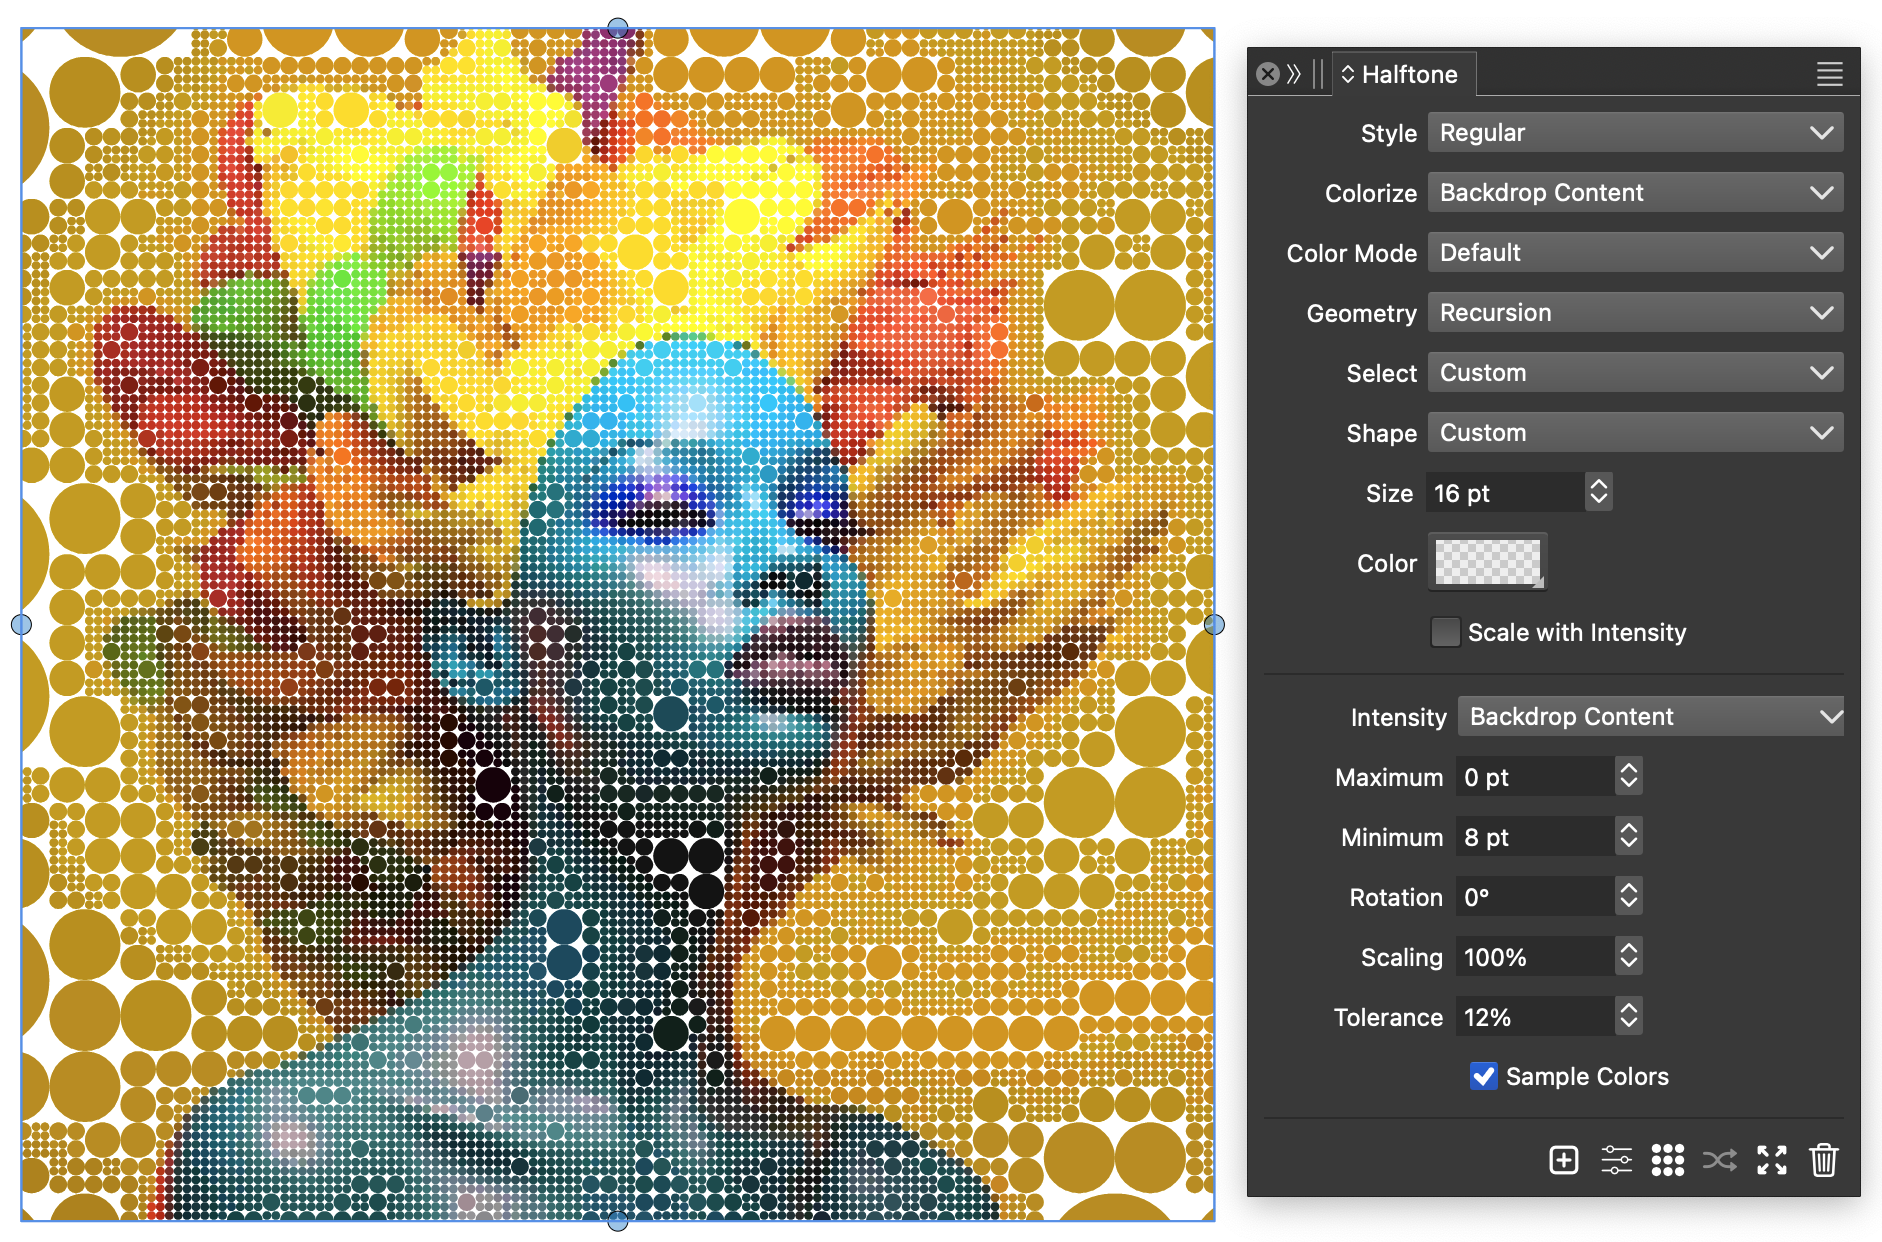
A recursion halftone with backdrop colorization.
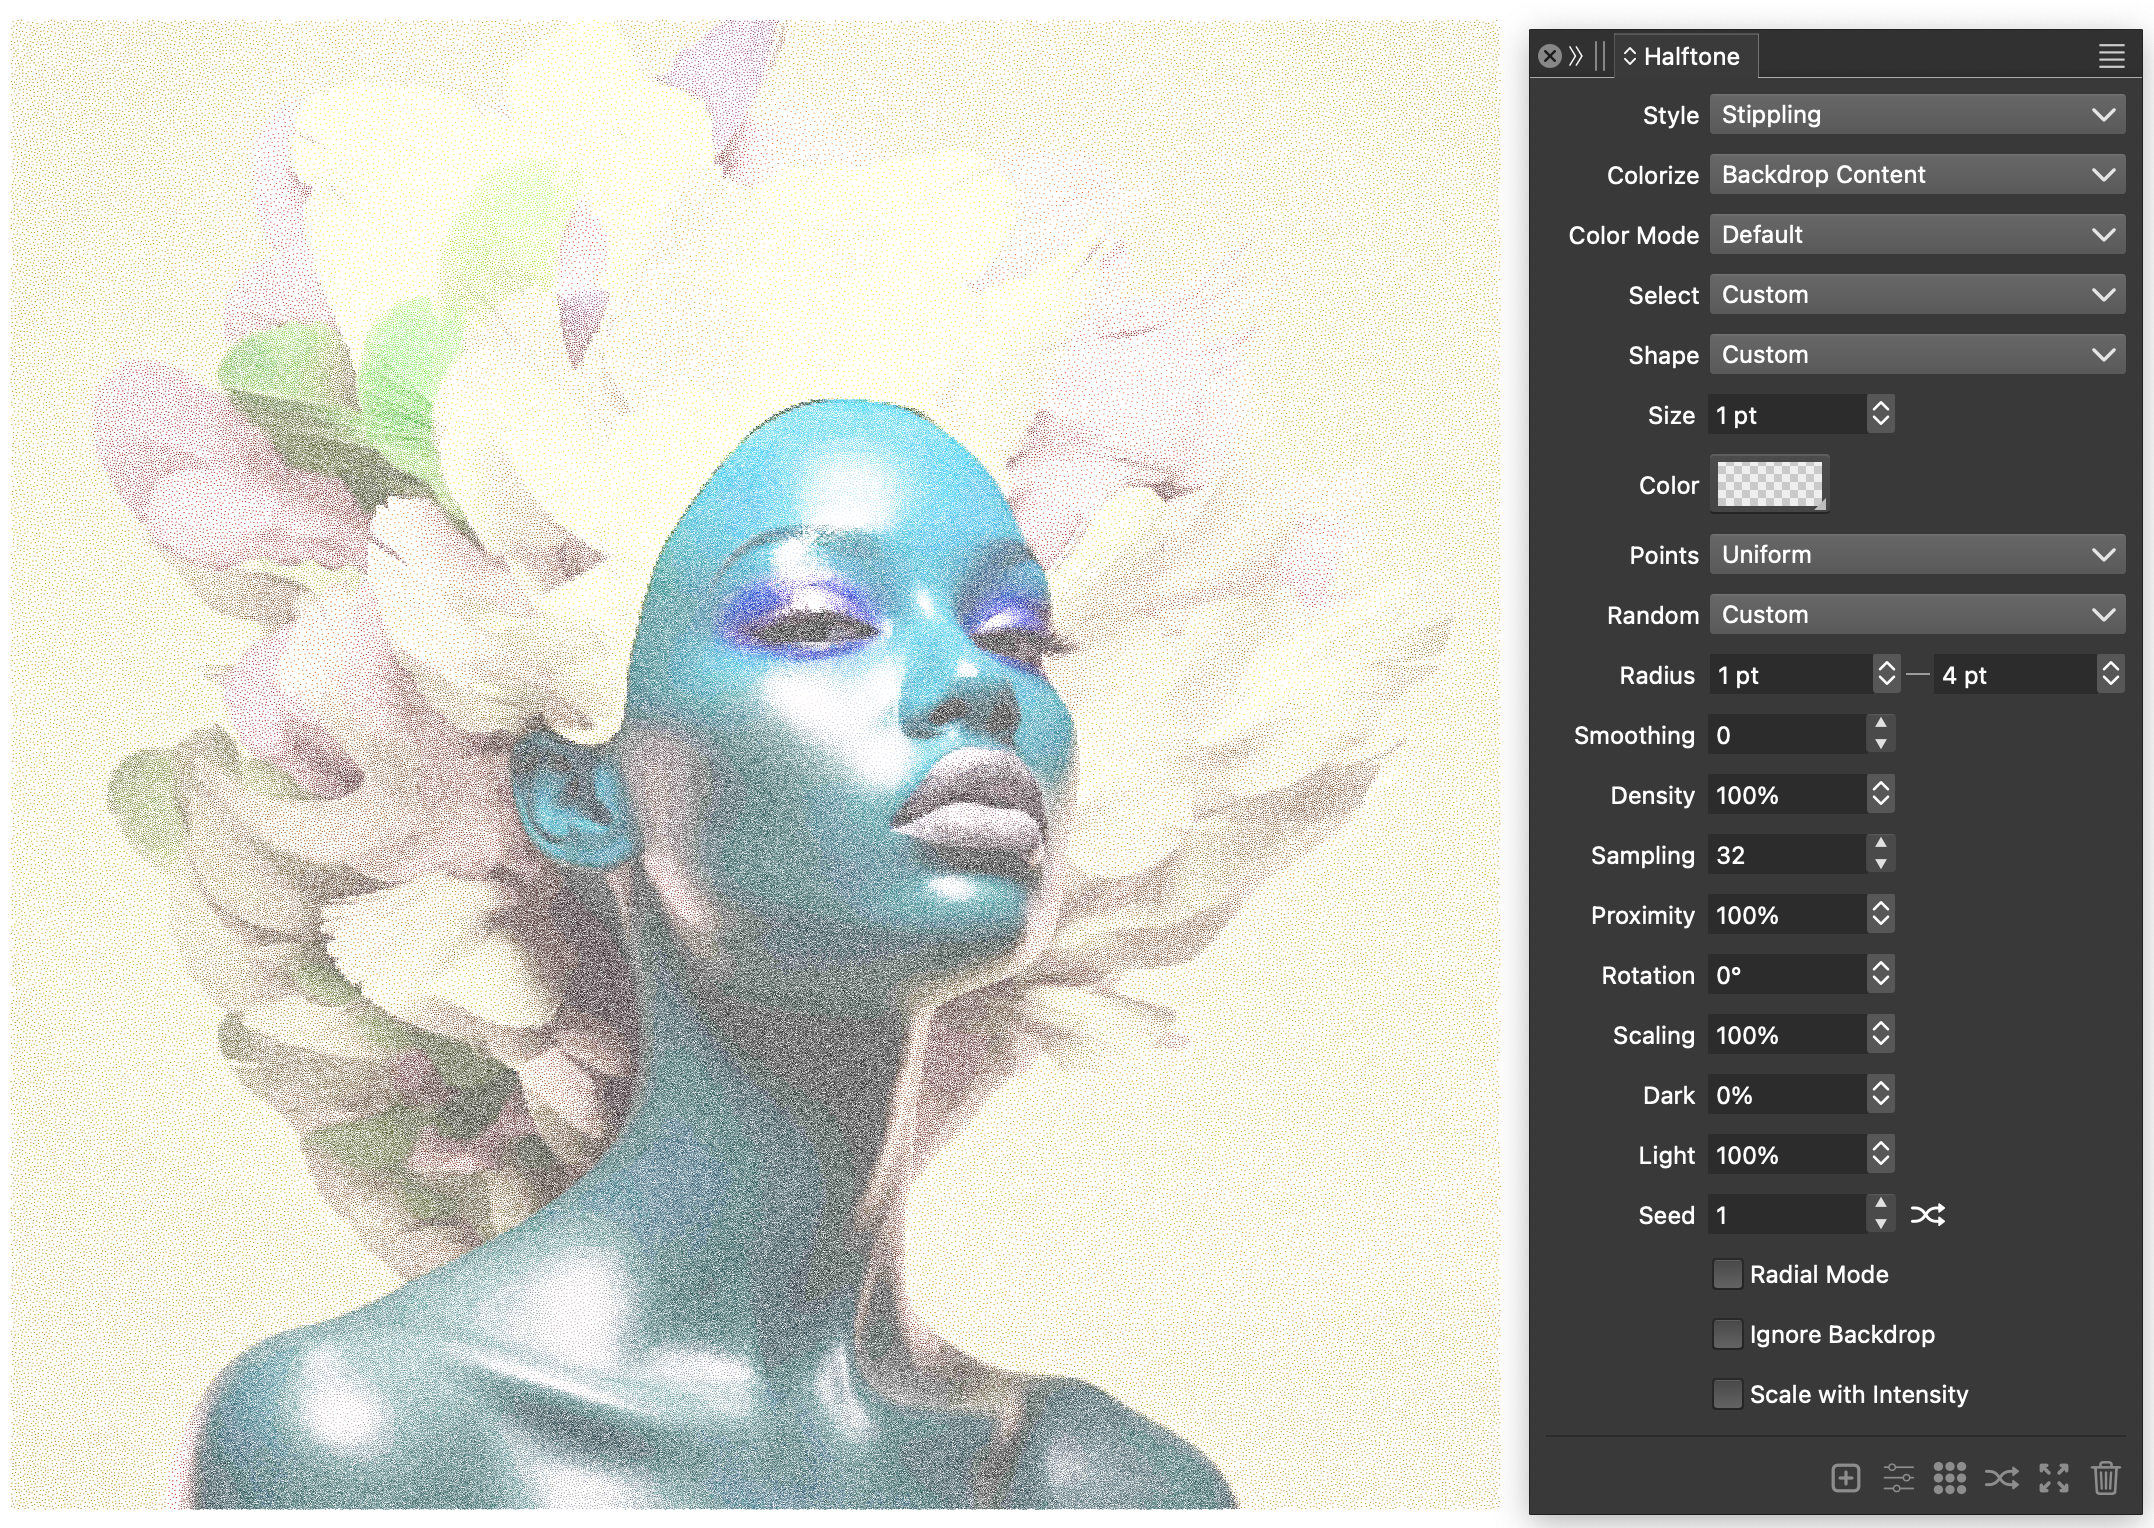
Stippling with colors
In the basic stippling effect, the image tones are reproduced by varying stippling dot densities. The color of these dots can be changed to a uniform color, to simulate an ink. This effect can be further improved, by colorizing these dots using the backdrop content.
This effect can be achieved using the following steps:
- Select the image and create a halftone effect using the button in the Halftone panel.
- For the halftone Style select Stippling.
- For the Colorize field, select Backdrop Content to use the colors from the image.
- For the halftone shape, select Default.
- Set the Size of the halftone dots to 1 points.
- Set the Radius density variations to 1 and 6 points, the point density will vary between these distances based on the backdrop intensity.
- Set the Dark and Light intensities to 0 and 100 respectively, to map the full range of tones.